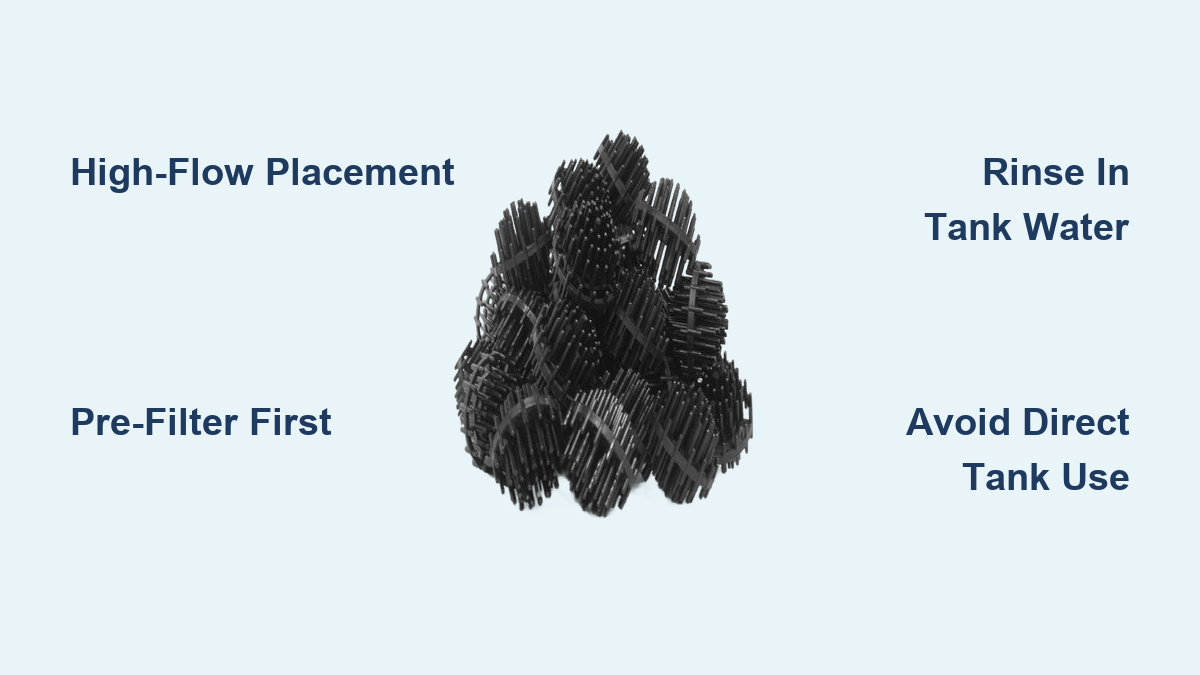
How to Use Bio Balls in Freshwater Aquariums
Your freshwater aquarium’s water stays cloudy despite regular cleaning, and ammonia tests show dangerous spikes. You added bio balls hoping for a quick fix, but they’re just gathering dust in the corner of your tank. Here’s the hard truth: bio balls only work when placed in high-flow filtration zones, not as decorative gravel. Most aquarists make this critical error, rendering their expensive media useless. This guide reveals the exact placement, setup, and maintenance steps to transform bio balls into your aquarium’s most powerful biological filtration tool. You’ll learn why water flow is non-negotiable, how to install them in any filter system, and avoid five deadly mistakes that crash your nitrogen cycle.
Bio balls aren’t magic—they’re precision-engineered bacterial hotels. Each 1-inch sphere contains a labyrinth of ridges creating massive surface area for ammonia-eating bacteria to colonize. But without constant water movement, oxygen and toxins can’t reach these microbes. When submerged in stagnant tank water, bio balls become slimy detritus traps that worsen water quality. Properly installed in your filter’s flow path, a single cup of bio balls can support 10x more beneficial bacteria than traditional ceramic rings. The difference? Consistent, oxygen-rich water washing over every microscopic crevice.
Why Your Bio Balls Fail Without High-Flow Placement
Dumping bio balls directly into your aquarium is like parking a food truck in a deserted alley—no customers (ammonia) will find it. These media require 3-5x tank volume water turnover per hour to function. Stagnant placement causes three critical failures:
Bacterial Starvation in Dead Zones
Beneficial Nitrosomonas and Nitrobacter bacteria need constant ammonia and oxygen delivery. In still water, the outer layer of bio balls may host bacteria, but the intricate interior becomes an oxygen-deprived wasteland. Test results from Russell Water Gardens show bio balls in low-flow zones lose 70% of their bacterial capacity within 48 hours. You’ll see persistent ammonia spikes even with “plenty” of media.
Detritus Clogging Turns Bio Balls Toxic
Loose bio balls in your substrate act like tiny vacuum cleaners for fish waste and uneaten food. As organic matter accumulates in their crevices, anaerobic pockets form—releasing hydrogen sulfide (rotten egg gas) that kills fish. A Fishlore forum case study documented 12 neon tetras dying within hours after bio balls were added directly to the tank bed. The culprit? Clogged media creating toxic dead zones.
Canister Filter Installation: Step-by-Step Bio Ball Setup
Your canister filter is the ideal bio ball home, but placement order is critical. Installing them before mechanical filtration guarantees clogging within weeks.
Preparing and Seeding for Instant Cycling
Rinse new bio balls in dechlorinated water—never tap water—to remove factory dust without killing bacteria. For immediate results, seed them by:
– Soaking in a mesh bag inside your established tank’s filter for 24 hours
– Swirling in a cup of water from a cycled aquarium during water changes
– Adding 5ml of liquid bacteria (like Seachem Stability) per 100 bio balls
This slashes cycling time from 6 weeks to 10 days in heavy-stocked tanks.
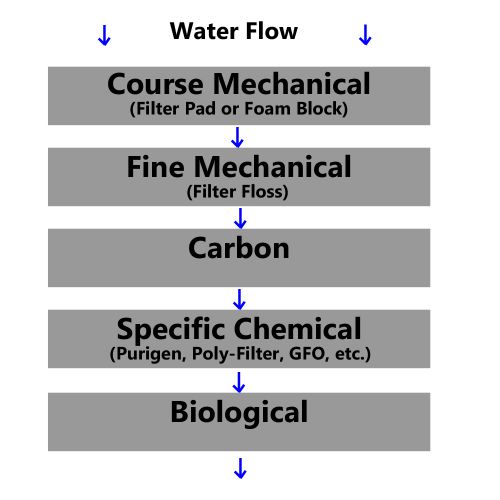
Layering Media for Uninterrupted Flow
Follow this exact sequence in your canister:
1. Bottom chamber: Coarse sponge (traps large debris)
2. Middle chamber: Fine filter floss (catches mulm before bio balls)
3. Top chamber: Loosely packed bio balls (fill 60% of basket—never cram)
Reassemble and prime the filter. Verify flow by watching water rush through the bio ball chamber—not just around it. If water bypasses the media, reduce bio ball quantity by 25%.
Using Bio Balls in Hang-On-Back Filters Without Clogging
HOB filters work with bio balls only if you prevent flow blockage—a common issue in compact models like AquaClear 50.
Mesh Bag Modifications for Maximum Exposure
Standard HOB cartridges lack space for bio balls. Instead:
– Cut a nylon stocking into 3-inch squares
– Fill with 50 bio balls and tie tightly
– Place after the carbon/floss cartridge in the media basket
This creates a “fluidized bed” effect where water lifts and swirls the balls. For low-flow HOBs (under 300 GPH), use only 20 balls per bag—overfilling chokes the impeller.
Flow Rate Troubleshooting for Small Tanks
In 20-gallon tanks, HOBs often lack power to move water through dense bio media. If bubbles gurgle instead of steady flow:
✅ Fix: Reduce bio balls by 40% and add spray bar to increase oxygenation
❌ Never: Remove mechanical pre-filtration to “improve flow”—this guarantees clogged media in 72 hours
Sump Systems: Optimizing Bio Ball Chambers for Continuous Flow
Dedicated sump chambers maximize bio ball efficiency but require precise water velocity control.
Designing the Perfect Bio Ball Zone
Your sump’s biological section needs:
– Water depth: 6-8 inches above media (prevents drying during power outages)
– Flow rate: 1,000+ GPH for every 50 bio balls (measured with a flow meter)
– Placement: After mechanical filtration (filter socks/sponges)
For 75+ gallon tanks, stack bio balls in a 12″x6″ chamber with a 500 GPH return pump. Position the outflow pipe 2 inches above the media to create turbulent, oxygenating flow.
Why You Must Avoid Placing Bio Balls Directly in the Aquarium
No exceptions—this mistake sabotages your entire ecosystem.
The Aesthetic Trap That Kills Water Quality
Many aquarists drop bio balls into tank corners hoping for “hidden filtration.” Within days:
– Algae coats surfaces, blocking bacterial colonization
– Fish dig them into substrate, creating anaerobic pockets
– Water clarity plummets as balls trap floating debris
Instead, use natural-looking lava rock or ceramic rings as substrate decor. Reserve bio balls exclusively for filter systems where flow is guaranteed.
Bio Ball Maintenance: Cleaning Without Killing Your Bacteria Colony

Over-cleaning causes more cycle crashes than under-cleaning. Bio balls last 5+ years if maintained correctly.
The Safe Rinse Protocol for 95% Bacteria Survival
When flow slows due to gunk buildup:
1. Remove bio balls during weekly water change
2. Swirl gently in removed tank water (never tap water)
3. Stop when water runs clear—don’t scrub!
4. Return immediately to filter
This removes debris while preserving 95% of bacterial colonies. A Fishlore experiment proved this method maintains 0ppm ammonia vs. 4.0ppm after tap-water rinsing.
5 Costly Bio Ball Mistakes That Cause Ammonia Spikes
Mistake #1: Washing in Chlorinated Tap Water
One rinse with tap water destroys your entire bacterial colony. Always use dechlorinated or tank water. Keep a dedicated bucket labeled “BIO MEDIA ONLY” to avoid accidental contamination.
Mistake #2: Overpacking Media Baskets
Cramming bio balls creates dead zones where bacteria suffocate. Fill baskets only 60% full—your thumb should fit between balls when pressed down.
Mistake #3: Skipping Pre-Filtration
Running water straight through bio balls without mechanical filtration clogs them in 72 hours. Always place sponges or filter floss before bio media.
Mistake #4: Using in Low-Flow Sponge Filters
Sponge filters lack the GPH to move water through bio balls. Use ceramic rings instead—they work with minimal flow.
Mistake #5: Replacing “Used” Media Annually
Bio balls don’t expire—the bacteria live on the surface, not inside plastic. Only replace if physically broken. Rinsing yearly in tank water maintains peak performance.
Real-World Results: Heavy-Stocked Tank Case Study
A 55-gallon cichlid tank (12 fish, 8 inches average size) struggled with 1.0ppm ammonia despite double-filtering. After moving bio balls from the substrate into a sump’s dedicated chamber:
– Ammonia dropped to 0ppm in 72 hours
– Nitrate production increased 40% (proving active bacteria)
– Water clarity improved by 90% within one week
The key change? Installing a 1,200 GPH pump to force water through 200 bio balls instead of around them.
Properly deployed bio balls transform your freshwater aquarium’s biological filtration capacity—but only when water flows through them consistently. Never place them loose in the tank, always pair with mechanical pre-filtration, and clean exclusively in tank water. For most hobbyists, canister filters provide the ideal balance of flow and accessibility. Within 14 days of correct installation, you’ll see fewer water changes, crystal-clear water, and zero ammonia spikes even in heavily stocked tanks. Ready to maximize your system? Start tonight by relocating those bio balls into your filter’s flow path—your fish will thank you by the weekend.