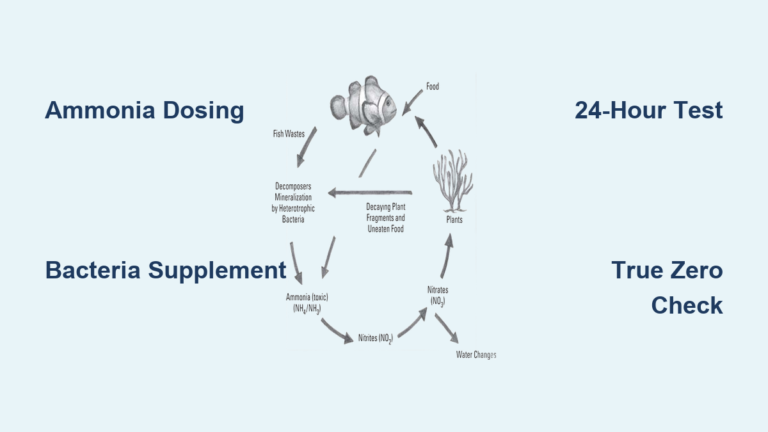
How to Build a Plastic Aquarium
Your dream fish tank shouldn’t break the bank. When standard glass aquariums can’t accommodate your unique space or budget, building a custom plastic aquarium becomes a practical solution. This DIY method using food-grade polyethylene sheeting and cedar frame construction creates a functional 20-50 gallon tank for less than half the cost of commercial options. You’ll avoid toxic materials, prevent catastrophic leaks, and craft a tank that fits awkward corners where pre-made units won’t. By following these precise steps verified by aquarium builders, you’ll create a watertight ecosystem ready for fish within 72 hours. Most importantly, you’ll learn the critical sealing techniques that separate successful DIY tanks from flooded living rooms.
Constructing a Rot-Resistant Cedar Frame for Your Plastic Aquarium Tank
Your frame must withstand constant moisture without warping or leaching chemicals. Cedar or redwood are non-negotiable choices here – pressure-treated lumber contains copper that will poison fish within days. Start by cutting four side pieces and a base from 1×2 inch boards using your circular saw. For a standard 30-gallon tank, cut two 24-inch lengths (front/back), two 12-inch lengths (sides), and a 23.5×11.5 inch base to allow plastic overlap. Assemble the box using waterproof wood glue and 1.5-inch stainless steel screws driven through pre-drilled holes. Your drill must create pilot holes to prevent splitting – skip this and your frame will crack under water pressure. Reinforce every corner with 2-inch galvanized corner braces screwed from both directions. Finally, sand all edges to 220-grit smoothness; any splinter will inevitably puncture your plastic liner during installation.
Selecting Food-Grade Polyethylene Sheeting That Won’t Poison Your Fish

Not all “heavy-duty” plastic works for aquariums. PVC sheeting often contains plasticizers that leach toxins, while standard trash bags contain dyes fatal to aquatic life. You need 20-30 mil thick polyethylene (PE) or polypropylene (PP) labeled “food-grade” – the same material used in water storage tanks. Visit a restaurant supply store for 4’x8′ sheets costing $15-$25. Test flexibility by draping a sample over your hand; it should bend smoothly without cracking. Avoid any plastic that smells chemical-like – that indicates volatile compounds that will contaminate water. Cut your sheet 4 inches larger than the frame’s outer dimensions on all sides. For our 30-gallon example, cut a 32″x20″ sheet. Your fingers should feel substantial thickness; thin plastic will stretch and tear under water pressure within weeks.
Why Thickness Matters for Long-Term Plastic Aquarium Durability
- 10-15 mil: Suitable only for temporary holding (max 2 weeks)
- 20 mil: Minimum for 6-12 month tanks (use for small setups under 20 gallons)
- 30 mil: Recommended for 2+ year durability in 30+ gallon tanks
- Critical check: Submerge a scrap piece overnight – if water beads form on the dry side, the plastic has micro-pores causing slow leaks
Securing and Silicone-Sealing Plastic Liner to Frame Edges
Place your frame upside down on a clean work surface. Center the plastic sheet over it with equal overhang on all sides. Working on one side at a time, pull the plastic taut (not stretched!) over the frame edge and secure with stainless steel staples every 2 inches using your staple gun. NEVER use a staple gun near corners – the concentrated pressure creates weak points. At corners, fold plastic like gift wrap with 45-degree mitered seams. Now the critical step: Apply a continuous 1/4-inch bead of 100% aquarium-safe silicone sealant along the entire inner seam where plastic meets wood. Press the plastic firmly into the silicone using a plastic putty knife – your knuckle should feel the silicone squeeze out slightly. Wipe excess with a paper towel dampened with vinegar. This creates the primary water barrier; any gap here guarantees failure.
Fixing Common Silicone Sealant Mistakes Before They Leak
- Problem: Bubbles forming in the silicone bead
Solution: Apply sealant in 12-inch sections, not full perimeter at once - Problem: Plastic pulling away from wood during curing
Solution: Weigh down edges with clean rocks until set - Problem: Cloudy silicone after curing
Solution: You used non-aquarium silicone – drain immediately and restart
Performing a 48-Hour Pressure Leak Test That Prevents Disasters

Fill your tank slowly with clean water to 1 inch depth. Wait 15 minutes and inspect every seam from below – look for moisture beads, not just drips. Gradually add water in 2-inch increments, pausing 20 minutes between levels. At full capacity, place paper towels along all bottom seams and corners. Let sit 24 hours undisturbed. Any damp spot means immediate resealing. Drain completely, dry with fans for 4 hours, then apply a second silicone bead over problem areas. Repeat the test. Never skip the second test – 90% of “fixed” leaks reappear under full pressure. Mark successful seal points with waterproof tape before proceeding.
Installing Protective Gravel Layers That Prevent Plastic Punctures
Your plastic liner is vulnerable to substrate abrasion. Before adding gravel, rinse 50 pounds of aquarium-safe gravel in a fine-mesh strainer until water runs clear – dirty gravel contains sharp silica that scratches plastic. Pour a 1.5-inch layer across the entire bottom, then smooth with your hand while wearing cotton gloves. Feel for any sharp protrusions; remove rocks that catch your skin. Now gently lift the plastic edges and tuck the overhang inward, creating a smooth transition from bottom to wall. Secure the folded lip with silicone along the top inner frame edge – this prevents fish from getting trapped in folds. Add decorations last, testing each item by rubbing firmly against spare plastic; if it leaves a scratch, sand it smooth.
Avoiding Sunlight Damage That Brittle-Fries Plastic Tanks

Direct UV exposure turns flexible plastic into shatter-prone shards within 6 months. Position your tank at least 5 feet from windows, or install UV-blocking film on nearby glass. During daylight hours, monitor water temperature – plastic conducts heat faster than glass. If your thermometer hits 82°F (28°C), add a small aquarium fan. Critical warning: Never use plastic tanks outdoors, even under cover – ambient UV radiation still degrades the material. Your hands should feel cool moisture on the tank exterior; warm spots indicate UV damage starting.
Recognizing Early Failure Signs Before Your Tank Floods
Weekly inspections prevent catastrophe. With the tank empty, run your palm slowly along all seams feeling for:
– Microscopic “crazing” (spiderweb cracks in plastic)
– White stress marks where plastic bends
– Silicone pulling away from wood
– Soft spots indicating chemical degradation
Check the frame base for warping – water weight can bow untreated wood. If you spot any issues, drain immediately and apply a fiberglass-reinforced epoxy patch to the affected area. Remember: A 1/8-inch leak in a 30-gallon tank releases 2 gallons per hour – that’s 48 gallons flooding your floor overnight.
Why Plastic Aquariums Require Different Maintenance Than Glass
Your cleaning routine must adapt to plastic’s vulnerabilities. NEVER use algae scrapers with metal blades – even “plastic-safe” versions can scratch. Instead, use a dedicated plastic credit card wrapped in microfiber cloth. During water changes, avoid siphon tubes with rigid tips; bend flexible tubing to reach the bottom. Test water parameters twice weekly – plastic tanks cycle faster but have less buffering capacity. Most critically, replace the liner every 18 months regardless of appearance; internal plastic degradation occurs before visible signs.
Building a plastic aquarium isn’t for permanent installations, but for temporary setups, custom shapes, or budget constraints, it delivers exceptional value when executed correctly. By prioritizing food-grade materials, double-sealing seams, and implementing UV protection, your DIY tank will safely house fish for 2-3 years. Start small with a 10-gallon test tank to master the sealing technique before attempting larger builds. Remember the cardinal rule: If your silicone bead isn’t perfectly continuous during application, drain and restart – no amount of patching fixes poor initial sealing. For your next project, consider upgrading to acrylic for permanent durability, but for now, enjoy the satisfaction of watching your first fish explore a tank you built with your own hands.