How to Clean a Bucket for Aquarium Use
Your fish’s survival depends on what you might consider a simple chore—knowing how to clean a bucket for aquarium use properly. Many aquarium crashes begin with a contaminated bucket that introduces invisible toxins into your carefully balanced ecosystem. Using a bucket that previously held household chemicals, soaps, or fabric softener can release lethal compounds that damage fish gills and destroy beneficial bacteria. This guide provides the comprehensive decontamination protocols you need to ensure any bucket is 100% safe for your aquarium—or when it’s smarter to buy new.
If you’ve ever wondered why your fish become lethargic after water changes or mysterious deaths occur following routine maintenance, bucket contamination could be the silent culprit. Even microscopic residues from household products can devastate aquatic life, as fish are incredibly sensitive to chemical contaminants. In this guide, you’ll learn a rigorous multi-stage decontamination process, discover which buckets should never be used regardless of cleaning, and understand when purchasing a new bucket is actually the safest and most cost-effective solution for protecting your aquatic investment.
Why Your Bucket Could Be Poisoning Your Fish Tank
An unclean bucket isn’t just dirty—it’s a silent, invisible threat to your entire aquarium ecosystem. Residues like soap, detergent, or chemical softeners are toxic to fish even in minute concentrations, damaging delicate gills and destroying the beneficial bacteria that maintain water quality. Fabric softeners contain quaternary ammonium compounds specifically designed to adhere to surfaces, making them particularly persistent and difficult to remove. These surfactants can coat fish gills, causing suffocation at concentrations as low as 0.1 ppm—far below what human senses can detect.
The goal isn’t merely to clean your bucket but to completely decontaminate it, eliminating all chemical and biological hazards. Unlike household cleaning where surface cleanliness is sufficient, aquarium bucket preparation requires removing microscopic residues that could devastate your aquatic environment. A single improper rinse leaves behind contaminants that might not affect humans but can trigger catastrophic tank crashes when introduced to your carefully balanced aquatic ecosystem.
What Makes Household Buckets So Dangerous for Aquariums?
Household buckets often contain chemical residues that are harmless to humans but lethal to fish. Fabric softener contamination is especially problematic because its cationic surfactants bind strongly to plastic surfaces and are engineered to resist rinsing. Even after multiple washes, these compounds can leach into aquarium water, disrupting fish osmoregulation and causing respiratory distress.
Other common contaminants include:
– Detergent residues that destroy the protective slime coat on fish
– UV stabilizers in construction-grade plastics that leach over time
– Microscopic chemical residues from previous cleaning products
– Biological contaminants from organic matter decay
Essential Safety Gear for Proper Bucket Decontamination

Before starting your bucket cleaning process, gather these critical supplies to ensure effective decontamination:
- Protection: Heavy-duty dishwashing gloves and safety goggles to protect against cleaning agents
- Cleaning Agents: Original formula (blue) Dawn dish soap (the wildlife cleaning standard used in oil spill operations), white vinegar, baking soda, and water conditioner
- Water Sources: Access to hot water (120-140°F), and dechlorinated water for final rinses
- Dedicated Tools: A new scrub brush used exclusively for aquarium buckets, lint-free cloths, and a separate container for mixing solutions
Pro Tip: Never use the same scrub brush for household and aquarium cleaning—designate one brush solely for aquarium decontamination to prevent cross-contamination. Keep this brush clearly labeled and stored separately from other cleaning tools.
Your Step-by-Step Bucket Decontamination Protocol
Follow this rigorous multi-stage process to eliminate all chemical and biological hazards from your bucket.
Stage 1: Critical Inspection & Safety Assessment
Begin with a thorough visual and sensory examination of your bucket. Inspect for cracks, deep scratches, or discoloration that can harbor chemical residues—these microscopic imperfections create reservoirs for contaminants that standard cleaning cannot reach. Perform a sniff test: any lingering chemical, soap, or fragrance odor indicates unsafe contamination levels.
When to abandon decontamination efforts: If the bucket previously held paint, automotive fluids, pesticides, or fabric softener, the safest choice is to purchase a new dedicated aquarium bucket. The risk of microscopic residue causing fish mortality far outweighs the cost of replacement—typically just $5-15 for a food-grade bucket.
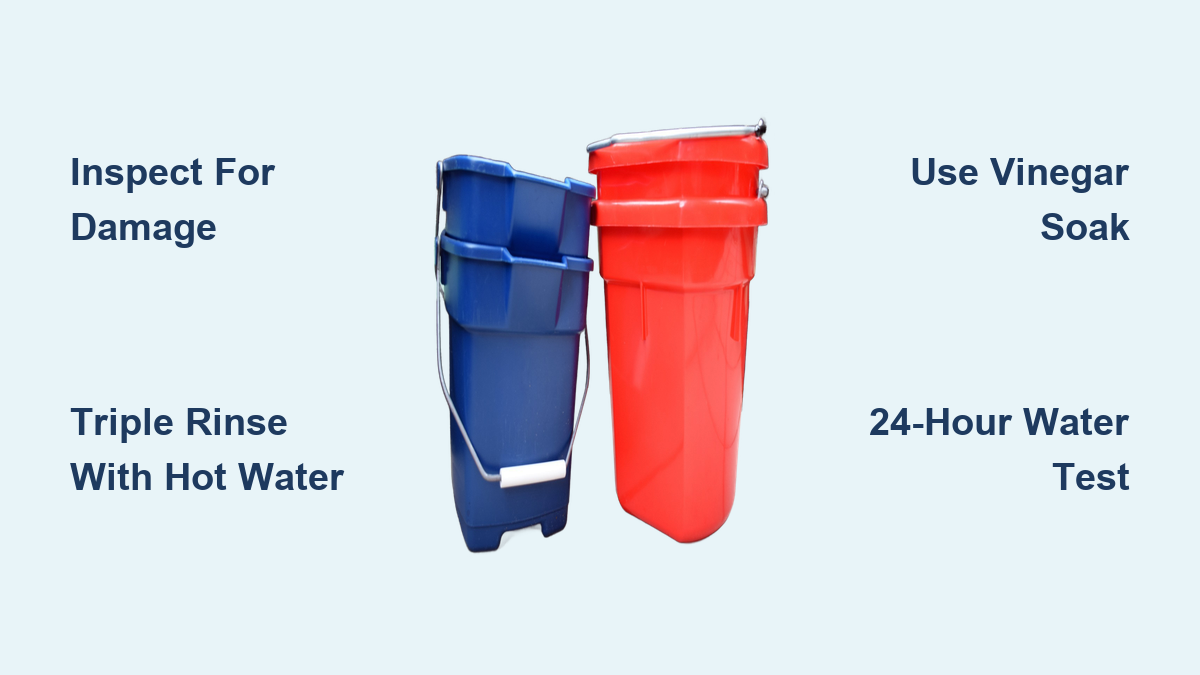
Stage 2: Triple-Rinse Decontamination Wash
- Hot Water Pre-Rinse: Rinse the entire bucket with the hottest tap water available (120-140°F) to remove loose debris and begin breaking down residues
- Dawn Dish Soap Scrub: Add 2-3 drops of original blue Dawn dish soap. Using your dedicated scrub brush, vigorously scrub the entire interior and exterior surface, paying special attention to the bottom rim and any grooves
- Triple Rinse Protocol: Fill and completely empty the bucket three times with hot water, ensuring no soap bubbles remain—any visible bubbles indicate continued contamination
Time Estimate: 20-30 minutes for thorough execution. Difficulty: Easy but requires attention to detail.
Stage 3: Chemical Neutralization Process
This critical step neutralizes acidic or alkaline residues that standard washing might miss:
- For General Residues: Create a paste with baking soda and water. Scrub the bucket’s interior thoroughly, then rinse
- For Chemical or Unknown Residues: Prepare a 50/50 solution of white vinegar and warm water. Soak the bucket for 1-2 hours to break down alkaline residues
- Final Verification: After neutralization, perform another sniff test—the bucket should have no detectable chemical, soap, or vinegar odor
Warning: If any odor persists after this stage, repeat the entire decontamination process. Do not proceed to aquarium use until all chemical smells are completely eliminated.
Stage 4: The 24-Hour Water Test
This final verification step confirms your bucket is truly safe:
- Fill the bucket with dechlorinated water (or tap water treated with double the normal dose of water conditioner)
- Let it sit undisturbed for 24 hours
- After 24 hours, smell the water—it should have no scent whatsoever
- For ultimate safety, test with a hardy “indicator species” like a guppy or cherry shrimp in a separate container for 24-48 hours
Pro Tip: Test the water parameters after the 24-hour soak—pH should remain stable (6.5-7.5), with no ammonia, nitrite, or unusual TDS readings compared to your control water sample.
Buckets That Should Never Touch Aquarium Water
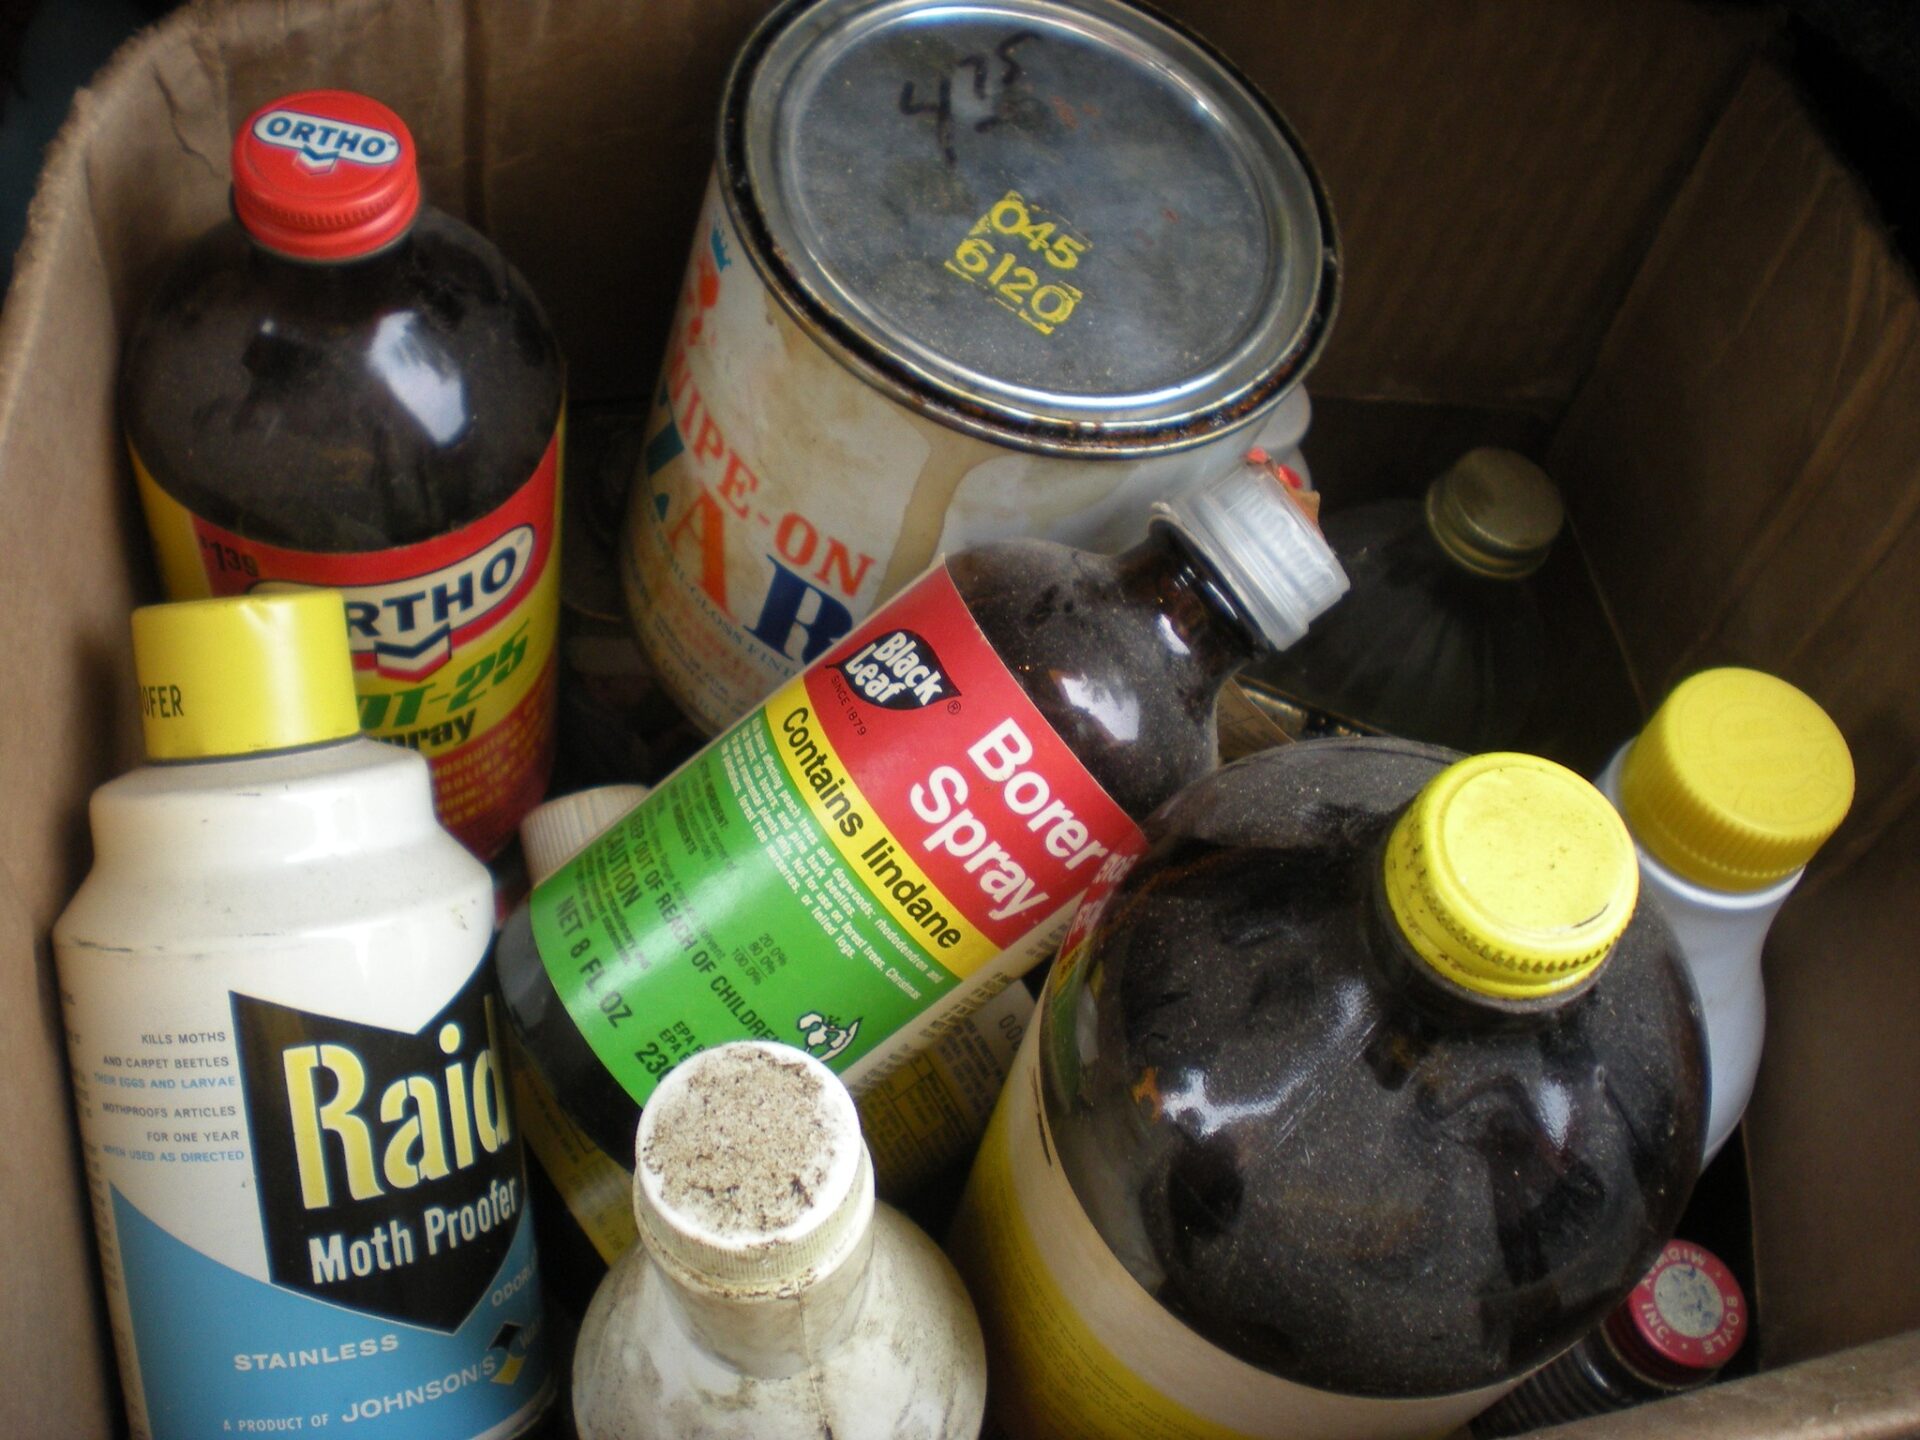
Some buckets should be permanently excluded from aquarium use regardless of cleaning efforts:
- Chemical Containers: Buckets that previously held pesticides, automotive fluids, or paint contain residues that bond permanently to plastic
- Construction Buckets: These often contain UV stabilizers designed to leach slowly over time—perfect for construction but deadly for fish
- Deeply Scratched Buckets: Scratches create microscopic reservoirs that trap chemical residues impossible to fully remove
- Buckets of Unknown History: If you can’t verify exactly what was previously stored, the risk isn’t worth taking
Critical Fact: Fabric softener contamination requires such intensive decontamination that most experts recommend discarding the bucket entirely. The cost of a new bucket ($5-15) is negligible compared to potential fish losses that could total hundreds of dollars.
When Buying a New Bucket Is Actually the Smart Choice
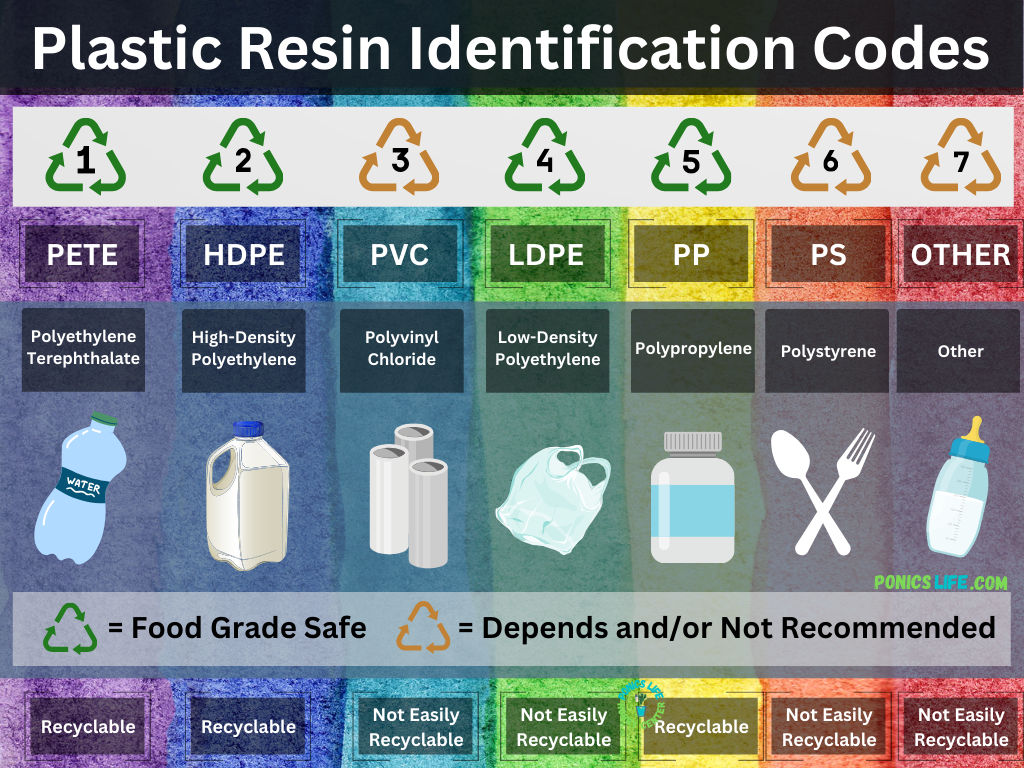
The safest solution for most aquarium keepers is purchasing a dedicated food-grade HDPE (resin code #2) or LDPE (resin code #4) bucket. These plastics are designed to be food-safe and chemically inert. When selecting a new bucket:
- Look for the resin identification code on the bottom—#2 or #4 indicates aquarium-safe plastic
- Avoid colored buckets, as dyes may leach over time—clear or white is safest
- Immediately label it permanently with “AQUARIUM USE ONLY – NO CHEMICALS” in waterproof marker
- Perform an initial wash with Dawn soap and triple rinse before first use
Cost-Benefit Reality Check: Decontaminating a questionable bucket takes 2-4 hours of labor plus $2-5 in supplies, while risking catastrophic fish loss. A new dedicated bucket costs $5-15—making it the smarter, safer investment for responsible fishkeeping.
Daily and Monthly Bucket Maintenance Protocol
Keep your dedicated aquarium bucket in optimal condition with these simple routines:
- After Every Use: Rinse immediately with hot water, never allowing residues to set
- Storage Protocol: Store upside down to prevent dust accumulation and ensure complete drainage
- Monthly Deep Clean: Perform a vinegar soak (1:1 vinegar:water) for 1 hour followed by thorough rinsing
- Quarterly Inspection: Check for developing scratches, discoloration, or odors that indicate degradation
- Five-Year Replacement: Rotate buckets every 3-5 years as plastics gradually degrade and become more porous
Critical Reminder: Never use your aquarium bucket for any non-aquarium purpose—even once. Cross-contamination from a single use with household chemicals can permanently compromise the bucket’s safety.
Final Verification: Is Your Bucket Truly Aquarium-Safe?
Before using your bucket with your main aquarium, perform this final verification:
- Complete the 24-hour water test described earlier
- Conduct a pH test on the stored water—it should remain neutral
- Perform a visual inspection for any film or residue
- If possible, run a bioassay test with hardy species for 24-48 hours
Ultimate Safety Tip: When in doubt, purchase a new food-grade bucket. The negligible cost provides absolute peace of mind knowing your maintenance routine won’t accidentally poison your fish. Your aquatic ecosystem’s health begins with the containers you use—treat bucket decontamination with the seriousness it deserves, and your fish will thrive in the pure environment you’ve created.