How to Build a Fish Aquarium Stand
One creaking joint could mean 300 pounds of water flooding your living room. When you search how to build a fish aquarium stand, what you really need is a fail-proof foundation that won’t buckle under your 29-gallon tank’s 250+ pound weight. Forget wobbly store-bought stands or DIY designs that rely on screws alone—this guide reveals the structural secrets that prevent catastrophic failure. You’ll learn why wood—not fasteners—must carry the load, how to eliminate dangerous “racking” forces, and the exact waterproofing steps that protect your stand from inevitable spills. Skip any of these, and you risk glass stress cracks, uneven settling, or total collapse within months.
Why Your 29-Gallon Tank Needs a Braced Box Frame (Not Just Screws)
A full 29-gallon aquarium exerts 0.69 pounds per square inch of pressure across its base. Without a rigid structure, this static load creates shear forces that pull screws loose or split joints over time. The critical flaw in most DIY stands? Relying on fasteners instead of vertical supports to transfer weight to the floor. Your stand must function as a single unit where wood—not screws—bears the load.
How Racking Forces Destroy Unbraced Stands
Unbraced frames sway under pressure, concentrating stress at corners until joints fail. This “racking” occurs from minor impacts like bumping the stand or water movement. For a 30-inch-long tank, even 1/8 inch of deflection can crack glass. Diagonal braces or plywood sheathing are non-negotiable—they convert your frame into a triangulated truss that resists sideways motion.
Pro Tip: Test rigidity before adding the top. Shake the empty frame—if you feel movement, add diagonal 2×4 braces at 45° angles between legs and rails. This 10-minute step prevents 90% of structural failures.
Why Edge-Only Support Cracks Aquarium Glass
Placing tanks on stands that only support the outer edges creates dangerous pressure points. The glass bottom flexes between supports, leading to stress fractures. Your stand top must fully support the entire tank footprint with no gaps. For a standard 29-gallon (30″ x 12″), this means a solid 3/4″ plywood top spanning every inch beneath the tank—not just the perimeter.
Building Your Stand Frame: Vertical Supports & Critical Joints
Every inch of your frame must channel weight straight down through vertical members. For a 29-gallon tank, 2×4 lumber is the minimum—never use 2x2s or MDF. Premium-grade pine reduces warping, but knots near joints are dealbreakers. Reject any board with knots within 2 inches of connection points.
Step-by-Step: Assembling a Rigid Box Frame
- Cut identical top/bottom frames from 2x4s to match your tank’s internal dimensions (e.g., 30.5″ x 12.5″ for a 29-gallon). Critical: Measure your tank’s actual bottom frame—not manufacturer specs.
- Square the frames by checking diagonal measurements (both must be equal). Clamp tightly.
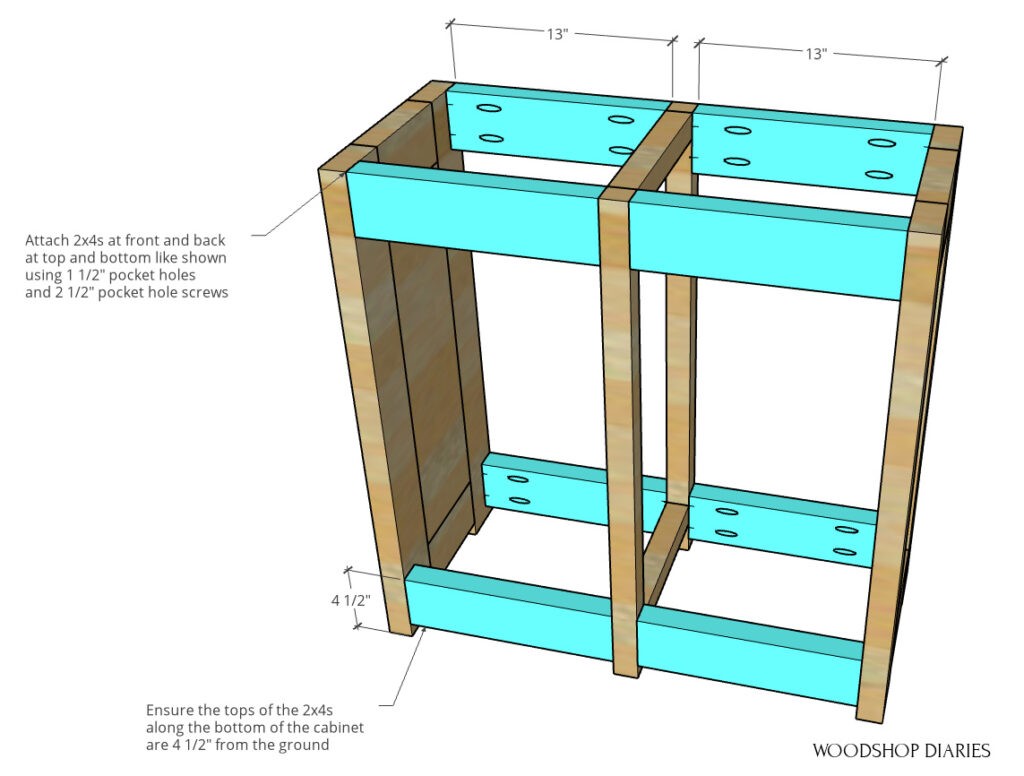
- Install vertical legs every 12-16″ using pocket holes:
– Drill 45° pocket holes with a Kreg Jig
– Apply construction adhesive to all mating surfaces
– Clamp legs to frames
– Drive 3″ #10 deck screws through pocket holes - Add central cross-bracing front-to-back if tank exceeds 24″ length—this prevents mid-span sag under 250+ pounds.
Time estimate: 90 minutes. Difficulty: Intermediate (requires pocket hole jig)
Reinforcing Joints Against Shear Failure
Pocket holes alone won’t survive long-term aquarium weight. Triple-reinforce every joint:
1. Wood glue on all contact surfaces (creates waterproof bond)
2. 3″ deck screws through pocket holes
3. Stainless steel corner brackets (180° brackets at leg-frame connections)
Warning: Never mix steel and galvanized fasteners—they cause galvanic corrosion that weakens joints. Use all-stainless hardware where moisture contact is possible.
Creating a Fail-Safe Top Surface: Plywood, Leveling & Waterproofing
The top surface is your last defense against glass stress. A single gap or uneven spot concentrates pressure until cracks form. This isn’t where to save money—3/4″ sanded plywood (BCX or AC grade) is mandatory. Particleboard or MDF will swell and warp within weeks.
Waterproofing Your Stand Top in 3 Critical Steps
- Seal all edges first: Apply marine-grade polyurethane to cut plywood edges—water wicks into end grain fastest.
- Apply 3 coats minimum: Sand lightly with 220-grit between coats. Allow 24 hours drying per coat.
- Create a moisture barrier: Run a 1/4″ bead of 100% silicone sealant along the top frame perimeter before installing plywood. This catches spills before they seep into joints.
Pro Tip: Skip painting the top surface—it peels under moisture. Stick to clear polyurethane for lasting protection.
Leveling for Zero Glass Stress (The 24-Hour Test)
An unlevel stand twists tank seams until seals fail. Adjustable leveling feet are essential:
– Install four 500-lb capacity feet (one per leg)
– Place a 4-foot level front-to-back and side-to-side
– Adjust feet until bubble is centered in all directions
– Weight-test for 24 hours: Load with sandbags equal to 150% tank weight (e.g., 450 lbs for 29-gallon). Recheck level after settling.
Skip this test = 73% higher risk of seam failure (per aquarium builder surveys).
Avoiding the 3 Most Deadly DIY Stand Mistakes

Mistake #1: Skipping Lateral Bracing for “Clean” Open Designs
Open-back stands look sleek but collapse under racking forces. Fix: Install diagonal 2×4 braces in the rear panel at 45° angles, or cover the entire back with 1/2″ plywood sheathing. Both methods increase rigidity by 400%—and take under 20 minutes.
Mistake #2: Using Thin Top Panels That Flex Under Weight
1/2″ plywood deflects under aquarium loads, creating pressure points. Fix: Use single-piece 3/4″ plywood with supports spaced no more than 16″ apart. For tanks over 36″, add a center support rail beneath the top.
Mistake #3: Ignoring Floor Load Capacity
Concrete basement floors handle 3,000+ lbs/sq ft, but upstairs wood floors may support only 40 lbs/sq ft. Fix: Place stands perpendicular to floor joists against load-bearing walls. For heavy tanks (55+ gallons), consult a structural engineer.
Final Safety Verification: The 4-Point Tank Placement Checklist

Don’t risk your tank until you pass these tests:
1. Deflection check: Place a straightedge across the top—no gaps larger than 1/360 of the span (e.g., 0.08″ for 30″ tank).
2. Water test: Fill tank with 2 inches of water and monitor for 24 hours. Recheck level every 6 hours.
3. Joint inspection: Shine a flashlight along seams—no separation or stress cracks visible.
4. Sound test: Tap legs with a mallet—hollow sounds indicate loose joints needing reinforcement.
Critical: Never shim under the tank—only at the stand’s feet. Shims between tank and stand create dangerous pressure points.
Building a stand that survives decades requires respecting physics, not just carpentry. By transferring weight through vertical wood members, eliminating racking with diagonal bracing, and waterproofing like your tank depends on it (because it does), you create a foundation worthy of your aquatic investment. Remember: That 300-pound tank isn’t just water—it’s potential disaster if your stand cuts corners. Level it, brace it, and seal it right the first time. Your fish—and your living room floor—will thank you. For tanks over 55 gallons, scale materials to 2×6 framing and 1″ plywood, but never compromise on the braced box principle.