How to Set Up an Aquarium Heater: Easy Steps
You’ve carefully chosen your tank, added substrate, and arranged decorations—now it’s time to figure out how to set up an aquarium heater. One wrong placement decision can create dangerous temperature fluctuations, fry your equipment, or stress your fish. Based on real aquarist experiences from new tank owners to seasoned hobbyists, the location of your heater isn’t just about convenience—it’s the difference between a stable ecosystem and a potential disaster. Incorrect positioning causes uneven heating, premature heater failure, and even glass shattering during water changes. This guide cuts through the confusion with battle-tested placement strategies directly from thousands of aquarium setups. You’ll learn exactly where to position your heater for optimal heat distribution, avoid critical safety hazards, and ensure your aquatic pets thrive in a consistently warm environment.
Why Heater Placement Determines Tank Stability
Placing your heater haphazardly creates “hot spots” near the device while leaving other areas dangerously cold—stressing fish and triggering disease outbreaks. The core issue? Heat distribution relies entirely on water movement. Without strong current flowing past the heater, warm water accumulates around the glass tube, tricking the thermostat into shutting off prematurely. This leaves most of your tank underheated while the heater cycles erratically. Crucially, heaters function as thermometers—they only measure the water immediately surrounding them. If that water isn’t circulating, your thermometer readings become meaningless. Positioning near high-flow zones solves this by constantly flushing the sensor with representative tank water, ensuring accurate temperature control. Ignoring this principle risks thermal shock during water changes or equipment failure that could wipe out your entire tank overnight.
Strategic Placement Zones for Perfect Heat Circulation

Your heater must live where water moves aggressively—never in stagnant corners or behind large decorations. The goal is immediate dispersion of warm water the moment it leaves the heater.
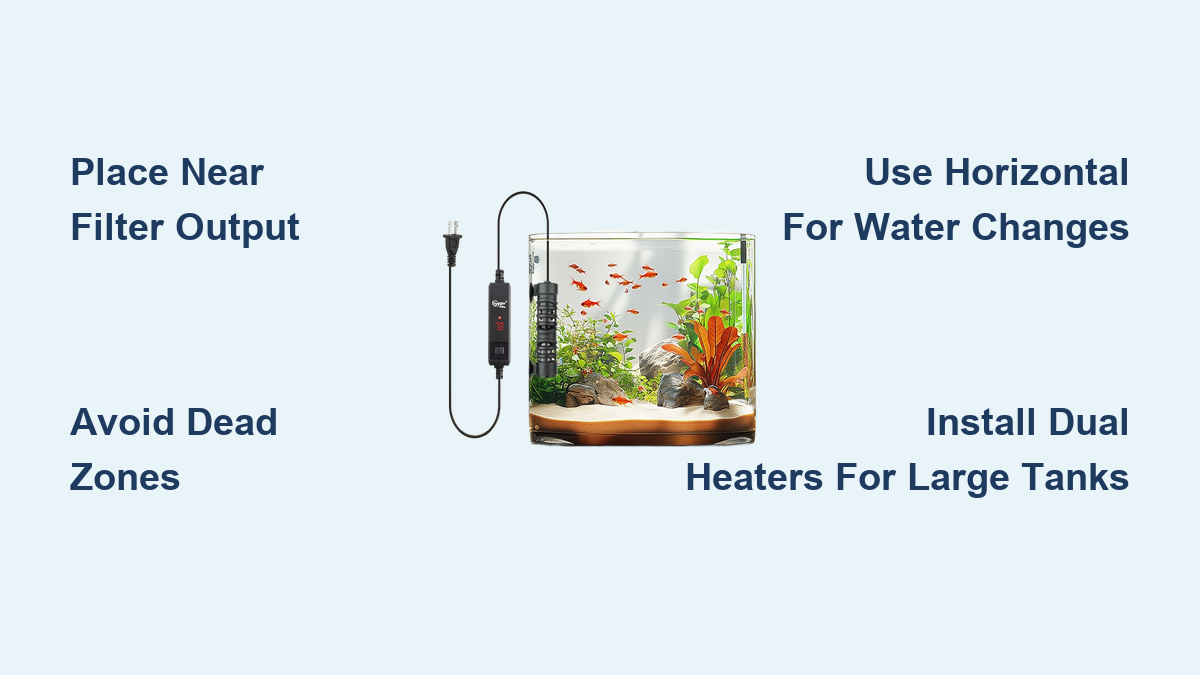
Optimal Position: Directly Beside Filter Output
Mount your heater within 2 inches of your filter’s outflow nozzle. This leverages the strongest current in your tank to blast heated water across the entire aquarium. As one 55-gallon tank owner confirmed: “I place mine next to the output—my thermometer on the opposite end shows perfectly even temps.” The constant jet stream prevents localized overheating and ensures the thermostat reads true tank conditions. For canister filters, clip the heater vertically near the spray bar where water exits. This spot consistently outperforms intake-side placement because output currents move water faster and farther.
Dead Zones That Sabotage Temperature Control
Never tuck heaters behind rocks, driftwood, or in tank corners. These “dead zones” have minimal water movement, causing three critical failures:
1. Warm water pools around the heater, triggering false “target temperature reached” signals
2. The rest of your tank stays dangerously cold while the heater sits idle
3. Mineral buildup accelerates due to stagnant water, shortening heater lifespan
One aquarist learned this the hard way: “I put mine in a corner—half the tank was 78°F while the heater side hit 84°F. My shrimp started dying within days.” Always verify circulation by watching how food particles move; if debris settles near your intended spot, choose another location.
Horizontal vs. Vertical: Safety-First Orientation Tactics
Your heater’s angle affects both safety and efficiency—choose based on your tank’s specific risks.
Horizontal Placement: The Water Change Safety Net
Lay heaters flat along the substrate for tanks where water levels fluctuate. This eliminates the #1 cause of shattered heaters: exposure during maintenance. As a relieved hobbyist shared: “After my heater smoked during a water change, I now keep it horizontal at the bottom. No more unplugging anxiety!” Ideal for:
– Tanks without auto-top-off systems
– Owners who frequently top off water manually
– Aggressive fish (cichlids, puffers) that bump vertical heaters
Critical check: Confirm your model supports full submersion—some thermostats malfunction horizontally. Always leave 1 inch of clearance between the heater and substrate/decor to prevent hot spots.
Vertical Placement: Maximizing Heat Distribution
Stand heaters upright near the filter output for superior circulation. This orientation lets rising warm water create natural convection currents that spread heat upward through the water column. Best for:
– Tanks with consistent water levels (auto-top-off systems)
– Shy fish that avoid bottom-dwelling zones
– Models with visible temperature dials needing frequent adjustment
Non-negotiable rule: The heating element must stay fully submerged at ALL times. Even brief exposure during water changes can crack the glass from thermal shock. If your water level drops within 2 inches of the top of the heater, switch to horizontal placement immediately.
How to Set Up an Aquarium Heater: Foolproof Installation Sequence
Follow these exact steps to avoid the most common setup disasters—backed by aquarists who’ve broken expensive heaters.
Pre-Installation Safety Protocol
- Unplug everything at the wall outlet before touching the heater or filter. Never handle electrical equipment near water.
- Attach suction cups to the heater body while it’s dry—wet glass causes brackets to slip.
- Submerge completely in tank water before powering on. For vertical placement, position near filter output; for horizontal, rest on substrate away from decor.
Critical Acclimation & Activation
- Wait 30 minutes after submerging before plugging in. This equalizes glass temperature to prevent cracking from thermal shock.
- Plug into a dedicated outlet (not a power strip with other equipment). Watch for the indicator light—no light means immediate replacement.
- Verify heat distribution after 1 hour: Place a separate thermometer at the tank’s farthest point from the heater. If readings differ by more than 2°F, reposition the heater closer to flow.
How to Set Up an Aquarium Heater for Long-Term Safety
Water Change Survival Protocol
Always unplug the heater before lowering water levels—even if partially submerged. One hobbyist recounted: “I forgot to unplug during a 50% water change. The exposed top smoked and cracked my $80 heater. Now I plug heaters and filters into the same power strip—flip one switch, both off.” For horizontal models, this step is optional but still recommended for thermostat accuracy.
Failure-Proof Maintenance System
- Use a secondary thermometer placed diagonally opposite the heater. Heater thermostats drift over time—rely on this external reading for true tank temps.
- Replace heaters annually even if working. Mineral buildup causes “stuck on” failures that can cook your tank in hours.
- Install guards for aggressive fish—a $5 plastic sleeve prevents shattered glass from nips or bumps.
- Deploy dual heaters in tanks over 40 gallons. Position one near each filter output for even heating and backup if one fails.
Proven Heating Hacks from Veteran Aquarists
The Two-Heater Rule for Large Tanks
For aquariums exceeding 40 gallons, use two 50% capacity heaters instead of one oversized unit. Example: A 75-gallon tank needs two 150W heaters (not one 300W). This provides:
– Redundancy if one fails “off” (preventing lethal cold snaps)
– 30% more even heat distribution
– Reduced strain on individual units
As one reef keeper noted: “My 120-gallon uses three 250W heaters in the sump. When one died ‘on,’ the others couldn’t overheat the tank—saved 200 fish.”
Wattage Calculation Mistake Avoidance
Never exceed 5 watts per gallon. Overpowered heaters cause dangerous temperature spikes during startup. Calculate:
– Cold rooms (below 68°F): 5 watts/gallon
– Average rooms (72°F): 3-4 watts/gallon
– Tropical tanks (82°F+): Add 10% extra wattage
A 20-gallon tank in a 70°F room needs exactly 60-80W—not the 150W “just in case” model many beginners buy.
Angle for Maximum Efficiency
Mount heaters at a 45-degree tilt toward the filter output. Heat rises along the glass tube, and angling creates a “conveyor belt” effect that pushes warm water downward into cooler zones. One user reported: “Since tilting my heater toward the outflow, my tank temps stabilized within 0.5°F across all zones.” This works for both horizontal and vertical placements.
Properly setting up your aquarium heater transforms it from a potential hazard into the silent guardian of your tank’s ecosystem. By positioning it where water flow is strongest, choosing the right orientation for your tank’s risks, and implementing dual-heater redundancy in larger setups, you create a stable thermal environment where fish thrive. Remember the golden rules: always submerge completely, verify temps with a secondary thermometer, and replace heaters yearly. These steps—forged from real aquarists’ costly mistakes—ensure your heater works invisibly in the background, just as it should. Now that your heating system is optimized, focus on the next critical phase: cycling your tank to build the biological foundation for healthy aquatic life.