Goldfish Breeding in Aquarium: A Complete Guide
Watching goldfish eggs hatch and develop into vibrant juveniles ranks among the most rewarding experiences for aquarium enthusiasts. Yet many hobbyists struggle when attempting goldfish breeding in aquarium environments due to overlooked details in preparation and care. This guide cuts through the confusion by providing actionable steps for triggering spawning, protecting fragile eggs, and nurturing fry through their critical first months. You’ll discover precisely how to identify breeding-ready fish, create optimal tank conditions, and overcome common pitfalls like egg fungus and fry cannibalism. Whether you’re aiming to produce show-quality Orandas or simply want to experience the full goldfish life cycle, these proven techniques will transform your breeding success rate.
How to Identify Breeding-Ready Goldfish: Tubercles vs. Round Bellies
Spotting the subtle differences between male and female goldfish becomes critical when planning your breeding efforts. Mature males develop tiny white breeding tubercles on their gill covers and pectoral fins during spawning season—these sandpaper-like bumps feel rough when gently touched. Meanwhile, females preparing to spawn exhibit a noticeably fuller body shape with a slightly protruding vent area, especially when viewed from above. For reliable results, select fish that have reached at least two years of age, as younger specimens often produce weak offspring. During the breeding season, observe males actively chasing females through the tank, a clear sign they’re ready to spawn. This visual identification process prevents wasted effort on incompatible pairs and ensures you’re working with truly breeding-ready specimens.
20-30 Gallon Breeding Tank Setup: Temperature, pH, and Spawning Mop Requirements

Your goldfish breeding in aquarium success hinges on creating a dedicated spawning environment separate from your main display. Start with a 20-30 gallon tank equipped with a gentle sponge filter—essential for maintaining water quality without endangering eggs or fry. Maintain precise water parameters: 68-74°F temperature range, pH between 7.0-7.5, and zero ammonia or nitrite levels. Anchor multiple sterilized spawning mops (6-8 inch clusters of green acrylic yarn) to the tank bottom, as these provide ideal surfaces for egg adhesion. Avoid gravel substrate in the breeding tank—it complicates egg collection and harbors debris. Instead, use bare-bottom construction for easy cleaning. This specialized setup mimics natural spring conditions while giving you complete control over the critical spawning environment.
Why Sponge Filters Are Non-Negotiable for Goldfish Fry Tanks
Unlike standard filters, sponge filters create gentle water movement that won’t suck in delicate fry while providing essential biological filtration. The porous sponge surface also harbors beneficial microorganisms that serve as supplemental food for newly hatched fry. When setting up your breeding tank, run the sponge filter continuously for at least two weeks before introducing breeding pairs to ensure full biological cycling. This preparation prevents dangerous ammonia spikes that could kill eggs or newly hatched fry.
Step-by-Step: Triggering Goldfish Spawning with Temperature Changes and Water Changes
Inducing spawning requires precise environmental manipulation that mimics natural spring conditions. Begin by conditioning your selected pair for 2-3 weeks with high-protein foods like bloodworms and brine shrimp, fed 3-4 times daily. Then initiate the spawning sequence: Perform a 50% water change using water that’s 2-3°F cooler than the tank temperature to simulate spring rains. Over the next 3-5 days, gradually increase the temperature by 2-3°F daily until reaching 72°F. Simultaneously, extend lighting to 14 hours daily. Watch for the male’s chasing behavior intensify as he pursues the female through the tank. Within 24-48 hours of these triggers, expect the female to release 1,000+ sticky eggs onto the spawning mops, with the male immediately fertilizing them.
Why You Must Remove Adult Goldfish After Spawning (Before They Eat Eggs)

The moment spawning concludes—typically within 2-6 hours—you must immediately remove the adult fish from the breeding tank. Goldfish exhibit no parental instincts and will eagerly consume their own eggs given the opportunity. Leaving adults in the tank often results in near-total egg loss within hours. Use a soft net to carefully transfer the breeding pair back to their display aquarium while leaving the eggs undisturbed on the spawning mops. This critical step separates successful breeders from those who repeatedly fail to produce viable fry. Check eggs within 24 hours; healthy fertilized eggs appear translucent amber, while unfertilized eggs turn opaque white and develop fuzzy fungus.
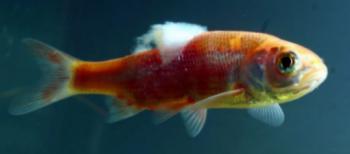
Preventing Fungus on Goldfish Eggs: Methylene Blue and Daily Maintenance
Combat egg fungus by adding 2-3 drops of methylene blue per gallon to the breeding tank immediately after removing adults. Perform small daily water changes (10-15%) using temperature-matched water to maintain pristine conditions. Promptly remove any opaque white eggs with a pipette to prevent fungal spread. These proactive measures can increase hatch rates from below 30% to over 75% in optimal conditions.
First 7 Days of Goldfish Fry Care: Infusoria to Baby Brine Shrimp Feeding Schedule

Goldfish fry emerge from their eggs as tiny, transparent larvae with yolk sacs attached—these provide initial nourishment for 2-3 days. Once the yolk sac disappears, begin feeding microscopic foods immediately. For the first 3 days, offer infusoria (microscopic organisms) 4-6 times daily. Create infusoria by soaking spinach leaves in tank water for 3-5 days until the water clouds with microorganisms. On day 4, transition to newly hatched brine shrimp—a nutritional powerhouse that dramatically improves survival rates. Feed baby brine shrimp 5-6 times daily in small quantities, ensuring all food is consumed within 5 minutes to prevent water fouling.
Goldfish Fry Growth Timeline: From 1mm Larvae to Marketable Juveniles
Tracking developmental milestones ensures proper care at each stage. During the larval phase (days 0-7), fry measure 1-5mm and cling vertically to tank walls. By week 2, they reach 1-2cm and begin horizontal swimming, requiring increased feeding frequency. Between weeks 3-4, growth accelerates to 1-2mm daily under optimal conditions as you introduce microworms and powdered fry food. At one month, juveniles measure 2-3cm and can handle finely crushed flake food. By three months, they’ve reached 4-5cm and resemble miniature adults, with fancy varieties beginning to show characteristic features like wen growth in Orandas. Consistent water changes (25% weekly) and careful feeding remain critical throughout this rapid development phase.
How to Prevent Egg Fungus and Cannibalism in Goldfish Fry Tanks
Two major threats jeopardize goldfish breeding in aquarium efforts: fungal infections and cannibalism. Combat fungus through strict water quality management—maintain 0 ppm ammonia and nitrites with daily 10-20% water changes using temperature-matched water. Apply methylene blue at the first sign of white fuzz on eggs. To prevent cannibalism, feed fry 6-8 times daily with appropriate-sized foods, ensuring constant availability. As fry grow beyond 1cm, separate them by size into different tanks to prevent larger individuals from eating smaller tankmates. Adding fine-leaved plants or breeding grass provides hiding spots for vulnerable fry. These proactive measures can increase survival rates from below 20% to over 50% in well-managed setups.
Ethical Culling Practices: How to Humanely Remove Deformed Goldfish Fry
Responsible goldfish breeding requires difficult decisions about deformed fry. Around 1-2 weeks post-hatch, examine fry for severe abnormalities like curved spines, missing fins, or unbalanced swimming. These fish face poor quality of life and should be humanely culled. The most ethical method involves clove oil euthanasia: Add 400mg per liter of tank water (approximately 4 drops per gallon) to induce painless sedation, followed by a complete water change with the same concentration to ensure humane termination. Never release deformed fish into home aquariums where they’ll suffer or compete with healthy specimens. Document culling decisions to improve future breeding stock selection.
Selective Breeding for Fancy Goldfish: Genetics Behind Orandas and Ryukins
Understanding basic genetics unlocks the ability to produce specific goldfish varieties. When breeding fancy types like Orandas or Ryukins, remember that the classic fancy body shape is recessive—two fancy parents will produce fancy offspring. However, crossing fancy with single-tail varieties (like comets) typically yields single-tail offspring due to dominant genetics. Color inheritance follows different patterns: red pigmentation dominates black, while metallic scales dominate nacreous (pearl) varieties. For consistent results, maintain detailed breeding records tracking parental traits and offspring development. Advanced breeders use selective pairing over multiple generations to enhance specific characteristics like wen development in Orandas or tail length in Ryukins.
Goldfish Breeding Troubleshooting: Why Your Fry Aren’t Surviving Past Week 2
When goldfish fry die after the first week, water quality issues are usually to blame. Test for ammonia spikes caused by overfeeding—fry tanks require smaller, more frequent water changes than adult tanks. Ensure your sponge filter runs continuously to maintain biological balance. Verify food size appropriateness; fry with undeveloped digestive systems cannot process particles larger than their eyes. Check for temperature fluctuations—maintain 75-78°F for optimal growth. If multiple batches fail, quarantine new breeding stock for 30 days before introducing them to your system to prevent disease transmission. Documenting each breeding attempt helps identify patterns and improve future success rates.
Goldfish breeding in aquarium environments demands patience but rewards dedicated hobbyists with the unique satisfaction of witnessing life’s earliest stages. By implementing these precise techniques—from identifying breeding-ready fish to managing fry nutrition—you’ll transform sporadic spawning attempts into reliable breeding success. Remember that consistent water quality management and timely intervention during critical developmental windows make the difference between thriving fry and failed batches. As your skills develop, consider keeping detailed records to track genetic traits and improve future generations. The journey from observing your first spawning chase to watching vibrant juveniles explore their tank represents one of aquarium keeping’s most profound experiences—a cycle of life you’ve nurtured from beginning to end.