How to Make a Sealed Aquarium: Step-by-Step Guide
Picture a miniature underwater world sealed inside a glass jar, humming with life while requiring zero water changes for months—even years. This isn’t science fiction; it’s a self-sustaining sealed aquarium, where plants, water, and microorganisms work in perfect harmony to recycle every resource. Learning how to make a sealed aquarium transforms a simple jar into a captivating closed-loop ecosystem that demonstrates nature’s balance on your windowsill. You’ll discover this isn’t just a decorative piece—it’s a living science experiment that teaches oxygen cycles, nutrient recycling, and ecological resilience through hands-on creation. By the end of this guide, you’ll know exactly how to build a stable, low-maintenance sealed aquarium using affordable materials and proven biology.
Why a 1-Gallon Glass Jar Creates the Perfect Sealed Environment
Glass transparency and precise volume make 1-gallon jars ideal for sealed aquarium success. Unlike plastic containers that leach chemicals or larger tanks that complicate balance, this size provides enough space for microfauna while allowing light penetration critical for photosynthesis. The rigid glass walls maintain consistent internal pressure during temperature shifts, preventing seal failure—a common reason sealed ecosystems collapse within weeks. Crucially, the narrow opening simplifies creating an airtight seal with standard lids, eliminating the need for custom modifications that risk leaks.
Choosing Your Jar Lid for Complete Ecosystem Sealing
A rubber-gasketed lid is non-negotiable for long-term stability. Test potential lids by filling your jar with water, sealing it tightly, and inverting it for 24 hours—any moisture escaping means bacteria and gases will too. For mason jars, replace the standard flat lid with a new rubber-sealed version; repurposed food jars require meticulous cleaning to remove oil residues that compromise adhesion. Never use wire-bail lids, as their imperfect seals cause gradual water loss visible as dropping water levels after 30 days.
Why Aquarium Substrate Beats Potting Soil Every Time
Potting soil introduces fatal problems: peat moss breaks down into sludge, fertilizers trigger toxic algae blooms, and soil particles cloud water permanently. Instead, build your foundation with aquarium-specific materials. The layered approach—starting with drainage stones—mimics natural wetland geology while preventing root rot. This setup allows beneficial bacteria to colonize the gravel surface, kickstarting the nitrogen cycle before plants even arrive. Skipping this step guarantees murky water and plant die-off within two weeks.
Building Your Drainage Layer with Stones and Activated Carbon
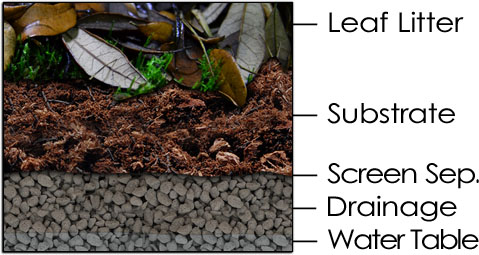
Your jar’s base must replicate natural water filtration processes. Without proper drainage, decomposing matter releases ammonia that poisons the entire ecosystem. This layer isn’t optional—it’s the engine converting waste into plant nutrients. Activated carbon is equally critical; it absorbs impurities released during initial setup, preventing the “new tank syndrome” that plagues beginners. One 1/2-inch charcoal briquette crushed into pea-sized pieces works for 1-gallon jars, eliminating the need for expensive filter cartridges.
Step 1: Adding the 1-Inch Stone Base
Pour rinsed pea gravel or small river stones to create a uniform 1-inch layer. Use tweezers to arrange stones away from jar walls, ensuring no gaps where debris could trap. This gap-free foundation prevents dead zones where anaerobic bacteria produce hydrogen sulfide (that rotten egg smell signaling ecosystem failure). Gently shake the jar to settle stones—visible gaps mean you’ll need to add 1/4 inch more material.
Step 2: Layering Nutrient-Rich Soil and Protective Gravel
Add 2 inches of aquarium soil—never garden soil—using a spoon to avoid disturbing the stone layer. Top this with 1/2 inch of fine aquarium gravel to anchor plants and block soil from clouding water. The gravel cap must be thick enough to cover all soil (test by pouring water slowly later), but thin enough to let plant roots penetrate. Press gently with a clean finger to eliminate air pockets that could float plants during watering.
Using Dechlorinated Water for a Stable Ecosystem Start
Chlorine in tap water destroys the beneficial bacteria colonies essential for nutrient cycling. Bottled spring water works but introduces inconsistent mineral levels that destabilize pH over time. The foolproof solution: dechlorinate tap water using a pet store conditioner (1 drop per gallon) and let it sit 1 hour before use—this removes chloramines that evaporation alone can’t eliminate. Skipping dechlorination causes immediate plant leaf melt and microfauna death, dooming your sealed aquarium before sealing.
How Much Water to Add: The Critical 25% Headspace Rule
Fill only 60-75% of your jar’s volume, leaving 25% air space above water. This headspace isn’t empty—it’s where gas exchange happens. Plants absorb CO2 from this air pocket during photosynthesis, releasing oxygen that dissolves back into the water. Too little headspace (<20%) causes oxygen depletion; too much (>30%) starves plants of dissolved CO2. Measure precisely: for a 1-gallon jar holding 128 oz, add 80-95 oz of water. Use a measuring cup—eyeballing this is the #1 beginner mistake.
Selecting Java Moss and Other Low-Light Plants That Thrive
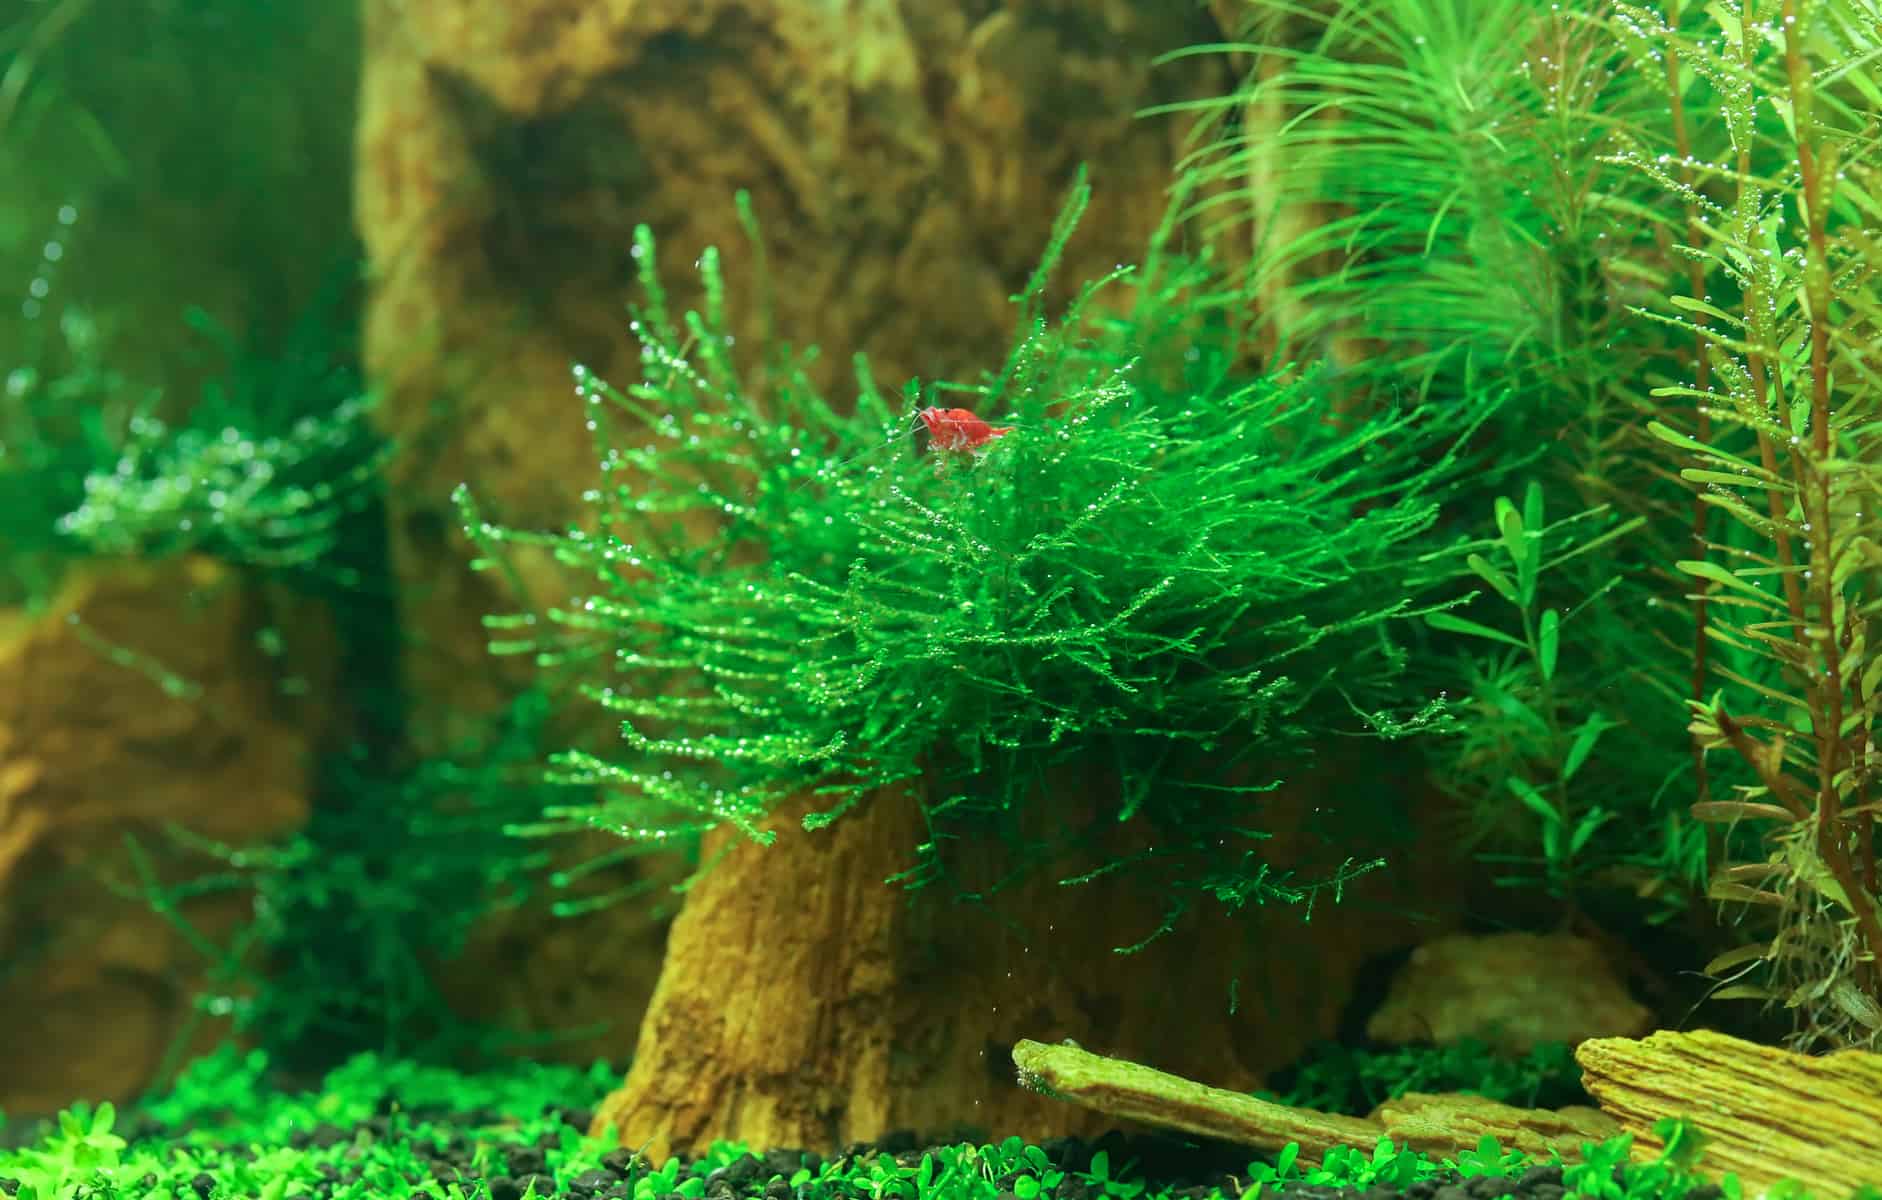
High-light plants like Amazon swords demand intense lighting that causes overheating in sealed jars. Instead, choose species evolved for low-energy environments. Java moss anchors to hardscape without substrate, absorbing nutrients directly from water—its dense growth also shelters microfauna. Marimo moss balls are photosynthesis powerhouses that rotate naturally to maximize light exposure, while Anubias nana’s thick leaves resist snail grazing. Avoid fast-growing stem plants like wisteria; they outcompete others and collapse the ecosystem within 60 days.
Marimo Moss Balls: The Ultimate Low-Maintenance Oxygen Producer
These living algae spheres require zero planting—they float freely, oxygenating water 24/7 through constant photosynthesis. Their slow growth (1-2 cm per year) prevents overcrowding, and they naturally shed debris that feeds microfauna. Place one 1-inch ball per gallon; larger specimens trap air bubbles that float them against the lid, blocking light. If yours turns brown, reduce light exposure immediately—this indicates chlorine damage from improper water preparation.
Adding Bladder Snails: The Right Time and Quantity
Bladder snails are ecosystem workhorses that consume decaying matter before it turns toxic. Add 2-3 immediately after planting—they reproduce slowly in stable conditions, maintaining population balance. Never introduce them dry; acclimate by floating the snail in a cup of your jar’s water for 15 minutes first. Overstocking (more than 5 per gallon) causes rapid algae overgrowth as their waste fuels blooms. If you see snail eggs (clear jelly clumps), reduce feeding—they’re breeding due to excess nutrients.
Why Wait 4 Weeks Before Adding Ghost Shrimp
Shrimp are sensitive to ammonia spikes during the initial nitrogen cycle. Adding them too soon causes “shrimp melt”—limp bodies floating within days. Wait until:
– Water clears completely (usually 10-14 days)
– You see tiny bubbles on plant leaves (indicating oxygen production)
– Condensation forms a daily cycle on the jar
Test with a $5 water kit: ammonia and nitrites must read zero. For 1-gallon jars, start with just one ghost shrimp—any more overwhelms the system. Introduce at night when light is off to reduce stress.
Positioning Away from Direct Sunlight to Prevent Algae Disasters
South-facing windows cause temperature swings over 10°F daily—this stresses plants and triggers explosive algae growth. Instead, place your sealed aquarium 3-5 feet from an east-facing window for gentle morning light. If using artificial lighting, a $4 clip-on LED with 6500K daylight bulbs works perfectly. Position it 8 inches above the jar for 8 hours daily—use a $5 timer plug to automate cycles. Never exceed 10 hours of light; this mimics natural photoperiods while starving algae.
Fixing Green Water Algae in 72 Hours Without Opening the Jar

Excessive light turns water pea-soup green within days—a sign your ecosystem is unbalanced. Immediately:
1. Move the jar to a darker spot (but not total darkness)
2. Cover half the jar with opaque paper for 48 hours
3. Restore normal lighting but reduce duration by 2 hours
Within 3 days, water should clear as plants outcompete algae for nutrients. If not, your headspace is too small—re-seal with more air next time. Never add algae-eaters like Amano shrimp to small jars; they starve without sufficient algae.
Monitoring Ecosystem Health: What Condensation Tells You
Daily condensation cycles are your sealed aquarium’s heartbeat. Morning fogging that clears by afternoon shows active transpiration—plants releasing water vapor that condenses on cooler glass. Persistent fog indicates overwatering or poor drainage; no condensation means the seal is leaking. Healthy jars develop thin biofilm on glass within 2 weeks—this beneficial bacteria colony is normal. Wipe only if it blocks >50% visibility, using a magnetic cleaner through the glass to avoid opening.
By following these precise steps, your sealed aquarium will thrive for years with zero maintenance—some enthusiasts report jars lasting over a decade. The key is respecting ecological limits: one snail per gallon, 25% headspace, and strict light control. When your first jar succeeds, explore advanced builds like half-gallon biotopes with terrestrial moss sections using the same principles. For troubleshooting, join r/Ecosphere on Reddit or study Serpa Design’s YouTube tutorials—they’ve perfected the art through hundreds of sealed jars. Start small, prioritize balance over aesthetics, and you’ll create a mesmerizing self-sustaining world that proves nature’s resilience in a single glass vessel.