Reef Aquarium Sump Setup Guide
You’ve outgrown canister filters and are ready to unlock the true potential of your saltwater ecosystem. A properly designed reef aquarium sump setup transforms your tank from a fragile display into a self-sustaining marvel—but the maze of baffles, socks, and reactors leaves most beginners paralyzed. What if you could harness the wisdom of reefers running 625L+ systems without drowning in complexity? The truth is, your sump isn’t just a hidden tank; it’s the life-support system where water clarity, nutrient control, and coral vitality are won or lost. In this guide, you’ll discover battle-tested configurations that eliminate guesswork and deliver results, whether you’re building your first sump or optimizing a high-bioload reef.
Forget “set it and forget it” myths. A thriving reef demands strategic filtration that mirrors natural ocean processes. Your sump handles three critical jobs: mechanical waste capture, nutrient export, and equipment housing—all while keeping maintenance manageable. The forum debate among 10+ experienced hobbyists proves there’s no universal blueprint, but their collective insights reveal universal principles. By the end of this guide, you’ll confidently choose components that align with your tank’s needs, avoid costly oversights, and build a sump that works while you sleep.
Critical Components Every Reef Sump Must Include

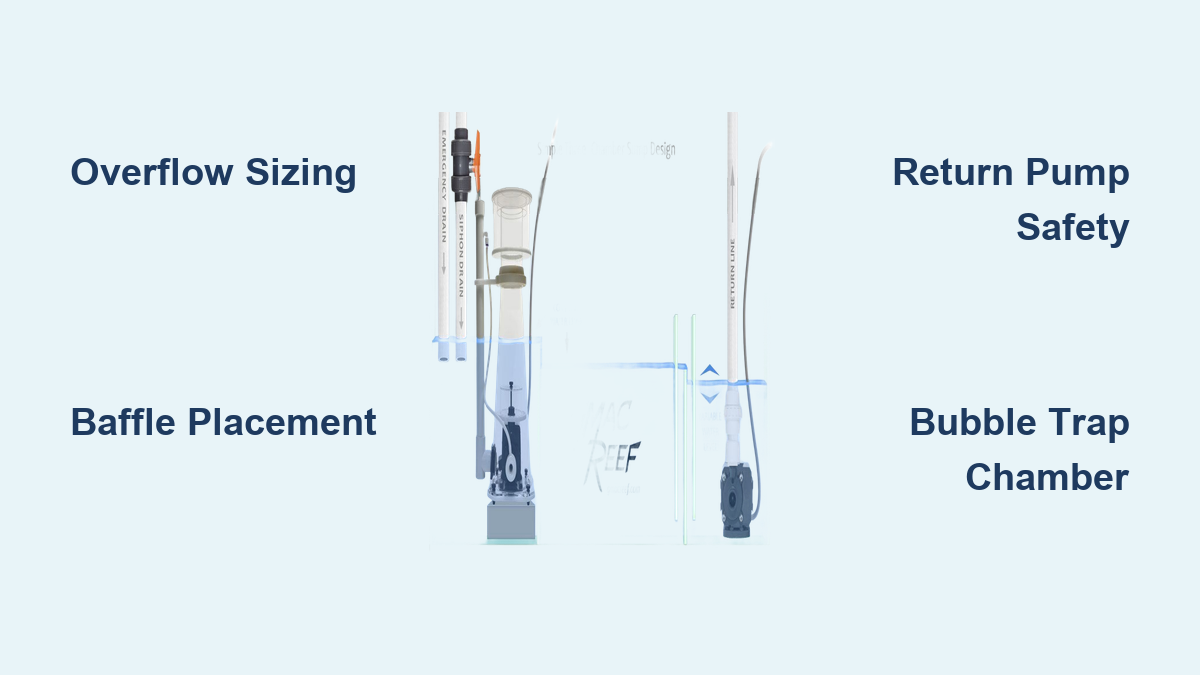
Your reef aquarium sump setup lives or dies by four non-negotiable elements working in harmony. First, the overflow system—whether bulkhead or hang-on—creates the gravity-fed drain from your display tank. Without a properly sized overflow, water movement stalls, risking dangerous siphon breaks. Next, the sump tank itself must accommodate sudden water surges during power outages; VictorC3’s 175-gallon plywood build demonstrates why volume matters for safety. The return pump then pushes filtered water back to the display, with its flow rate dictating your entire system’s turnover. Finally, the filtration sequence determines water quality: skip any step, and detritus decomposes into nitrates that fuel algae outbreaks.
Why Baffles Make or Break Your Flow Path
Baffles aren’t optional dividers—they’re traffic controllers directing water through each filtration stage. Without them, water shortcuts past critical components like a protein skimmer. rfgonzo’s minimalist build uses just three baffles before the return pump, proving simplicity works when strategically placed. Key insight: position baffles to create a “drop” between chambers (as Euphyllia97 does) forcing water to flow under each barrier. This traps bubbles and ensures contact time with filtration media. Never seal baffles to the sump’s top—leave 1-2 inches of airspace to prevent overflow during power failures.
The Silent Killer: Return Pump Chamber Sizing
Here’s where most beginners fail: underestimating the return chamber’s capacity. When power cuts out, water from your display tank rushes into the sump. If the return chamber can’t hold this surge, water floods your stand. Measure your display tank’s volume above the overflow teeth—this is the “drain-back” volume your sump must contain. cloak avoids this risk by keeping his sump simple with no chambers, but for multi-stage setups, dedicate 25-30% of sump volume solely to the return section.
Choosing Your Filtration Strategy: Minimalist vs. Multi-Stage
The war between “less is more” and “maximalist” camps rages online, but your tank’s bioload—not forum trends—should dictate your approach. Low-fish, coral-dominated tanks often thrive with cloak’s barebones method: protein skimmer + heater + return pump. No socks, no refugium. His logic? Fewer parts mean fewer failure points and effortless cleaning. But if you run a fish-heavy system like Willbiker’s 625L tank, you’ll need layered filtration to handle waste.
The Step-by-Step Flow Sequence That Wins 90% of Reef Tanks
After analyzing 8 forum setups, this sequence consistently delivers results:
1. Mechanical filtration first: Water hits filter socks or cups (Plecosam’s preference) to trap debris before it decomposes.
2. Protein skimmer second: badluckman runs his skimmer here to remove organics while water is still dirty.
3. Refugium or media reactor third: Chaeto-filled refugiums (badluckman, Euphyllia97) export nutrients or reactors (mcshams) house biopellets.
4. Bubble trap final: rfgonzo’s three-baffle trap ensures microbubble-free water returns to the display.
Pro Tip: Never place your skimmer after the refugium. As Euphyllia97 discovered, chaeto fibers clog skimmer intakes. Position it early where water is dirtiest for maximum efficiency.
When to Add a Refugium (and When to Skip It)
Refugiums divide the reef community. Proponents like badluckman use them for three proven benefits:
– Nutrient export: Chaeto outcompetes nuisance algae for nitrates and phosphates.
– Pod production: Undisturbed breeding grounds boost copepod populations for coral food.
– pH stabilization: Lighting refugiums on reverse schedules (VictorC3’s method) counters pH drops at night.
But cloak and waleedreef argue refugiums are unnecessary with a quality skimmer—especially if you prioritize low-maintenance. Their verdict? Add one only if you struggle with nitrate spikes or want natural food production. VictorC3’s “cryptic refugium” (dark zone with live rock and sponges) offers a middle ground: zero lighting costs with biological filtration.
Building Your Sump: 5 Actionable Steps from Pro Reefers
Skip the paralysis by analysis. These steps mirror how badluckman and Euphyllia97 built functional sumps on their first try.
Map Your Flow Path Before Buying Equipment
Sketch chamber sizes based on your display tank’s volume. For a 100-gallon system:
– Chamber 1 (15% volume): Mechanical filtration (filter socks)
– Chamber 2 (25% volume): Skimmer + heater
– Chamber 3 (30% volume): Refugium or reactor
– Chamber 4 (30% volume): Return pump + bubble trap
Dinodanger’s filter roller sits here if used—automating sock changes. Never force components into undersized chambers; mcshams regrets cramming UV, reactors, and heaters into one section.
Install the Overflow and Return with Safety Margins
Your overflow’s max flow rate must exceed the return pump’s output by 20%. If your pump moves 1,000 GPH, size the overflow for 1,200 GPH to prevent flooding. Use a gate valve on the drain line (Indytraveler83’s solution) to fine-tune flow and eliminate gurgling. For the return, choose a pump with 5-10x your tank’s volume in turnover—e.g., 5,000 GPH for a 500L tank.
Start Simple, Then Scale Up
badluckman’s advice is golden: begin with socks → skimmer → return. Run this for 2 months to stabilize parameters before adding a refugium or reactor. VictorC3 phased out his skimmer gradually after establishing cryptic filtration—never overhaul everything at once.
Choose Media That Earns Its Space
Marine Pure blocks (favored by Euphyllia97 and mcshams) boost biological filtration but demand space. Plecosam warns: “They’re too brittle—handle gently.” If space is tight, skip biomedia entirely. rfgonzo and waleedreef prove live rock in the display provides sufficient bacteria when paired with a skimmer.
Schedule Maintenance Around Your Life
The #1 sump failure isn’t equipment—it’s inconsistent upkeep. badluckman cleans socks twice weekly; VictorC3 swaps carbon monthly. Track these in your phone:
– Filter socks: Clean when 50% clogged (every 3-7 days)
– Skimmer cup: Empty when 1/3 full
– Chaeto: Prune 30% weekly to prevent decay
– Carbon: Replace monthly
Avoid These 3 Costly Sump Setup Mistakes
Skipping the Bubble Trap Chamber
Microbubbles in your display tank aren’t just annoying—they scatter light, reducing coral growth. rfgonzo’s “three bubble trap baffles” before the return pump solve this by forcing water through a zigzag path that separates air. If you see bubbles in your display, add a final 2-inch-wide chamber where water slows dramatically before the return pump.
Overloading with Unnecessary Media
cloak’s mantra—”no baffles, no socks, no refugium”—works because he avoids “filter creep.” Adding reactors, bio-balls, or sponges without a specific goal creates dead zones where detritus rots. waleedreef states bluntly: “Filter is waste of money and time” for his clear-water system. Only add components that target your current water issues.
Ignoring Return Pump Safety
A return pump running dry burns out in minutes. Ensure the pump sits 1-2 inches above the sump’s base so debris doesn’t get sucked in. mcshams uses two 150W heaters here—but position them away from the pump intake to avoid overheating. Most critical: during power outages, the water level must stay above the pump. Mark “normal” and “power-off” levels on your sump with a permanent marker.
Final Note: Your Path to a Thriving Reef Starts Here
The perfect reef aquarium sump setup isn’t the most complex—it’s the one you’ll maintain consistently. As VictorC3 proves with his low-effort cryptic system, or cloak with his skimmer-only simplicity, success hinges on matching your sump to your lifestyle. Start minimalist: overflow → filter socks → skimmer → return pump. Master this foundation before adding refugiums or reactors. Remember badluckman’s twice-weekly sock cleaning or VictorC3’s monthly carbon swaps—these small habits prevent nitrate spikes that crash reefs. Within 6 months, you’ll have the crystal-clear water, stable parameters, and thriving corals that make all the effort worthwhile. Now go build the engine room your reef deserves.