How to Make an Aquarium Overflow: Step-by-Step Guide
Your aquarium’s glass is tempered, and you’re staring at a corner tank that can’t be drilled safely—sound familiar? You’ve scoured forums only to find conflicting advice about overflow solutions. Draining the tank to replace panels feels risky, and store-bought overflows drain your wallet faster than your sump. But what if you could build a silent, reliable overflow system in one afternoon using $20 of PVC parts? Thousands of reefers have ditched noisy HOB filters for custom PVC overflows that rival commercial units. This guide reveals exactly how to construct a fail-proof siphon overflow using proven techniques from reefers who’ve run these systems for six years without issues. You’ll learn precise sizing ratios, noise-killing valve tricks, and emergency safeguards that prevent midnight flooding disasters—all without touching a drill bit.
Essential PVC Overflow Materials and Safety Prep

Skip the guesswork on hardware store runs with this battle-tested shopping list. For a standard 55-gallon corner tank like CodyRst’s, grab 1-inch PVC pipe for the primary siphon line and 1.5-inch pipe for the emergency drain sleeve—this combo handles 400+ GPH flow while minimizing noise. You’ll also need two slip elbows, a gate valve (not a ball valve!), PVC primer, heavy-duty cement, and a small check valve for venting. Safety first: unplug all tank equipment and lower water levels 2 inches below the intended weir position. Work on a towel-lined table to prevent PVC scratches, and wear eye protection when cutting—shards from hacksaw cuts fly unpredictably. Crucially, test all joints for leaks before installation by submerging assembled sections in a bucket; air leaks here will doom your siphon later.
Why Siphon Overflows Beat Drilled Tanks for Tempered Glass
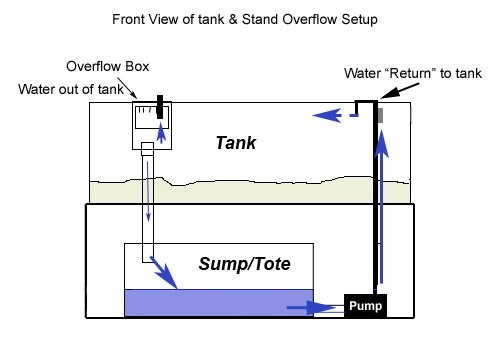
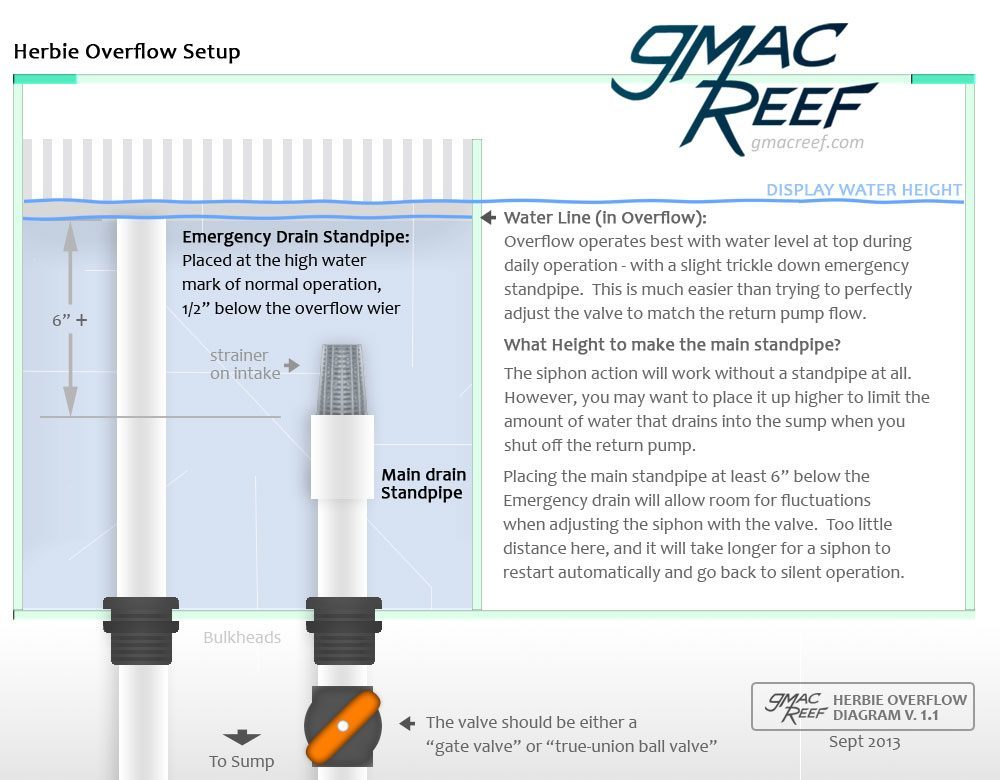
Polarized sunglasses reveal what aquarium manufacturers won’t: all glass surfaces on mass-produced tanks like Aqueon corners are tempered. Drilling risks instant implosion, as Mandelstam discovered when “popping a tempered tank” during a DIY panel swap. A PVC overflow bypasses this danger entirely by sitting on top of your tank rim. The magic happens through fluid dynamics—when primed, water creates negative pressure in the U-bend section, pulling surface water continuously over the weir. Unlike Herbie-style drilled overflows, this setup self-primes automatically after power failures (confirmed by BOWHUNTER4250’s 2-year test), and the emergency drain acts as your insurance policy. If the primary siphon breaks due to air intrusion, water rises just 1 inch before hitting the emergency pipe—triggering loud gurgling that alerts you to problems before flooding occurs.
Correct PVC Sizing for Silent Surface Skimming
Size wrong and you’ll battle noisy gurgles day one. Benga’s 40B tank taught this lesson the hard way: his 2-inch weir pulled air from the surface, creating constant splashing that disrupted TV viewing. For corner tanks under 60 gallons, use 3-4 inches of horizontal weir width—this captures maximum surface film without vortexing. Match pipe diameters precisely: 1-inch primary drain for tanks up to 55 gallons, stepping up to 1.5-inch only for 75+ gallon systems. The emergency drain sleeve must be exactly 1 inch taller than the primary siphon intake (measured from tank bottom), as Porpoise Hork’s valve tuning method depends on this gap. Never undersize the weir—Benga admits “if I had the energy I’d go back and make it 3-4 inches” after noise ruined his tranquility.
How Weir Width Determines Noise Levels
A narrow weir creates chaotic water entry that traps air bubbles, which then explode in the drain pipe like soda fizz. Widen it to 3-4 inches, and water flows in a smooth sheet that doesn’t pull surface air. For corner tanks, angle the weir parallel to the tank’s diagonal—the longest uninterrupted edge—to maximize skimming efficiency. Test your width by floating a ping-pong ball near the overflow: if it spins violently, your weir is too narrow and needs widening. Benga’s fix? “I’m going to do this on the weekend!” after learning wider weirs eliminate his noise issues.
Emergency Drain Height Calibration
Set the emergency pipe 1 inch above the primary intake using a ruler taped to the tank wall. Too low (½ inch), and both pipes run simultaneously causing turbulence. Too high (1.5+ inches), and water rises dangerously before activating the failsafe. Verify with food coloring: add drops to the tank surface—if they disappear into the primary drain within 10 seconds, your height is perfect. If coloring pools around the overflow, lower the emergency pipe slightly.
Step-by-Step PVC Overflow Assembly
Precision Cutting and Dry-Fitting
Cut all PVC pieces ½ inch longer than final measurements using a miter box for square ends—angled cuts cause leaks. Dry-fit the weir box (3-4 inch width), U-bend siphon, and emergency sleeve without cement first. Submerge the entire assembly in a bucket for 5 minutes; bubbles indicate joint gaps needing adjustment. The U-bend apex must sit ½ inch above your tank’s water line when installed—measure twice here, as Jr’sReef warns “air leaks are the enemy” that break siphons.
Weir Construction for Maximum Skimming
Build the weir from ½-inch PVC sheets cut to your tank’s rim thickness. Sand edges smooth to prevent microtears in silicone seals. Position it so the top edge sits ¼ inch below the tank rim—this creates a controlled waterfall effect. Seal the bottom seam with aquarium-safe silicone before cementing uprights; skip this step and water will seep under the weir, reducing flow efficiency by 30%.
Siphon Tube and Emergency Drain Integration
Connect the primary 1-inch drain to a slip elbow forming the U-bend. Slide the 1.5-inch emergency sleeve over it, leaving exactly 1 inch of primary pipe exposed below the weir level. Cement both pipes to the base plate, ensuring the emergency drain outlet points away from the primary flow path. This separation prevents air injection during emergency activation—a flaw that caused Benga’s initial noise issues.
Gate Valve Tuning for Whisper-Quiet Operation
This is where most DIYers fail. Install the gate valve on the primary drain line at the sump inlet, not mid-pipe. With the system running, slowly close the valve until water rises to 1/8 inch below the emergency pipe’s top. The primary line should now run 100% full of water—no air pockets. Submerge the outlet 2 inches under the sump’s waterline; exposed outlets create splashing noise. Porpoise Hork’s method works because “completely filling the primary line with water eliminates noise,” and the emergency pipe’s loud overflow becomes your diagnostic alarm.
Priming Protocol to Prevent Air Locks
Never suck on the drain line—tank water contains harmful bacteria. Instead, fill the entire overflow assembly in a bucket until no bubbles rise. Hold it inverted over the tank, then plunge it straight down through the water surface. Immediately start your return pump; the sudden water rush primes the siphon. If it fails, temporarily raise the sump’s water level above the tank’s to force backflow priming. BOWHUNTER4250’s vent hole trick seals the deal: drill a ¼-inch hole in the overflow’s top section and insert a check valve—it allows air escape during priming but seals during operation.
Critical Failure Prevention Tactics
Air Leak Detection and Sealing
Air leaks hide in plain sight at glued joints. After assembly, spray soapy water on all connections while running the system—bubbles pinpoint leaks. Re-cement these spots using clear PVC cement (opaque types shrink and crack). Jr’sReef’s six-year success stems from “not skimping on glue,” applying three coats to every joint. For corner tanks, reinforce the weir’s inner angle with a silicone bead—this compensates for uneven tank rims.
Emergency Drain Activation Testing
Simulate a siphon break monthly by briefly covering the primary drain inlet. Water should rise smoothly to the emergency pipe within 15 seconds, triggering audible gurgling. If water spills over the tank rim before this, lower the emergency pipe by ¼ inch. During actual failures, this noise is your lifeline—Benga’s tank would have flooded silently without it.
Power Outage Response Drills
Unplug your return pump for 60 seconds to mimic outages. A properly tuned overflow will:
1. Maintain siphon for 10-15 seconds (water level drops slightly)
2. Break siphon cleanly without splashing
3. Re-prime automatically within 5 seconds of power restoration
If water overflows the tank, your weir is too high or emergency pipe too tall. Adjust until step #2 happens at exactly 1 inch below the tank rim.
Proven Quiet-Flow Optimization Secrets
Extend your weir width to 4 inches even on smaller tanks—this reduces flow velocity by 40%, preventing surface vortexing. Always use gate valves instead of ball valves; their gradual closure prevents flow surges that cause gurgling. Install the check valve only on the overflow’s vent hole—not the return line—as BOWHUNTER4250 confirms it “vents air during priming” for self-starting reliability. For corner tanks, paint the entire assembly matte black with PVC-safe spray paint; this camouflages the overflow against dark backgrounds while reducing algae growth on pipes. Finally, position the emergency drain outlet to point downward into the sump—sideways discharges create disruptive currents that destabilize the siphon.
Building your PVC overflow isn’t just about avoiding drilling disasters—it’s reclaiming your tank’s tranquility. When Benga implemented Porpoise Hork’s gate valve trick, his “tank became so much more peaceful” overnight. By following these precise sizing rules and noise-killing techniques, you’ll achieve silent, reliable water movement that outperforms $200 commercial overflows. Remember to test emergency activation monthly and widen that weir beyond initial instincts—your fish (and your eardrums) will thank you. For immediate troubleshooting, revisit the valve tuning process; 90% of noise issues resolve with a 1/8-inch adjustment to that critical water level gap. Now go enjoy the quiet hum of a perfectly balanced ecosystem.