How Aquarium Heaters Work: Simple Guide
Nothing ruins an aquarium faster than unstable water temperature. When your tropical fish shiver in cold water or gasp in overheated conditions, their immune systems collapse, inviting disease and death. Understanding how aquarium heaters work transforms you from a passive observer to an active temperature manager who can prevent disasters before they happen. This guide reveals the precise mechanics behind these life-saving devices, showing you exactly how they maintain that critical 78°F sweet spot your fish need to thrive.
Most beginners assume aquarium heaters simply “make water warm,” but the reality involves sophisticated temperature regulation that operates 24/7 without your intervention. By the end of this guide, you’ll know how to select, calibrate, and maintain your heater to create a stable aquatic environment—plus recognize warning signs before a malfunction turns deadly. Let’s dive into the engineering that keeps your underwater world perfectly balanced.
Why Your 20-Gallon Tank Needs Exactly 60-100W of Heating Power
Choosing the wrong wattage creates temperature instability that stresses your fish. The precise formula? You need 3-5 watts of heating power per actual gallon of water in your tank. For a standard 20-gallon aquarium, that means a 60-100W heater provides optimal performance. If your room temperature runs cooler than 72°F, lean toward the higher end of that range. Larger tanks over 50 gallons benefit from using two smaller heaters instead of one massive unit—this provides fail-safe protection and more even heat distribution.
Critical placement mistake: Positioning your heater in a dead water zone creates dangerous temperature stratification. Always mount submersible heaters near your filter’s outflow where water movement ensures heated water circulates throughout the tank. For maximum effectiveness, angle the heater at 45 degrees rather than standing it vertically—this prevents air pockets from forming inside the glass tube that could cause thermal stress cracks. Never exceed the manufacturer’s maximum submersion line, as partial exposure creates hot spots that damage the heater element.
Bimetallic Strip Mechanics: Your Heater’s Temperature Switch
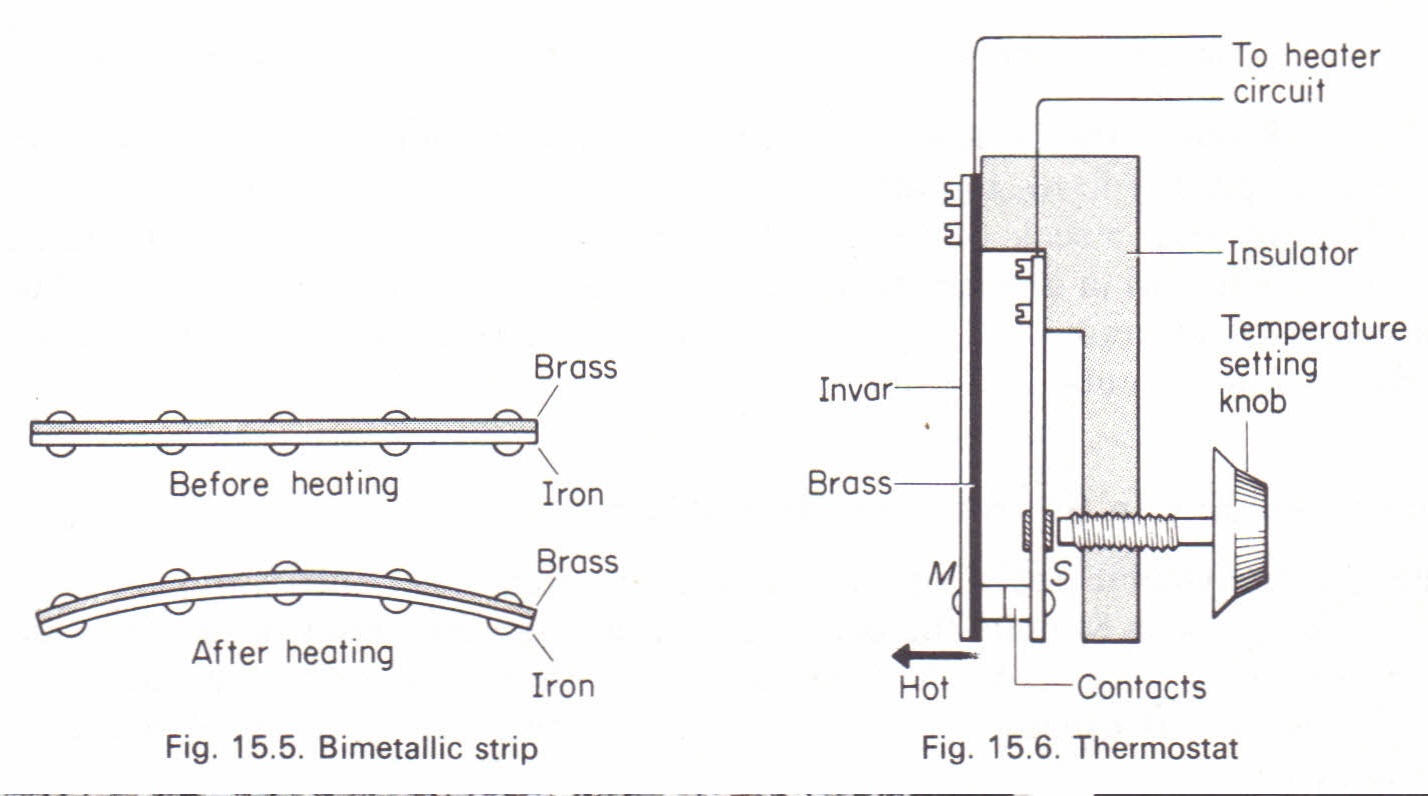
The magic behind most aquarium heaters happens inside a tiny bimetallic strip. This clever component contains two different metals bonded together, each expanding at different rates when heated. When water temperature drops below your set point, the strip stays straight, completing an electrical circuit that activates the heating element. As water warms, the metals expand unevenly, bending the strip until it breaks the circuit—shutting off the heater precisely at your target temperature.
This automatic on-off cycle happens constantly, maintaining stability within 1-2 degrees of your set point. When you notice the heater’s indicator light flickering on and off regularly, that’s the bimetallic strip doing its job correctly. However, cheap heaters often use poorly calibrated strips that cause wider temperature swings—investing in a quality unit pays off in stable conditions your fish require.
Why Dial Settings Lie: The Truth About Heater Temperature Accuracy

Your heater’s temperature dial is merely a reference point, not an accurate measurement. Most budget heaters require calibration because their internal thermostats don’t match actual water temperatures. You might set the dial to 78°F but discover through independent measurement that your tank actually runs at 81°F. This discrepancy happens because water flow, placement, and manufacturing tolerances affect thermostat performance.
Essential calibration procedure: After installing your heater, place a separate glass or digital thermometer diagonally across the tank from the heater. Wait 24 hours for temperature stabilization, then compare readings. If your thermometer shows 76°F while the heater dial reads 78°F, adjust the dial upward until you achieve your target temperature. Mark this calibrated setting with a waterproof marker—this becomes your true reference point. Never skip this step; accurate temperature is non-negotiable for fish health.
The 30-Minute Rule: Preventing Glass Cracks During Water Changes
Heater breakage during maintenance causes more aquarium disasters than faulty thermostats. The critical safety protocol? Always unplug your heater and wait at least 30 minutes before removing it from the water. Why? The glass tube operates at 10-15°F above water temperature. Removing a hot heater exposes it to cooler air, creating thermal shock that cracks the glass instantly.
Visual inspection checklist: During water changes, examine your heater for:
– Cracks or hairline fractures in the glass
– White mineral deposits coating the element
– Condensation or water droplets inside the tube
– Discoloration of the heating element
If you see water inside the glass tube or persistent condensation, replace the heater immediately—do not attempt repairs. A compromised heater risks electrical shock to you and lethal temperature spikes for your fish.
Why Two 50W Heaters Beat One 100W Unit for Temperature Stability
Installing multiple smaller heaters provides critical redundancy that prevents catastrophic temperature crashes. If your single 100W heater fails in a 20-gallon tank, temperatures can drop 10°F overnight—enough to trigger disease outbreaks. With two 50W units, if one fails, the other maintains baseline warmth while you arrange a replacement.
Strategic placement: Position dual heaters at opposite ends of the tank, both near filter outflow for maximum circulation. Set both to the same temperature but stagger their placement—one near the front viewing area, the other toward the back. This creates overlapping heat zones that eliminate cold spots. For tanks longer than 36 inches, consider adding a third heater to maintain consistent temperatures from end to end.
Troubleshooting Guide: Fixing Common Heater Temperature Problems
When your aquarium temperature drifts unexpectedly, follow this diagnostic sequence before replacing equipment. First, verify readings with a separate thermometer—many “heater problems” are simply inaccurate dials. If the water temperature doesn’t match your thermometer, check these common failure points:
Why Your Heater Won’t Turn On (And How to Fix It in 5 Minutes)
Most “dead” heaters suffer from simple power issues rather than internal failures. Check these in order:
1. Confirm the outlet works by plugging in another device
2. Inspect the heater’s power cord for damage or fraying
3. Test the GFCI outlet if your aquarium uses one
4. Examine the heater’s fuse (if equipped) for discoloration
If the heater remains unresponsive, the thermostat may be stuck in the “off” position. Unplug the unit, wait 30 minutes, then gently rotate it horizontally while submerged—this can free a jammed bimetallic strip. If the indicator light still doesn’t illuminate, replace the heater.
The Hidden Danger of a Stuck Thermostat and How to Address It
A thermostat stuck in the “on” position causes dangerous overheating that can cook your fish alive. Warning signs include:
– Heater indicator light stays constantly illuminated
– Water temperature rises above set point and keeps climbing
– Visible steam or excessive bubbling around the heater
Immediate action: Unplug the heater immediately and perform a partial water change with cooler water to lower temperatures gradually. Never add cold water directly to an overheated tank—this shocks fish more than sustained warmth. After cooling the tank, replace the faulty heater before reconnecting power.
Titanium Heaters: Why Saltwater Tanks Need Special Temperature Solutions
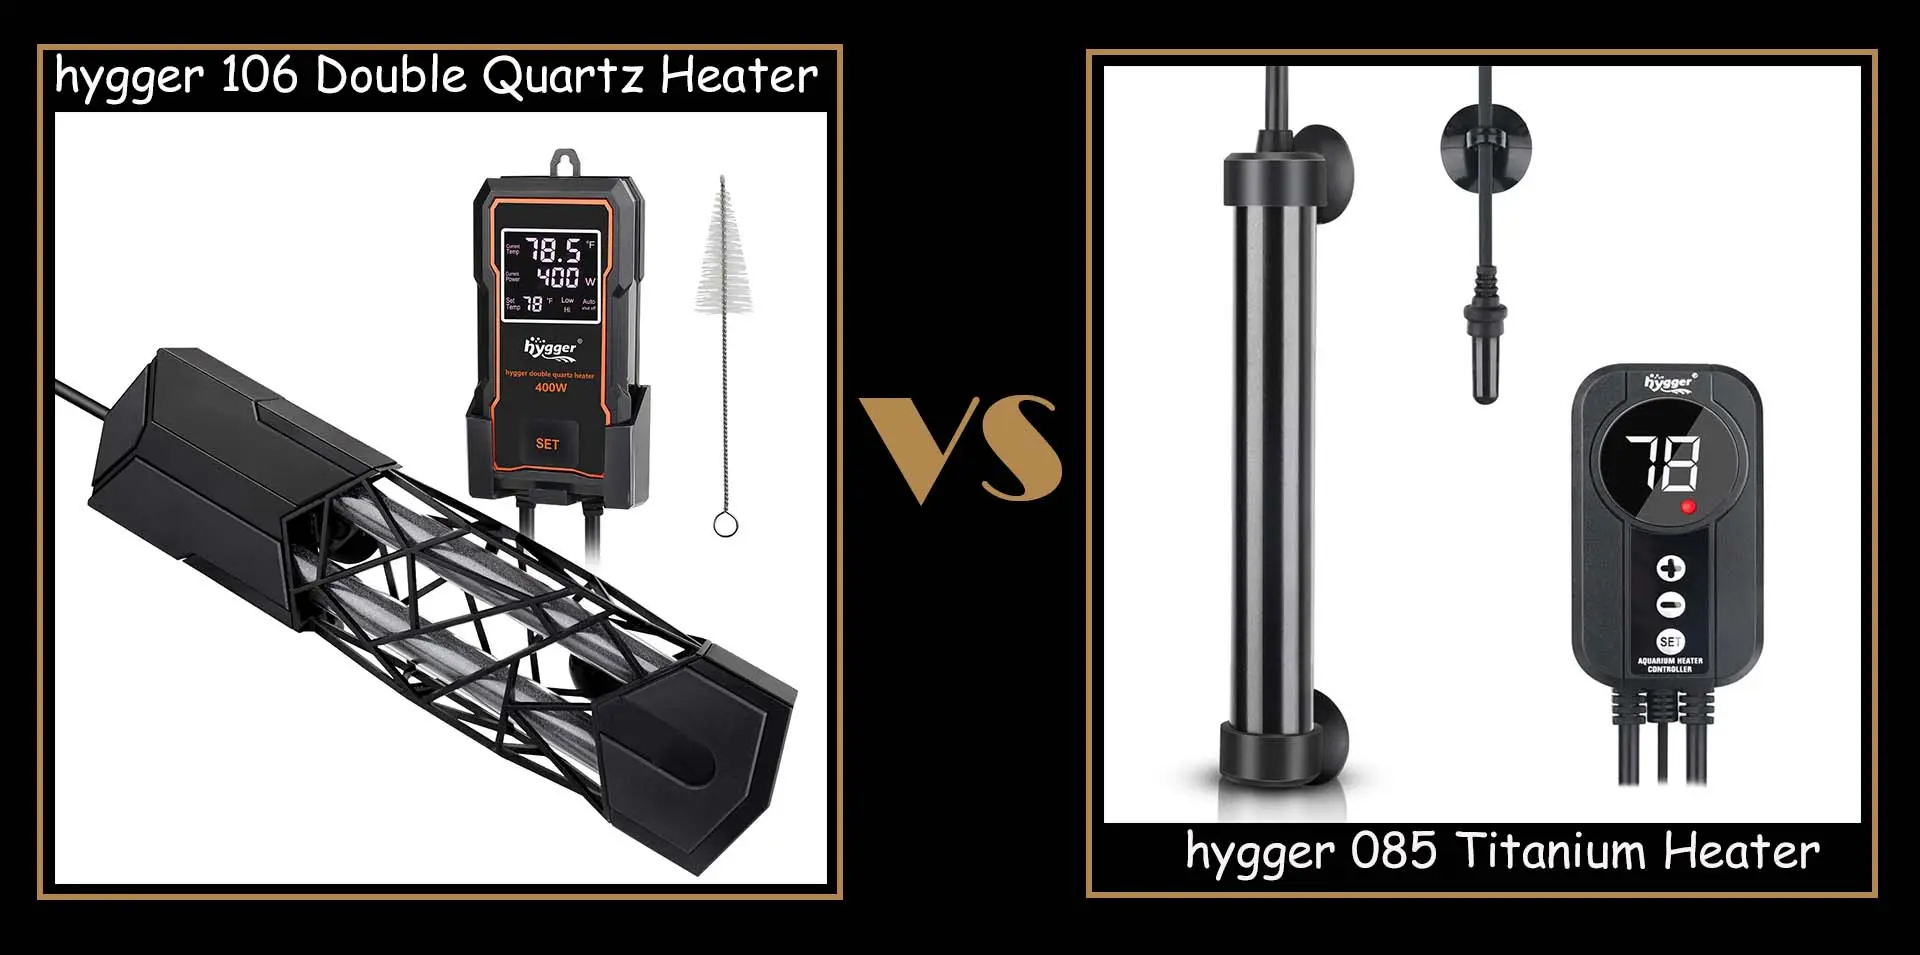
Saltwater environments demand specialized heating solutions that resist corrosion. Standard glass heaters develop mineral buildup that insulates the element, reducing efficiency and causing inaccurate temperature control. Titanium heaters solve this with corrosion-resistant elements that maintain consistent performance in saltwater.
Critical advantage: Titanium units connect to external controllers that monitor temperature with laboratory-grade accuracy—essential for reef tanks where corals require stability within 0.5°F. The titanium element itself contains no glass components, eliminating breakage risks. While more expensive upfront, they last 2-3 times longer than standard heaters in saltwater applications, making them cost-effective long-term.
External Controllers: The Ultimate Safety Net for Temperature Stability

An external temperature controller like an Inkbird provides critical protection that heater thermostats alone cannot match. You plug your heater into the controller, which uses a separate probe to monitor tank temperature independently. If your heater’s thermostat fails in the “on” position, the controller cuts power before temperatures become lethal.
Setup protocol: Position the controller’s probe midway between heater and thermometer, away from direct heater contact. Set the safety cutoff 2-3°F above your normal operating temperature—this allows normal fluctuations while preventing dangerous overheating. For coldwater tanks, set a low-temperature alarm that triggers a backup heater if room temperatures drop unexpectedly.
Final temperature control checklist: Always use a separate thermometer to verify readings, position heaters near filter outflow, wait 30 minutes before handling hot units, and consider dual heaters for critical tanks. Regularly inspect for mineral buildup and physical damage during water changes. Remember that proper heater function isn’t just about warmth—it’s about creating the stable environment your fish need to thrive. When you understand how aquarium heaters work, you transform from equipment user to aquatic environment manager who prevents problems before they threaten your fish’s health.