How to Build an Aquarium Canopy
Frustrated by harsh LED glare disrupting your living room ambiance or light spill contaminating your fish tank’s natural day/night cycle? A custom aquarium canopy solves both problems while giving your setup a polished, professional look. Unlike store-bought models that rarely fit perfectly or match your décor, building your own canopy lets you control every detail—from ventilation for heat-prone lights to hidden wire channels for a clean aesthetic. You’ll create a functional cover that reduces evaporation by up to 30% while providing easy access for feeding and maintenance.
This guide cuts through the guesswork of how to make an aquarium canopy using proven techniques from real builds. Forget flimsy cardboard or expensive pre-fab units that warp in humidity. With basic woodworking skills and $80-$150 in materials, you’ll craft a durable canopy tailored to your tank’s exact dimensions. We’ll cover critical steps most tutorials miss—like calculating the precise support lip depth to avoid crushing glass lids—and share humidity-proof finishing tricks that prevent mold outbreaks. By the end, you’ll have a sleek, functional canopy that elevates both your aquarium and your room’s design.
Must-Have Tools for Building Your Canopy

Skip this step and you’ll fight crooked cuts or stripped screws mid-build. Gather these tools before measuring your tank to avoid frustrating interruptions. Focus on precision tools that handle plywood cleanly—critical for seamless joints in humid environments.
Critical Cutting Tools
- Table saw with dado stack (or router + straight bit): Creates the essential groove for your support lip (more on this later)
- 10-inch circular saw with guide rail: For straight rips if you lack a table saw
- Kreg Jig pocket hole system: Makes invisible, ultra-strong joints—non-negotiable for clean edges
- Orbital sander (120/220-grit paper): Smooths plywood edges that chip easily
Why Dado Blades Trump Router Work
While routers work, a dado blade stack cuts perfect, consistent grooves in one pass. As one builder noted: “My Dewalt couldn’t handle dado blades, forcing multiple router passes that left uneven grooves.” If you lack a table saw, rent one—this groove is the canopy’s foundation.
Measuring Your Tank Like a Pro
Never measure the glass—only the outer frame. This critical mistake causes canopies to wobble or crush tank lids. Here’s the exact method used in successful builds:
Step-by-Step Measurement Protocol
- Measure the outside width and depth of your tank’s plastic rim (e.g., 48″ x 18″ for a 90-gallon)
- Subtract 1/8″ from each dimension: Allows easy on/off access without gaps
- Determine height: 8-12 inches is ideal—tall enough for hand access but short enough to avoid light loss
- Sketch a diagram labeling all panels: Top, front, back, two sides
Pro Tip: Place masking tape on your tank frame and mark cut lines directly. Test-fit cardboard mockups before cutting plywood—saves $20 in wasted material.
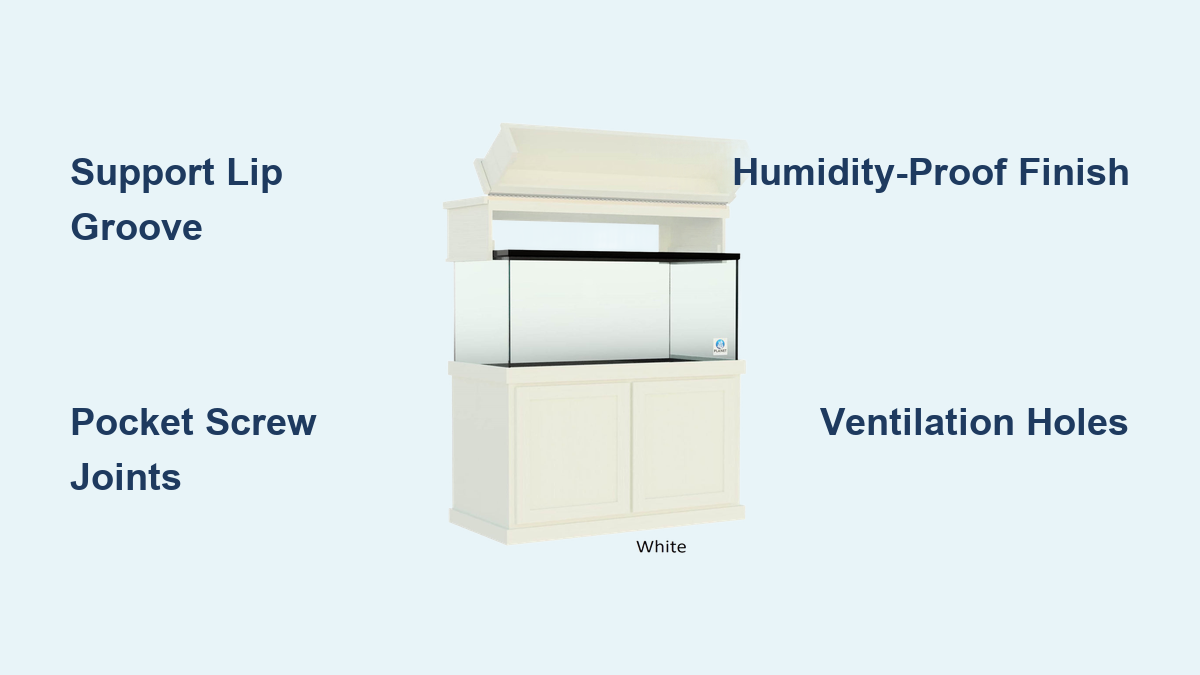
Building the Support Lip That Prevents Catastrophes
This hidden feature is why DIY canopies outlast store-bought ones. The lip rests only on the tank’s plastic frame—not the glass—distributing weight safely. Skip this and you risk cracked aquariums.
Creating the Weight-Bearing Groove
- Set your dado stack to match your tank frame’s thickness (typically 1/2″)
- Cut a groove 1/2″ deep along the bottom inside edge of all four side panels
- Test with a scrap: Slide a 1/2″x1/2″ wood strip into the groove—it should sit flush with the panel bottom
- Insert strips into grooves, securing with wood glue only (no screws)
Visual Cue: When placed on your tank, the canopy should sit 1/8″ above the water line with no glass contact. If it touches glass, shave 1/16″ off the support strips.
Assembling Panels with Invisible Joints
Pocket screws create rock-solid corners that won’t loosen in humidity—unlike butt joints. Follow this sequence to avoid misalignment:
Foolproof Assembly Order
- Attach front and back panels to side panels using 1¼” pocket screws + wood glue
- Clamp corners for 30 minutes until glue sets
- Install the top panel last with 1½” screws through the top into side panels
- Reinforce with corner braces inside if housing heavy lighting
Critical Mistake to Avoid: Screwing through outer faces leaves visible holes that trap moisture. Pocket screws keep all hardware hidden inside the canopy.
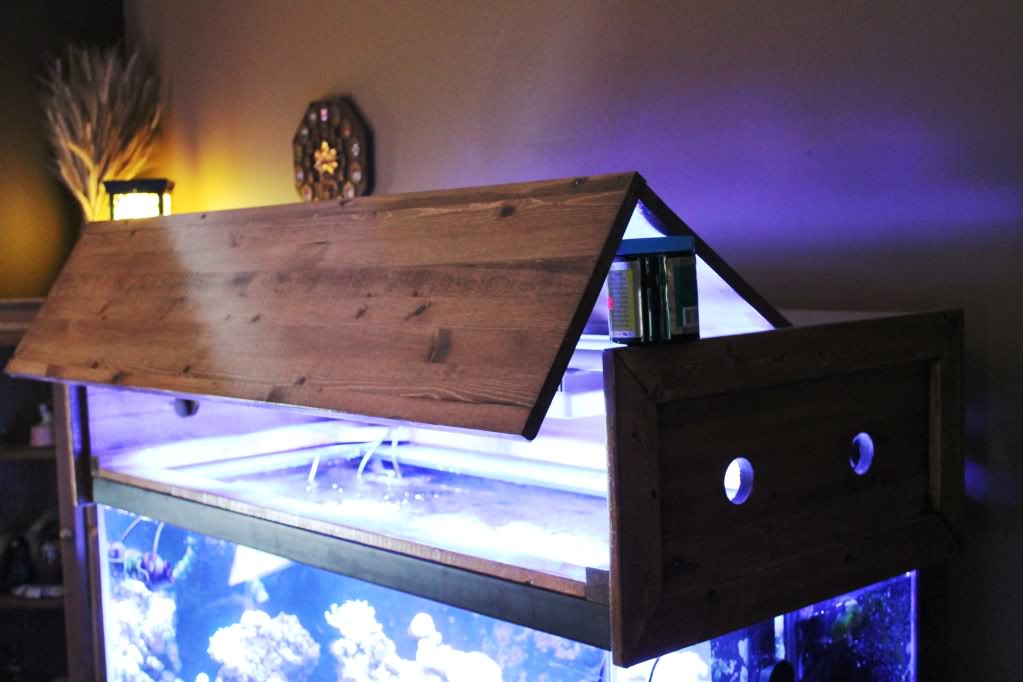
Installing Smart Access Doors
Your arm must fit through the opening to feed fish or adjust equipment—no tiny peepholes. A 10″ tall door provides perfect access without compromising structural integrity.
Hinge Installation Checklist
- Use stainless steel or brass butt hinges (never steel—they rust)
- Position hinges 1″ from top/bottom of door frame
- Cut hinge mortises with a chisel for flush mounting
- Secure with magnetic push latches (no protruding knobs)
Pro Tip: Make doors 1/2″ wider than the opening. They’ll overlap the frame, hiding gaps and creating a seamless look when closed.
Humidity-Proof Finishing That Prevents Mold
This step makes or breaks your canopy’s lifespan. Standard paint peels in weeks, leading to wood rot. One builder’s cabinet developed black mold within months—yours won’t.
4-Step Waterproofing Process
- Sand to 220-grit smoothness—no visible scratches
- Apply oil-based primer to all surfaces (inside/out)
- Paint with 2 thin coats of semi-gloss bathroom/kitchen paint
- Seal interior with non-toxic polyurethane (marine-grade for saltwater tanks)
Expert Note: Matte black interior paint reduces light reflection and hides wires. As one user confirmed: “Spraying the inside matte black made my LED glow disappear from the room.”
Managing Heat and Wires Like a Pro

Overheating kills lights and stresses fish. Poor wire management creates tripping hazards. Fix both in 20 minutes.
Ventilation Hacks That Work
- Drill two 1.5″ holes in the back panel near the top
- Install a 40mm PC fan ($8 on Amazon) blowing outward
- For saltwater tanks: Add a 1/2″ notch at the back bottom for airline tubes
Cord Exit Strategy
- Drill a 1.25″ hole in the top-rear corner
- Insert a rubber grommet to prevent wire fraying
- Bundle cords with Velcro straps along interior corners
- Route all cords through the single exit point
Warning: Never block ventilation holes with decor. Test heat buildup by running lights for 2 hours—surface should feel warm but not hot.
Installing Your Canopy Without Disaster
The final test: Will it fit perfectly? Does it crush your glass lids? Follow this checklist:
Safety-First Placement
- Lift canopy straight up—never slide it onto the tank
- Confirm full contact between support lip and tank frame
- Check for 1/8″ clearance above water line
- Verify doors open/close smoothly with glass lids in place
Critical: During water changes, always remove the canopy. Its weight creates a tipping hazard when leaning over the tank.
Why This Simple Canopy Beats Store-Bought Models
After building three canopies this way, the advantages are undeniable. You gain custom height for your arm size, perfect wire channels for your equipment, and décor-matching finishes—all while avoiding the $200+ cost of commercial units. Most importantly, the support lip design eliminates the #1 failure point: glass pressure. One builder summed it up: “I’m no expert woodworker, but this simple method gave me a canopy that looks pro and lasts.”
For those avoiding power tools, try the picture-frame alternative: Attach a 1×2 wood strip inside an old frame to create a resting shelf, then paint it black. It won’t hide equipment like a full canopy, but it blocks glare instantly.
Final Note: A well-built canopy transforms your aquarium from a functional tank into a living artwork. By focusing on the support lip, humidity-proof finishes, and smart access points, you’ve created a solution that protects your investment for years. Now enjoy your tank’s natural glow without light pollution—and take pride in the custom touch only DIY can provide. For your next project, consider adding dimmable LED strips inside the canopy for moonlight effects.