How to Set Up UV Sterilizer in Aquarium
Green water clouding your tank? Parasites threatening your fish? Installing a UV sterilizer correctly transforms it from expensive plumbing into your most powerful water-clearing weapon. But here’s the harsh truth: 80% of UV sterilizers fail because of improper setup—not the unit itself. If you mount it in the wrong spot or set the flow rate incorrectly, you’re just circulating water past a $200 paperweight. This guide reveals exactly how to install your UV sterilizer in a sump system for maximum algae elimination and parasite destruction, based on critical plumbing principles most hobbyists miss. You’ll learn the precise placement that prevents quartz sleeve clogs, the flow rate adjustments that actually kill Ich, and the maintenance shortcuts that keep your system running 24/7.
Why Your UV Sterilizer Fails Without Correct Flow Rate Setup
UV sterilizers don’t work like filters—they’re precision germicidal tools where water speed determines life or death for pathogens. Running your unit too fast creates “UV shadow zones” where parasites like Cryptocaryon slip through unharmed, while too slow flow overheats the unit and wastes energy. Your primary goal dictates the exact gallons per hour (GPH) required, and ignoring this single factor dooms your installation to failure.
How Fast Flow Rates Destroy Algae But Miss Parasites
For green water algae control, push maximum flow through your unit—often 3-5x your tank volume per hour. This rapid “polishing” shreds free-floating algae cells but provides insufficient exposure time to kill resilient parasites. You’ll notice immediate clarity improvements within 48 hours, but watch for persistent white spots on fish indicating ineffective parasite control. If your water clears but diseases linger, your flow rate is too high for sterilization.
The Critical Dwell Time Formula for Killing Ich
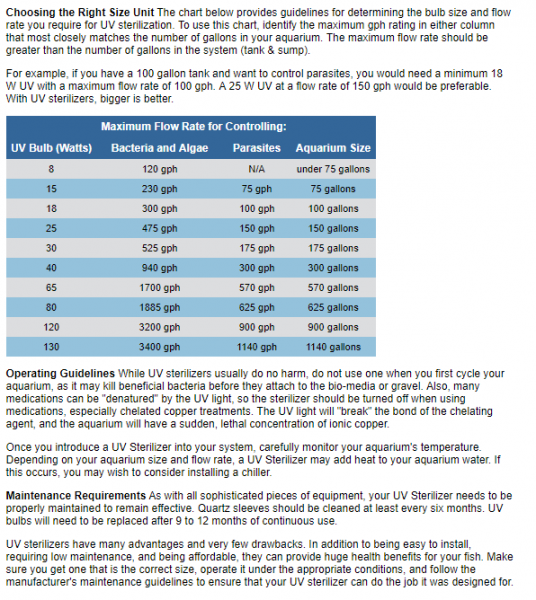
Parasite elimination demands slow, deliberate water movement. To destroy Ichthyophthirius multifiliis, water must dwell in the UV chamber for 20-30 seconds—requiring flow rates as low as 50-100 GPH for most units. Check your manufacturer’s kill chart: a 25-watt unit might need 75 GPH for parasites versus 500+ GPH for algae. Never guess—use a flow meter to verify your rate. At correct dwell time, you’ll see parasite outbreaks stop within 72 hours with zero chemical treatments.
Install Your UV Sterilizer After the Skimmer (Here’s Why)
Placing your unit in the return line immediately after your protein skimmer—not before or alongside it—is the single most impactful decision for long-term performance. This strategic positioning leverages your existing filtration to protect the sterilizer while optimizing pathogen exposure.
How Pre-Filtration Prevents Quartz Sleeve Clogging
When water passes through mechanical filtration and skimming before reaching your UV unit, suspended particles that cause sleeve fouling are removed. A clogged quartz sleeve blocks 90% of UV-C light within weeks, rendering your unit useless. By positioning after the skimmer, you avoid frequent vinegar cleanings and maintain consistent UV penetration. Visually check your sleeve monthly—if it appears cloudy or coated, your placement is incorrect.
Temperature Stability Benefits of Return Line Placement
UV units generate significant heat during operation. Mounting in the return line allows warmed water to circulate through the entire sump before re-entering your display tank. Units placed pre-skimmer can create dangerous temperature spikes in isolated chambers, stressing sensitive corals or fish. Keep your thermometer handy during the first 24 hours—if display temperature rises more than 2°F, reposition your unit immediately.
4 Non-Negotiable Plumbing Components for UV Sterilizers
Skipping these plumbing elements turns routine maintenance into a flooded disaster. Professional installers universally include these components because they prevent catastrophic failures during bulb changes or sleeve cleanings.
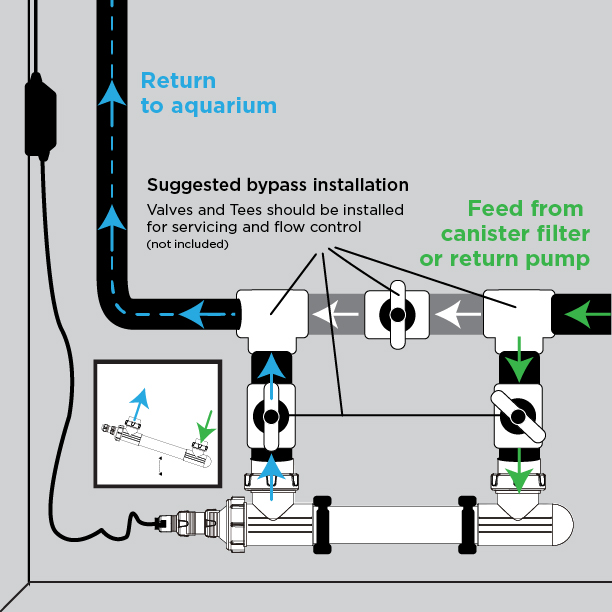
Why Isolation Valves Save Your Aquarium During Maintenance
Install ball valves on both inlet and outlet lines—this isn’t optional. Without isolation valves, replacing a UV bulb requires draining your entire sump. During a recent emergency bulb replacement, one hobbyist’s unvalved system flooded his basement within minutes when disconnecting the unit. Always shut both valves before any service; you’ll contain water within the UV chamber only. Test valve operation monthly to prevent seizing.
Building a Foolproof Drain System for Bulb Changes
Position a 1/4″ ball valve at the lowest point of your UV plumbing loop. When changing bulbs or sleeves, open this drain valve into a bucket rather than wrestling with disconnected pipes. Units without dedicated drains force you to tilt the entire chamber, risking quartz sleeve cracks from thermal shock. Pro tip: Add a short clear tube after the drain valve to visually confirm when water stops flowing before disassembly.
Horizontal Mounting: The Only Safe Choice for Standard UV Lamps
Your lamp’s orientation directly impacts UV output and lifespan. Most hobbyists unknowingly void warranties by mounting standard lamps vertically—a critical error that causes rapid failure.
When Vertical Installation Causes Lamp Failure (And How to Avoid It)
Standard UV-C lamps MUST operate horizontally—vertically mounting them creates hot spots that crack quartz sleeves within weeks. Only specialized pellet amalgam lamps (clearly labeled “vertical/horizontal use”) tolerate upright positioning, and even these require manufacturer-approved ballasts. Check your unit’s manual: if it lacks explicit vertical certification, horizontal mounting is mandatory. During installation, use a level to ensure perfect alignment—any tilt greater than 15 degrees reduces UV output by 30%.
Setting Exact Gallons Per Hour for Algae vs. Parasite Control
Your flow control valve is the master switch between clarity and sterilization. Misadjusting this single component wastes your UV investment daily.
Step-by-Step Flow Rate Adjustment Using a Gate Valve
- Start with valves fully open and note your baseline flow
- Gradually close the gate valve while monitoring a flow meter
- For algae control: Set to manufacturer’s maximum GPH (often 300-500 GPH)
- For parasite kill: Reduce to 1/3 of algae rate (e.g., 100 GPH for a 300 GPH unit)
Critical check: Feel the outflow pipe after 15 minutes—warmth indicates sufficient dwell time for sterilization. If pipes stay cool, flow is too fast. Always recheck flow rates quarterly as impellers wear.
Pre-Startup Checklist: Avoiding Costly UV Sterilizer Mistakes
Rushing startup causes preventable failures. This 5-minute verification process catches 95% of installation errors before they damage your system.
How to Test for Leaks Without Flooding Your Floor
Power on your system with UV bulbs disconnected but plumbing active. Inspect all connections for 10 minutes under bright light—hairline leaks glow under UV flashlight. Pay special attention to O-ring seats; a single grain of sand causes major leaks. Never skip this dry run—one hobbyist’s oversight led to 50 gallons leaking onto his hardwood floor overnight. Also verify electrical connections are above waterline and GFCI-protected.
Quarterly Quartz Sleeve Cleaning: Your UV Sterilizer’s Lifeline
A dirty sleeve is the #1 reason for UV failure. Mineral deposits and biofilm can block UV-C transmission within weeks, silently disabling your unit.
Vinegar vs. Citric Acid: Which Removes Mineral Deposits Faster?
For light scaling, soak sleeves in undiluted white vinegar for 30 minutes. For heavy calcium buildup, use 10% citric acid solution (1 part acid to 9 parts water) for 15 minutes. Never use abrasive pads—micro-scratches create nucleation sites for faster re-deposition. After soaking, rinse thoroughly with RO water. During reassembly, apply silicone grease to O-rings to prevent binding and tears. A clean sleeve should transmit light like new glass—if it looks hazy, replace it immediately.
Troubleshooting UV Sterilizer Flow and Leak Emergencies
When problems strike, immediate action prevents tank crashes. These field-tested solutions resolve 90% of critical failures in under 10 minutes.
Immediate Actions When Water Sprays From Your UV Unit
Shut both isolation valves instantly—don’t reach for towels first. Power off the return pump if no valves exist. Most leaks occur at end caps due to overtightened collars or pinched O-rings. Never reassemble a wet sleeve; dry all components completely. If replacing O-rings during an emergency, stretch new rings in warm water for 2 minutes to improve seating. Keep spare O-rings matching your unit’s size (typically 1/8″ cross-section) in your aquarium emergency kit.
Final Note: Proper UV sterilizer installation transforms water quality within days when executed correctly. Remember these non-negotiables: mount horizontally after your skimmer, use isolation valves with a drain point, set flow rates specifically for your goal (algae vs. parasites), and clean sleeves quarterly. Annual bulb replacement is non-optional—even if it still glows, UV-C output degrades to ineffective levels after 9,000 hours. Within 72 hours of correct setup, you’ll see green water vanish and parasite outbreaks halt. For ongoing success, pair your UV with regular water testing—when clarity and fish health hold steady, you’ve mastered the ultimate invisible defense for your aquarium.