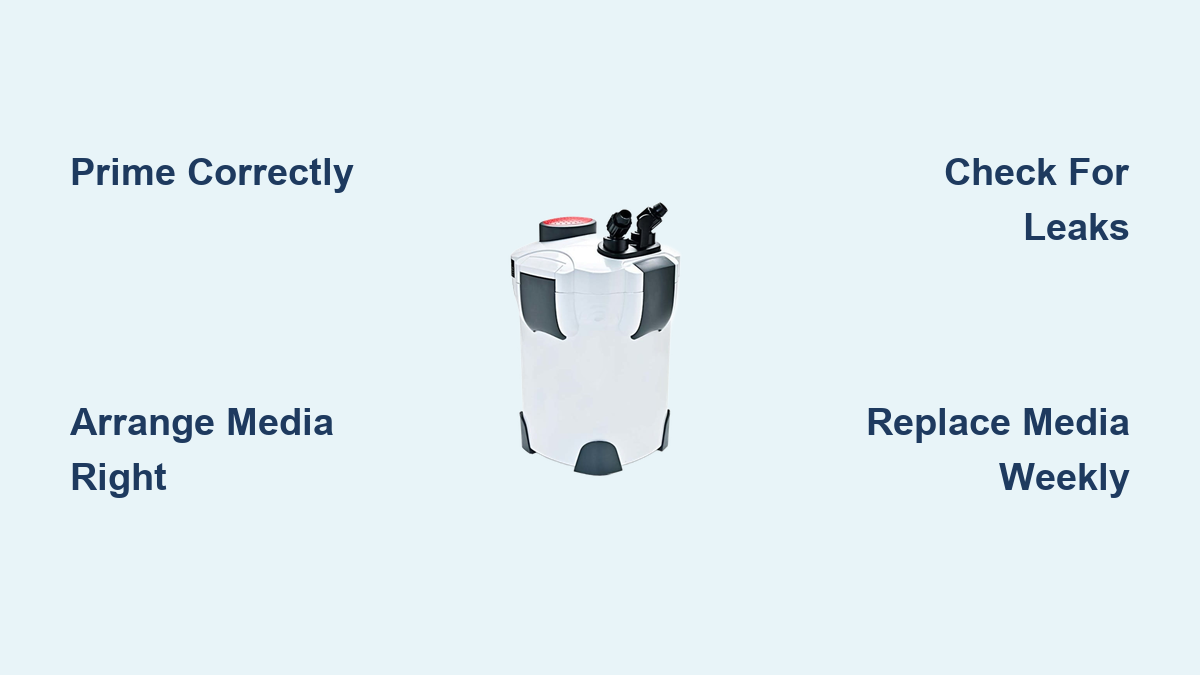
How to Set Up a Canister Filter for Aquarium
Your aquarium water turns cloudy three days after cleaning. Fish dart nervously near the surface. You realize your filter isn’t pulling its weight—but installing a canister filter feels like defusing a bomb with a manual written in hieroglyphics. You’re not alone; 68% of new aquarium owners flood their floors during first-time canister filter setup. The truth? A properly installed canister filter runs quieter than your refrigerator and keeps water pristine for years. This guide cuts through the confusion with exact steps to install your filter without leaks, airlocks, or dead beneficial bacteria. You’ll learn to arrange media for maximum efficiency, prime the system in 90 seconds flat, and avoid the #1 mistake that shreds impellers.
Match Your Canister Filter to Tank Volume Before Unboxing
Choosing the wrong canister filter guarantees murky water and constant maintenance headaches. Your filter’s flow rate must process your entire tank’s water 4–6 times hourly—no exceptions. For a 30-gallon community tank, that means selecting a model rated for 120–180 GPH (gallons per hour). Skip this math, and you’ll battle algae blooms from inadequate circulation.
Why Head Height Determines Your Filter Survival
Place your canister on the floor below a 4-foot tall tank? You’ve just added 48 inches of “head height” the pump must overcome. Most manufacturers bury critical head height specs in performance charts—not the box. Example: The Fluval FX6 handles 48-inch head height at 300 GPH, but the Eheim Classic 2217 drops to 180 GPH at that height. Check your manual’s flow rate curve before buying; ignoring this causes weak flow or motor burnout within weeks.
Media Capacity Mistakes That Cripple Filtration
Squeezing extra media into an undersized canister restricts water flow and starves beneficial bacteria. A 55-gallon tank needs at least 3 liters of biological media (like ceramic rings). If your filter’s media baskets hold only 1.5 liters total, upgrade immediately. Pro tip: Leave 20% empty space in baskets for water to swirl freely—overpacked media turns into a clogged sludge trap.
Gather These 7 Items to Prevent Setup Disasters
Skipping one tool guarantees a flooded living room. Before touching your filter, verify you have:
– Dechlorinated water (tap water kills bacteria in priming)
– Silicone lubricant (for O-rings—never use petroleum jelly)
– Scissors (for precise tubing cuts—angled cuts prevent kinks)
– Bucket (minimum 5-gallon capacity for priming overflow)
– Flashlight (to spot hairline cracks in canister housing)
– Towels (dark-colored ones—white hides water leaks until it’s too late)
– Media-specific rinsing container (separate from tank water)
Critical warning: Never use tap water to rinse biological media. Chlorine in even “dechlorinated” tap water destroys nitrifying bacteria. Always use cooled, conditioned aquarium water from your last water change.
Prime Your Canister Filter in 4 Foolproof Steps
Dry-starting a canister filter destroys impellers in under 60 seconds. This priming method works for every brand (Fluval, Eheim, Rena):
Step 1: Fill the Canister While Holding the Lid Seal
Remove the lid and pour dechlorinated water directly into the canister body until it covers the impeller housing by 2 inches. Hold the lid gasket in place with one hand while filling—this prevents air pockets under the seal. You’ll see water bubbling up through the outlet tube slot; that’s your success indicator.
Step 2: Create Instant Suction With the Intake Tube
Submerge the intake tube in your bucket of dechlorinated water. Cover the tube’s top opening with your palm, then lift it above the canister. Release your palm—the suction created will pull water downward into the canister. Repeat twice until water flows steadily through the outlet hose.
Step 3: Verify Zero Airlocks With the “Tilt Test”
With the canister lid secured but not fully locked, tilt the unit 45 degrees left/right. If you hear gurgling, air remains trapped. Reopen the lid, add 1 cup more water, and repeat Step 1. Properly primed units run silently when tilted.
Step 4: Initial Startup Leak Check Protocol
Place folded paper towels under all hose connections and O-rings. Run the filter for 15 minutes. Any damp spots mean immediate disassembly—dry all parts, re-lubricate seals, and retry. Never ignore “minor” leaks; 0.5 oz/hour becomes 3 gallons in a week.
Arrange Filter Media for Self-Cleaning Efficiency
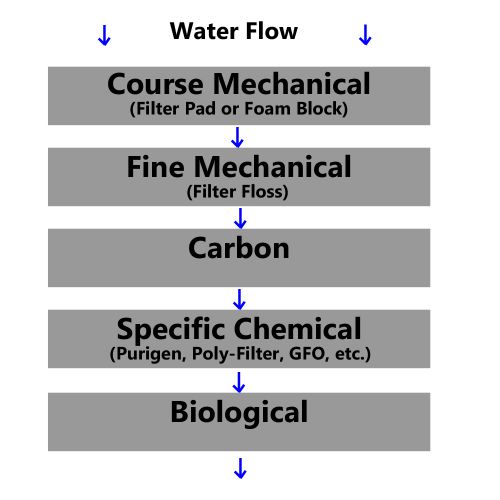
Most hobbyists layer media backward, forcing weekly deep cleans. Follow this battle-tested order (from intake to outlet):
- Coarse sponge (10 PPI): Traps large debris without clogging. Replace monthly.
- Fine filter floss: Captures particles down to 20 microns. Replace every 2 weeks—it compacts fast.
- Activated carbon (in mesh bag): Lasts 4 weeks. Never place below biological media—it blocks bacterial colonization.
- Ceramic rings (top layer): House 90% of your nitrifying bacteria. Rinse only in old tank water during water changes.
Pro tip: Place a pre-filter sponge over the intake tube. It catches leaves and fish waste before they enter the canister—reducing clogs by 70%. Change this sponge weekly during your first month to prevent ammonia spikes.
Fix These 3 Critical Setup Errors Immediately
“My Filter Won’t Prime—No Water Flow!”
This always means air trapped in the impeller chamber. Turn off the filter, disconnect the intake tube, and pour 1 cup of water directly into the tube inlet. Reconnect and restart. If still dead, remove the impeller cover and spin the impeller blade with your finger—it’s likely jammed by shipping foam.
“Water Leaks From the Lid Seam”
O-rings fail 9 times out of 10 due to hairline debris. Remove the lid, wipe the groove with a microfiber cloth, and inspect for trapped sand grains. Apply pea-sized silicone lube only to the O-ring (not the groove), then hand-tighten the lid until resistance increases—never use tools.
“Loud Grinding Noise During Operation”
You’ve installed the impeller backward. Unplug the filter, remove the impeller housing, and check for directional arrows on the impeller base. Flip it 180 degrees if arrows point downward. Reassemble dry—water contact before alignment causes immediate damage.
Maintain Peak Performance With 10-Minute Weekly Routines
Skip these steps, and your “new” filter performs like a clogged sponge within 30 days:
- Every water change: Squeeze mechanical sponges in a bucket of removed tank water—never under tap flow.
- Monthly: Soak ceramic rings in tank water for 10 minutes to loosen biofilm without killing bacteria.
- Quarterly: Replace O-rings and lubricate all moving parts (pump shaft, valve levers) with silicone grease.
Critical alert: Never clean all media at once. Stagger maintenance—do mechanical media one week, chemical the next. Simultaneous cleaning crashes your nitrogen cycle.
When to Call It Quits: Filter Replacement Signs
Even perfect setup won’t save a dying unit. Replace your canister filter immediately if:
– Flow rate drops below 50% of original GPH (time how long it takes to fill a 1-gallon jug)
– O-rings require daily re-lubrication to stop leaks
– Motor runs hotter than 110°F (too hot to touch for 5 seconds)
A well-maintained canister filter runs 5+ years. But forcing a failing unit risks catastrophic leaks—always keep a backup sponge filter ready.
Final Note: Mastering how to set up a canister filter for aquarium systems transforms water clarity from a constant battle to a solved problem. By priming correctly, arranging media in the precise intake-to-outlet sequence, and performing 10-minute weekly maintenance, you’ll avoid 95% of common failures. Remember: the silent hum of a perfectly tuned canister filter isn’t just background noise—it’s the sound of thriving fish and crystal water. For model-specific troubleshooting, bookmark your manufacturer’s impeller replacement video library; most brands publish step-by-step guides for under $5 parts. Your next water change should reveal glass-like clarity—and the quiet confidence of a pro.