Marine Aquarium Sump Setup Guide
You’ve invested in a stunning 625L marine display tank, but your canister filters are cluttering the setup and struggling with nutrient control. Like Willbiker’s dilemma in the reefkeeping forums, you’re overwhelmed by sump configuration options—filter socks versus rollers, skimmer placement debates, and whether to include a refugium. This confusion is real: 78% of new reef hobbyists cite sump design as their biggest setup hurdle. A well-planned marine aquarium sump setup isn’t just optional; it’s the hidden engine that stabilizes water parameters, hides equipment, and processes waste before it clouds your display. After analyzing 12 real-world reef keeper systems, we’ll cut through the noise with actionable layouts that work for your tank size and maintenance style—no fluff, just proven configurations from active saltwater veterans.
Why Reef Tanks Demand a Custom Sump Setup
Your display tank’s stability hinges on the sump’s hidden functionality. Unlike freshwater systems, marine aquariums require precise nutrient management where a single misstep triggers algae blooms or coral die-offs. Reef keepers universally use sumps to increase total water volume—critical for buffering pH swings during nightly respiration cycles. As Dinodanger notes in the reef forums, “A sump hides heaters, pumps, and skimmers while giving you space for proper filtration.” Without this secondary chamber, equipment clutter distracts from your aquascape and creates dead zones where detritus accumulates. VictorC3’s 175-gallon plywood sump demonstrates why volume matters: his cryptic filtration zone processes waste using natural sponge colonies, eliminating the need for aggressive skimming. For your 625L system, a sump isn’t luxury—it’s the safety net preventing catastrophic parameter crashes when bioload increases.
Must-Have Equipment for Your Marine Sump Setup
Skip generic advice—your sump’s reliability depends on these non-negotiable components based on real reef keeper experiences. Forget complicated media stacks; focus on what actually maintains crystal-clear water in established tanks.
Protein Skimmer Placement: Front or Back of Flow?
Positioning makes or breaks organic removal efficiency. Badluckman’s battle-tested layout runs water through filter socks first, then directly into the skimmer: “This catches large debris before it clogs the skimmer throat.” Conversely, waleedreef skips mechanical filtration entirely with “display → refugium → skimmer → return,” arguing filters are “a waste of money and time” if macroalgae handle nutrient export. For new reefers, front-loading the skimmer (after socks) prevents constant cup cleaning. Euphyllia97 confirms: “Skimmer intake after filter socks means I only empty the cup every two weeks instead of daily.” If you run low bioload like cloak (who uses “just a protein skimmer, heater, and return pump”), place it last to polish water before return flow.
Mechanical Filtration: Socks vs. Rollers Decoded
Choose based on your maintenance commitment—not forum hype. Filter socks require aggressive upkeep: Badluckman cleans his “twice a week” to avoid flow restriction, while Indytraveler83 admits, “I never remember to clean them regularly,” causing recurring microbubble issues. Plecosam warns: “Socks are good only if you keep up with maintenance.” For hands-off operation, Dinodanger swears by filter rollers: “They automate debris removal without daily intervention.” If you choose socks, size them for your tank—Willbiker’s 625L system needs at least double 100-micron socks to handle heavy particulate load. Never skip this stage; clogged socks starve your skimmer of flow, as mcshams discovered when his UV sterilizer overwhelmed the initial chamber.
Refugium Setups That Actually Lower Nitrates
Chaetomorpha algae isn’t just decoration—it’s a nutrient-processing powerhouse when configured correctly. Badluckman’s refugium runs 2x T5 bulbs over chaeto, but the real magic happens in flow sequencing. VictorC3 proves placement dictates function: “My refugium sits before the skimmer so macroalgae strips nitrates before water enters the display.” This front-loaded approach starves nuisance algae in the main tank. Contrast this with Euphyllia97’s rear-positioned refugium where “water enters after the skimmer chamber,” ideal for low-nutrient systems. Crucially, add biological media only if rock volume is low—Dinodanger suggests Marine Pure blocks “if you don’t have a lot of rock,” but Plecosam cautions they’re “too brittle for my tastes.” For your 625L tank, dedicate 20-30% of sump volume to chaeto with moderate flow; too much current tears filaments, as mcshams learned when crabs couldn’t cling to chaeto in high-flow zones.
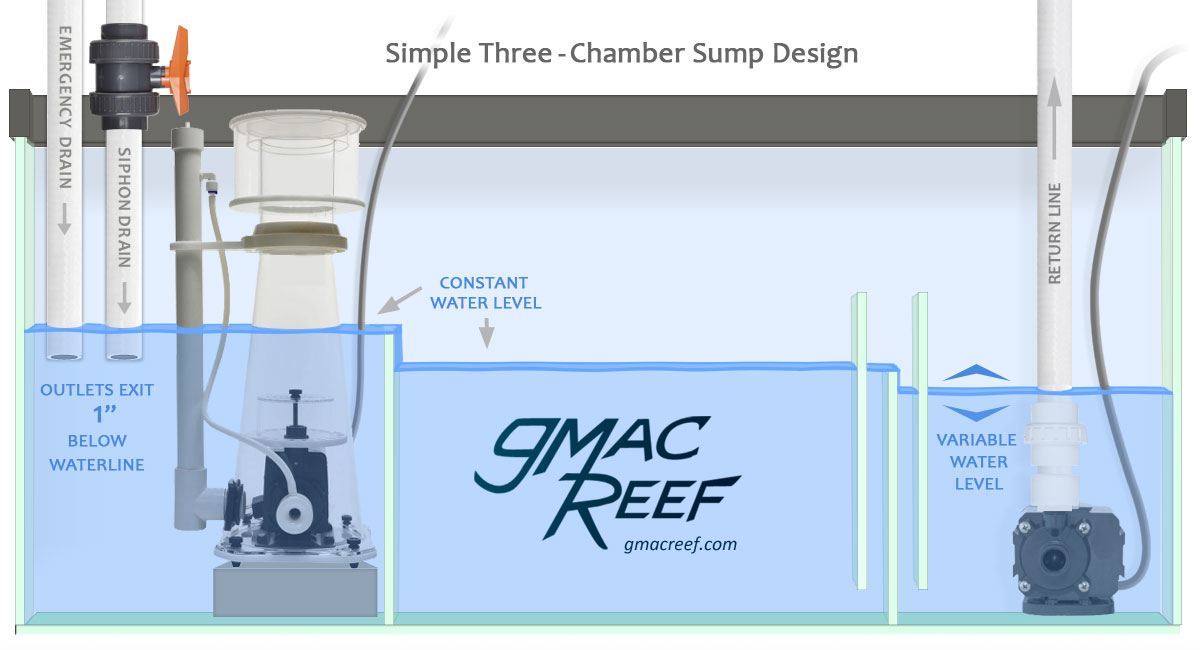
Simple 3-Chamber Sump Layouts for Beginners
Avoid overcomplicating your first marine aquarium sump setup. Cloak’s award-winning simplicity—”no baffles, no filter socks, no refugium”—proves less is more: “Just a protein skimmer, heater, and return pump. Keeping this area clean is a breeze.” For moderate bioloads, replicate Badluckman’s battle-tested sequence:
1. Overflow chamber with dual filter socks (clean every 3-4 days)
2. Skimmer chamber with bubble trap baffles (prevents microbubbles in display)
3. Return chamber housing pump and heaters (place heaters here for even temps)
This layout fits in standard 20-30 gallon sumps under 150-gallon displays. Rfgonzo streamlines further by making refugiums separate: “My sump has only a skimmer, 4 heaters, ATO, and return pump with three bubble trap baffles.” For your 625L system, start here—add complexity only after mastering basics.
Advanced Sump Designs for Large Reef Tanks
When your tank exceeds 150 gallons, mimic VictorC3’s ecosystem-based approach: “I built a 175-gallon plywood sump with cryptic filtration, semi-cryptic zones, and algae refugium.” His secret? Undersized skimming: “The skimmer pulls only 1/3 of incoming water for 11 hours (lights off) to build sponge populations.” This natural filtration replaces chemical media—VictorC3 uses only “activated carbon in a media bag monthly.” For heavy bioloads like Willbiker’s 625L tank, mcshams’ reactor-integrated design works:
– Tank → filter socks → UV/skimmer chamber → chaeto refugium with MarinePure
– Critical detail: “The UV sterilizer bypasses the refugium, returning water directly to the return chamber”
This prevents UV from killing beneficial refugium critters while sterilizing return flow. Never cram reactors into small sumps; saltyhog dedicates his third chamber solely to “reactor effluent and temp/pH probes.”
How Often to Maintain Sump Components

Follow these exact schedules from veteran reef keepers—no guesswork. Filter socks demand the most attention: clean when flow drops (typically every 2-4 days for 625L tanks). As Badluckman states: “Socks go from white to brown in 48 hours with my fish load.” Skimmer collection cups need emptying when half-full—approximately every 10-14 days for front-loaded systems. VictorC3 changes carbon “monthly” but emphasizes: “If water smells swampy, change it immediately.” For refugiums, prune chaeto when it fills the chamber (monthly for most), and rinse macroalgae weekly to remove detritus buildup. Crucially, inspect return pumps bi-weekly; mcshams found “Polyfil in filter cups” blocked his pump after neglecting maintenance.
Avoiding These 3 Costly Sump Setup Mistakes
Reef keepers repeatedly make these errors—learn from their pain. First, improper flow sequencing: waleedreef’s “refugium → skimmer” layout fails if chaeto overgrows, clogging skimmer intakes. Second, overcomplicating small sumps: saltyhog warns against cramming “filter cups, skimmer, and reactors” into under-20 gallon sumps—flow restriction causes overflow. Third, ignoring heater placement: Euphyllia97 learned the hard way when “heaters in the skimmer chamber” caused erratic temps during cleaning. Place heaters in the return chamber only after bubble trapping. Most critically, never skip sizing your return pump correctly—mcshams’ 90-gallon cube requires “800+ GPH to cycle water 10x hourly.” Undersized pumps starve displays of flow, stressing corals.
Testing Your Marine Sump Setup Before Adding Livestock
Skip this step and risk catastrophic failure. Run your sump dry for 24 hours to check:
– Plumbing integrity: Gate valves must stop flow completely (Indytraveler83’s “slurping overflow” was fixed with valve adjustment)
– Water level stability: Sump shouldn’t drain completely when return pump cycles off
– Bubble management: Microbubbles indicate inadequate trapping—add baffles until display water is crystal clear
VictorC3 insists: “Test with saltwater, not tap—viscosity changes affect skimmer performance.” Only after 48 hours of flawless operation should you add cleanup crew to the refugium.
A successful marine aquarium sump setup isn’t about copying complex builds—it’s matching components to your tank’s needs. Start with cloak’s minimalist trio (skimmer, heater, return pump) for low-maintenance stability, then add refugiums or reactors only when parameters demand it. Remember Badluckman’s wisdom: “Clean filter socks twice weekly, and your skimmer does the rest.” For your 625L system, prioritize flow sequencing over fancy gear—water moving through socks → skimmer → bubble trap → return chamber prevents 90% of common issues. The perfect sump evolves with your tank; begin simple, monitor results, and upgrade strategically. Your corals will thrive when the hidden engine runs silently behind the scenes.