How to Remove Cyanobacteria from Aquarium
That slimy blue-green film spreading across your aquarium substrate isn’t just unsightly—it’s a warning sign your tank is out of balance. Cyanobacteria, commonly mislabeled as blue-green algae, creates smelly, suffocating mats that choke plants and deplete oxygen. Unlike true algae, this photosynthetic bacteria indicates serious nutrient imbalances that won’t disappear with simple scrubbing. When you search “how to get rid of cyanobacteria in aquarium,” you need solutions that address both the visible slime and the underlying causes. This guide delivers a complete action plan to eliminate current outbreaks and prevent recurrence, combining immediate physical removal with long-term tank balancing strategies proven effective by experienced aquarists.
Immediate Physical Removal Techniques That Work
Don’t waste time debating causes when cyanobacteria appears—act fast to reduce the problem’s scale. Grab your gravel vacuum and target the thick, slimy mats covering your substrate and decorations. Siphon as much visible cyanobacteria as possible during your next water change, focusing on areas where it’s thickest. For stubborn patches on decorations, remove them and gently scrub with a toothbrush in a bucket of tank water—never use soap or chemicals that could harm your ecosystem.
Vacuuming Cyanobacteria Mats Without Damaging Your Tank
Use a thin siphon tube to lift cyanobacteria mats directly off surfaces without disturbing your substrate too deeply. Start by turning off filters to prevent spreading bacteria through the system. Position the tube just above the slime layer and slowly lift it away from surfaces before vacuuming. Work section by section, removing as much as possible before proceeding to water changes. This targeted approach prevents breaking up the mats and spreading them throughout your tank.
Proper Water Change Protocol for Initial Cyanobacteria Reduction
After physical removal, perform a 50% water change using temperature-matched, dechlorinated water. Vacuum your substrate thoroughly during this change to remove the organic detritus fueling cyanobacteria growth. Clean your filter media in the removed tank water (never tap water) to preserve beneficial bacteria while removing accumulated waste. This combination of physical removal and water change immediately reduces cyanobacteria biomass and its nutrient supply.
Diagnosing Your Tank’s Nutrient Imbalance (The Real Culprit)
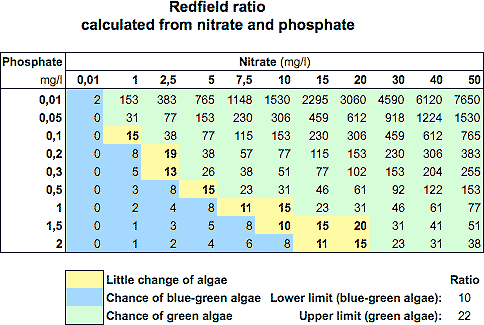
Cyanobacteria thrives in specific nutrient conditions that most aquarists unknowingly create. Unlike true algae, it often blooms when phosphates are high while nitrates remain low—a common scenario in tanks where fish waste accumulates but plants aren’t consuming enough nutrients. Understanding this imbalance is critical to eliminating cyanobacteria permanently rather than just treating symptoms.
Testing for Excess Phosphates That Fuel Cyanobacteria Growth
Grab a phosphate test kit and check your levels immediately. Cyanobacteria explodes when phosphate exceeds 0.5 ppm, often from overfeeding, decaying matter, or phosphate-rich tap water. Test both your tank water and tap water to identify sources. If levels are high, implement phosphate-removing media like PhosGuard in your filter for 2-4 weeks while reducing feeding.
How Low Nitrate Levels Create Perfect Conditions for Cyanobacteria
Contrary to popular belief, cyanobacteria often appears when nitrates are too low rather than too high. This bacteria can fix atmospheric nitrogen, giving it an advantage when your plants lack sufficient nitrates. Test your nitrates—if they’re below 5 ppm, consider adding a nitrate source while addressing phosphate issues to rebalance your nutrient profile.
Starving Cyanobacteria With Smart Nutrient Control
Reducing phosphate is your most powerful weapon against cyanobacteria. Cut feeding by 50% immediately—fish only need what they consume in 2-3 minutes once daily. Vacuum the substrate thoroughly during water changes to remove uneaten food and waste. Consider adding fast-growing plants like hornwort or floating species that compete directly with cyanobacteria for nutrients.
Installing Phosphate-Removing Media in Your Filter
Place phosphate-removing media like RowaPhos or PhosGuard in your filter’s media basket for 2-4 weeks. This starves cyanobacteria without harming your tank inhabitants. Replace the media according to manufacturer instructions while monitoring phosphate levels. Most aquarists see significant improvement within 10-14 days when combined with reduced feeding and increased water changes.
Mastering Light Management to Eliminate Cyanobacteria
Lighting plays a complex role in cyanobacteria outbreaks. Both insufficient and excessive lighting can trigger blooms, but the most effective treatment is complete darkness. Implement a 3-5 day blackout by covering your tank with opaque material—no light of any kind. Most aquarium plants survive this period, but cyanobacteria cannot.
Implementing a 3-5 Day Complete Blackout Treatment
Turn off all lights and cover your tank completely with blankets or cardboard. Perform a 50% water change before starting and another after completion. Monitor fish closely for stress, and consider adding extra aeration since oxygen levels may drop. This treatment works by starving the photosynthetic bacteria while your tank’s ecosystem remains intact. Many stubborn outbreaks resolve completely after a single blackout.
Hydrogen Peroxide Spot Treatment: Step-by-Step Application

For persistent patches, 3% hydrogen peroxide provides targeted elimination without harming your entire tank. Turn off filters and use a syringe to apply directly to cyanobacteria mats. You’ll see immediate bubbling as the H₂O₂ reacts with the bacteria. Wait 15-20 minutes before restarting filtration to allow maximum contact time.
Applying H₂O₂ Without Harming Sensitive Plants and Invertebrates
Use minimal amounts—1-2mL per 10 gallons directly on problem areas. Avoid spraying near sensitive plants like mosses or delicate invertebrates. Test on a small area first if concerned about plant damage. This method works best when combined with nutrient control—otherwise, cyanobacteria will simply return within days.
Creating Water Flow That Prevents Cyanobacteria Return

Stagnant water creates perfect conditions for cyanobacteria to establish. Position powerheads or adjust filter outputs to create gentle, circular flow throughout your tank. Eliminate dead zones where water isn’t moving, especially near the substrate where cyanobacteria often starts. Most tanks need flow that completes 4-6 tank turnovers per hour to prevent stagnation.
Positioning Powerheads to Eliminate Dead Zones
Place intake and output points diagonally across from each other to create cross-tank circulation. Angle filter outputs toward the surface to improve gas exchange while preventing strong currents that stress fish. Check flow patterns by adding a drop of food coloring—watch how it disperses through your tank to identify and correct stagnant areas.
Building Your Long-Term Cyanobacteria Prevention Plan
Weekly 25% water changes with thorough substrate vacuuming form the foundation of cyanobacteria prevention. Test phosphate levels monthly and maintain levels below 0.5 ppm. Add fast-growing plants like water sprite or floating species that compete with cyanobacteria for nutrients. Most importantly, address problems at the first sign of slimy patches rather than waiting for full-blown outbreaks.
Weekly Maintenance Routine That Keeps Cyanobacteria Away
- Perform 25% water changes with substrate vacuuming
- Remove any uneaten food immediately
- Check filter flow and clean if reduced
- Inspect for early cyanobacteria signs on substrate
- Trim fast-growing plants to maintain nutrient uptake
Critical Mistakes That Make Cyanobacteria Worse
Changing all filter media at once crashes your biological filtration, creating worse imbalances. Making multiple changes simultaneously (new chemicals, lighting changes, and water parameter adjustments) makes it impossible to identify what’s working. Most dangerously, ignoring phosphate levels while focusing only on nitrates addresses half the problem, guaranteeing cyanobacteria’s return.
Over-Cleaning Your Filter and Crashing Your Cycle
Never clean or replace all filter media simultaneously. Instead, rinse media in removed tank water during water changes, replacing only one component at a time over several weeks. Your filter houses beneficial bacteria essential for tank stability—disturbing it too much creates ammonia spikes that worsen conditions for cyanobacteria control.
Biological Controls That Actually Work Against Cyanobacteria
While many “algae eaters” ignore cyanobacteria, Siamese algae eaters (Crossocheilus oblongus) actively consume it. Nerite snails may pick at edges but won’t solve established blooms. Amano shrimp show limited interest. Important: Don’t rely solely on biological controls—they work best as supplemental measures after you’ve addressed the underlying nutrient imbalance causing cyanobacteria in the first place.
Final Note: Successfully eliminating cyanobacteria requires patience—most treatments take 2-4 weeks to show full results. Focus on correcting the root causes (nutrient imbalance, poor flow, lighting issues) rather than just removing visible slime. Implement consistent maintenance, monitor phosphate levels regularly, and act immediately at the first sign of recurrence. When you address “how to get rid of cyanobacteria in aquarium” with this comprehensive approach, you’ll create a balanced ecosystem where cyanobacteria cannot gain a foothold, ensuring long-term tank health and clarity.