How to Anchor Aquarium Plants in Gravel
Watching your carefully positioned sword plant float to the surface during a routine water change is one of the most frustrating experiences in aquascaping. How to anchor aquarium plants in gravel effectively is the critical skill that separates temporary arrangements from thriving underwater gardens. Gravel’s chunky gaps leave delicate roots with nothing to grip, causing plants to uproot from filter currents, active fish, or even your own gravel vacuum. Without proper anchoring, your plants waste energy regrowing roots instead of producing vibrant new growth. This guide delivers battle-tested techniques used by professional aquascapers to lock plants securely in place—transforming your gravel substrate from a liability into a stable foundation for lush underwater landscapes.
Why Standard Planting Fails in Gravel Substrates
Gravel’s loose, coarse structure creates three critical anchoring failures you must overcome. First, large gaps between stones prevent roots from forming a secure matrix—unlike fine sand where roots weave through particles. Second, insufficient substrate depth (under 2 inches) gives roots no room to establish downward growth. Third, inert gravel lacks nutrients, forcing plants to prioritize survival over root development. The solution starts with substrate preparation: Rinse medium-grade gravel (1-3mm) thoroughly before tank setup to eliminate dust clouds that smother root tips. Create planting zones with 2.5-3 inch depth pockets using a substrate spatula—critical for root-bound plants like Amazon swords. Never skip this step: shallow gravel guarantees constant replanting.
Precision Tools That Prevent Root Damage
Generic tweezers crush delicate stems and scatter gravel. Invest in these exact tools for surgical planting:
– Curved-tip aquascaping tweezers (6-8 inches long) for stem plants like Rotala
– Straight-point tweezers with micro-grip edges for carpeting plants
– Substrate spatula with narrow blade to create planting holes without disturbing neighbors
– Lead-free plant weights (zinc alloy rings) that won’t discolor gravel
Pro Tip: Dip tweezers in tank water before planting. Wet tools slide through gravel smoothly instead of scattering stones. Always trim roots to 1.5 inches before planting—this stimulates aggressive new root growth that grips gravel faster.
Step-by-Step Anchoring Techniques That Actually Work

Secure Stem Plants Using the 45-Degree Lock Method
Straight-down planting snaps stems and creates air pockets. Do this instead:
1. Grip stem 0.5 inches above roots with curved tweezers
2. Insert at 45-degree angle to 2-inch depth (aiming toward desired growth direction)
3. Gently pull stem upright while holding base—this creates natural gravel compression
4. Press gravel around stem base with tweezers until no wiggle remains
5. Add lead-free weight ring if fish are active in that zone
Time Required: 45 seconds per plant. Difficulty: Easy. Visual Cue: Roots should disappear under gravel with no air bubbles escaping.
Anchor Carpet Plants with the Mesh Grid System
Dwarf hairgrass floats relentlessly in bare gravel. Create instant stability:
1. Cut plastic mesh (1/4″ grid) to fit planting zone
2. Place mesh directly on gravel base
3. Insert plants through mesh holes using straight tweezers
4. Cover with 0.5 inch gravel layer—mesh holds plants while roots penetrate below
This method works 3x faster than individual planting. Expect 95% retention during water changes versus 40% with standard planting.
Attach Rhizome Plants Without Burying Them
Critical Mistake Alert: Burying Anubias or Java Fern rhizomes causes fatal rot within days. Instead:
1. Position plant against driftwood near base
2. Apply tiny drop of aquarium-safe super glue gel (NOT liquid) to rhizome
3. Press firmly against wood for 15 seconds
4. Tie with black cotton thread if glue insufficient
Pro Tip: Use thread only as temporary support. Roots will grip wood naturally in 3-4 weeks while thread dissolves.
Fix Floating Plants in Under 60 Seconds
When plants detach mid-week, avoid emergency replanting that damages roots. Try these instant fixes:
– For stem plants: Slide lead-free weight ring over stem base, then push 0.5 inch deeper
– For carpet plants: Place small flat stone (pea-sized) over uprooted section
– For rhizome plants: Reapply super glue directly to exposed rhizome
Never pull floating plants out completely—this destroys fragile new roots. Gently guide roots back into gravel while adding micro-anchors.
Boost Root Growth with Substrate Layering
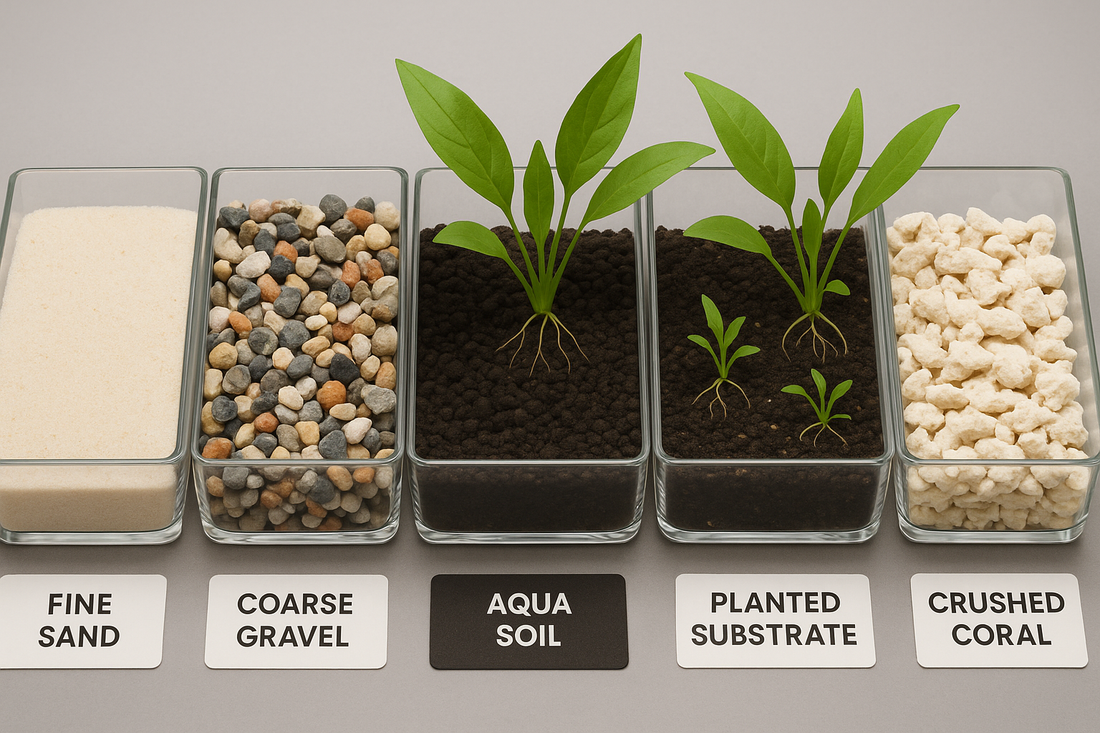
Gravel alone starves roots of essential nutrients. Create a nutrient sandwich that accelerates anchoring:
1. Bottom Layer (1 inch): Aquatic soil (e.g., ADA Amazonia)
2. Middle Layer (0.5 inch): Pool filter sand (prevents soil clouding)
3. Top Layer (2 inches): Your decorative gravel
Plants establish roots 50% faster in this setup. Heavy root feeders like Cryptocorynes thrive with this method—no root tabs needed for 6+ months.
Troubleshoot Common Anchoring Disasters

Plants Keep Floating Despite Proper Planting
Cause: Filter flow exceeding 5x tank volume per hour near plants
Fix: Redirect flow with spray bar or create gravel barrier using 1-inch stones
Yellowing Leaves After Planting
Cause: Nutrient deficiency in inert gravel
Fix: Insert root tabs 2 inches from plant base—wait 72 hours before expecting improvement
Algae Blooms at Plant Bases
Cause: Stagnant water trapping detritus
Fix: Position mini powerhead to create gentle surface ripple without disturbing gravel
| Symptom | Immediate Action | Long-Term Fix |
|---|---|---|
| Plant floats during water changes | Press gravel around base with tweezers | Add plant weight ring |
| Roots growing upward | Gently reposition roots downward | Increase substrate depth |
| Rhizome rot | Remove plant, trim rot, reattach | Never bury rhizomes |
Long-Term Anchoring Success Checklist
Weeks 1-2: Use weights on all stem plants. Avoid touching plants.
Weeks 3-4: Remove weights if roots resist gentle tug test. Add root tabs to heavy feeders.
Week 5+: Only replant if new growth appears—established roots hold securely.
Critical Maintenance: During water changes, hold gravel vacuum 2 inches above substrate. Sudden suction near plant bases causes 80% of accidental uprooting. Use 3/8″ diameter tubing instead of standard 1/2″ for precise control.
Proven Plant-Specific Anchoring Guide
Sword Plants: Plant crown 0.25 inch above gravel. Use 3 root tabs in triangular pattern.
Dwarf Hairgrass: Plant 5-plant clusters through mesh grid. Wait 4 weeks before trimming.
Anubias Nana: Glue rhizome to wood underside—prevents algae exposure.
Rotala Indica: Angle plant toward light source during insertion for denser growth.
When to Avoid Gravel Anchoring Altogether
Some plants simply won’t thrive in gravel no matter your technique:
– Bucephalandra: Requires porous rock attachment
– Mosses: Must be glued to driftwood
– Rootless floaters (Frogbit): Never plant—anchor with floating ring
Switch to sand or specialized substrate if you see consistent failure with stem plants after 8 weeks.
Final Anchoring Verification Test
Your plants are securely anchored when:
– Roots visibly emerge from gravel surface
– Plant resists gentle tug without lifting
– New growth appears within 14 days
– Zero movement during full-power water changes
Mastering how to anchor aquarium plants in gravel transforms maintenance from constant repair into effortless enjoyment. By applying these precise techniques—especially the 45-degree insertion method and nutrient sandwich substrate—you’ll create root systems that grip gravel like natural bedrock. Remember: The first 14 days are critical. Avoid rearranging plants during this period to allow roots to establish permanent hold. Within 6 weeks, you’ll watch your plants not just survive, but thrive, forming the lush underwater landscape you envisioned. Start with one technique today—your gravel substrate is about to become the most stable foundation in your tank.