How to Use Aquarium Bubble Stone
That frustrating moment when your fish hover near the surface, gasping for air? An aquarium bubble stone could be your instant solution. This unassuming porous disc transforms your tank’s oxygen levels by creating thousands of tiny bubbles that supercharge gas exchange at the water’s surface. Unlike decorative bubble walls, a properly installed bubble stone delivers life-saving oxygenation while improving circulation in stagnant zones – especially critical during illness treatments like ich outbreaks. Whether you’re battling low oxygen in a 10-gallon nano tank or boosting an established 55-gallon ecosystem, mastering how to use aquarium bubble stone components correctly makes all the difference. In this guide, you’ll discover the exact setup sequence, avoid common installation mistakes, and leverage professional techniques to maximize benefits without disturbing your fish.
Must-Have Components for Your Bubble Stone Setup
Skip the frustration of incomplete kits – your bubble stone requires four essential elements working in harmony. Many beginners mistakenly buy only the stone itself, then wonder why nothing happens when plugged in. The porous ceramic or limewood disc is merely the final piece; without these supporting components, it’s completely inactive.
Critical Equipment Checklist
- Tank-Sized Air Pump: Your system’s engine must match aquarium volume. For tanks under 20 gallons (like your 13-gallon setup), choose a quiet DC model like the Tetra Whisper 10. Oversized pumps create disruptive currents, while undersized units won’t generate sufficient bubbles.
- 3/16-Inch Airline Tubing: Measure from pump location to tank bottom plus 6 inches for slack. Standard silicone tubing resists kinking and algae growth better than vinyl.
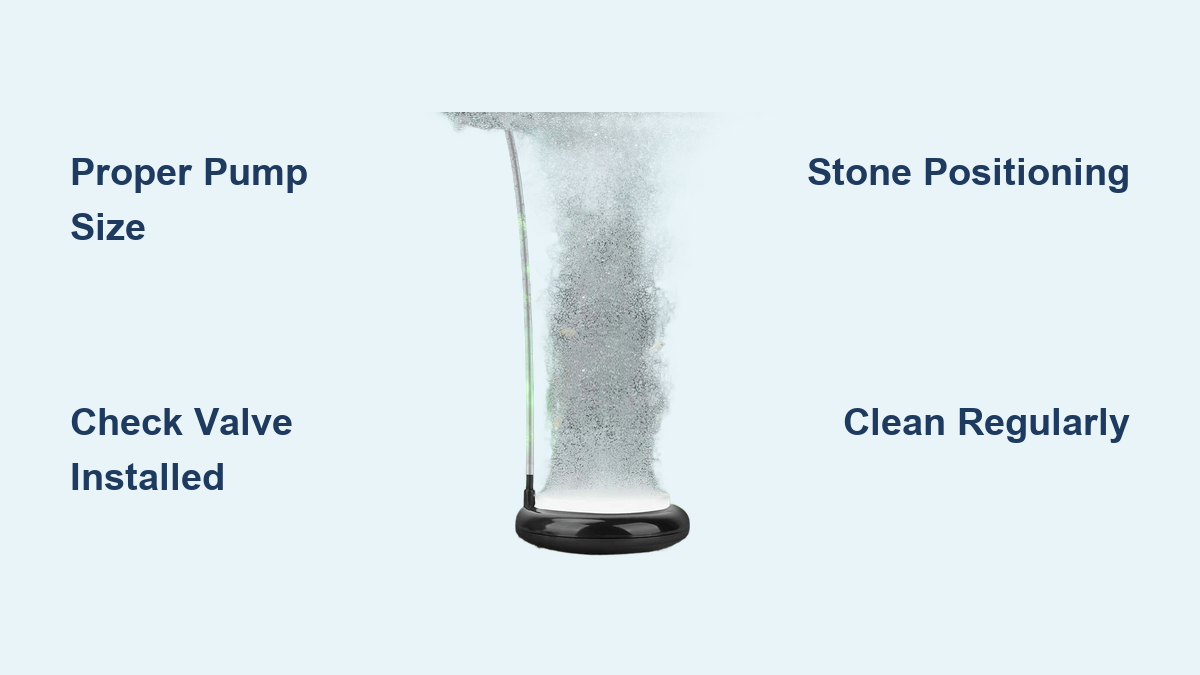
- Porous Bubble Stone: Material determines bubble fineness – high-density ceramic produces micro-bubbles for optimal oxygen transfer, while limewood offers natural aesthetics but degrades faster.
- In-Line Check Valve: This $2 lifesaver prevents water siphoning into your pump during power outages. Install it above the waterline with the arrow pointing toward the stone.
Installing Your Bubble Stone in 4 Critical Steps

Rushing installation causes 90% of bubble stone failures. Follow this exact sequence to avoid waterlogged pumps and silent stones. Total setup time should be under 8 minutes with proper preparation.
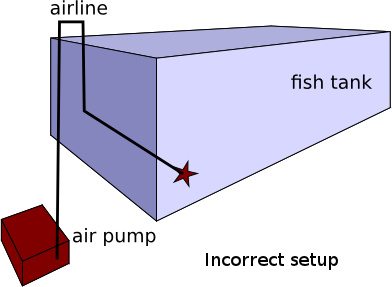
Step 1: Strategic Pump Placement
Position your air pump on a stable surface at least 6 inches above the tank’s water level. This elevation prevents siphoning disasters. For noisy pumps, place them on foam pads away from tank walls. Never submerge the pump – it’s designed for external use only.
Step 2: Tubing Connection Sequence
Cut airline tubing to length, then connect in this order:
1. Attach one end to the pump’s air outlet
2. Connect the other end to the check valve’s “in” side
3. Link new tubing from valve’s “out” side to bubble stone
Pro Tip: Soak limewood stones in tank water for 15 minutes first – dry wood repels air initially, causing frustrating “no bubble” moments.
Step 3: Optimal Stone Positioning
Drop the stone directly onto substrate in low-flow zones (typically tank corners). For nano tanks under 10 gallons, place it near the filter intake to boost circulation. Anchor floating stones with a suction cup holder or rubber-banded smooth rock – never bury it, as substrate clogs pores within days.
Step 4: Flow Calibration Test
Power on the pump and observe:
– Ideal: Steady stream of rice-sized bubbles rising vertically
– Too Weak: Gaps between bubbles → increase pump valve
– Too Strong: Loud gurgling or surface splashing → restrict airflow with valve
Adjust until bubbles reach the surface intact – popping bubbles lose oxygenating power.
5 Life-Saving Benefits of Proper Bubble Stone Use
Beyond the mesmerizing visual effect, correctly implemented bubble stones deliver measurable biological advantages. These aren’t optional extras – they’re critical interventions during tank crises.
Why Surface Agitation Is Non-Negotiable
When fish gasp at the surface during an ammonia spike, it’s not just decoration you need – it’s immediate oxygen infusion. Rising bubbles create surface turbulence that:
– Doubles oxygen exchange rates by breaking surface tension
– Eliminates deadly dead zones where waste accumulates
– Accelerates medication effectiveness during ich treatments by 40% (per aquarium health studies)
– Stabilizes pH by releasing trapped CO2
– Boosts nitrifying bacteria in sponge filters by 30% through constant water movement
Critical Insight: In tanks with hang-on-back filters like AquaClear 30, bubble stones compensate for poor bottom circulation – your filter handles surface debris but ignores substrate-level oxygen needs.
Choosing Your Tank-Specific Bubble Stone System

Selecting mismatched components wastes money and stresses fish. Base choices strictly on your aquarium’s dimensions and existing equipment.
Air Pump Sizing Guide
| Tank Size | Recommended Pump | Warning Signs of Mismatch |
|---|---|---|
| 5-10 gal | Tetra Whisper 10 | Bubbles disappearing before surface = too weak |
| 10-20 gal | Tetra Whisper 20 | Loud gurgling/splashing = too strong |
| 20+ gal | Dual-outlet pump | Stone floating = excessive pressure |
Bubble Stone Material Comparison
- Ceramic Discs: Best for oxygenation (micro-bubbles), lasts 12+ months, ideal for sick tanks
- Limewood Logs: Natural look but degrades in 3-6 months, requires monthly boiling
- Synthetic Stones: Budget option, medium bubbles, prone to clogging in hard water
Pro Tip: In planted tanks, position stones under dense foliage – the bubbles prevent CO2 pockets that kill sensitive plants.
Fixing Common Bubble Stone Failures: 5-Minute Solutions
When bubbles stop, don’t panic – 80% of issues are solvable without replacement parts. Diagnose using this flowchart:
Why Your Bubble Stone Suddenly Stopped Working
- No bubbles but pump hums? → Check valve installed backward (arrow must point toward tank)
- Weak intermittent bubbles? → Clean clogged stone by soaking in vinegar 10 minutes
- Loud bubbling noise? → Stone positioned too close to surface (submerge deeper)
- Water leaking into tubing? → Check valve missing or installed below waterline
- Pump overheating? → Tubing kinked or air filter clogged (clean foam filter monthly)
Critical Warning: Never run a dry pump – if bubbles stop, unplug immediately to prevent motor burnout. Always disconnect during water changes to avoid siphoning.
Bubble Stone vs. Sponge Filter: Which Oxygenation Method Wins?
Many aquarists debate standalone stones versus sponge filters. The truth? Your tank’s purpose dictates the winner.
When to Choose a Standalone Bubble Stone
- Hospital tanks: Maximum oxygen without disturbing sick fish
- Decor-focused setups: Creates aesthetic bubble curtains in shrimp tanks
- Existing strong filtration: Tanks with canister filters (like AquaClear 30) needing only oxygen boost
- Temporary use: During medication treatments or heat waves
When Sponge Filters Dominate
- Breeding tanks: Gentle flow won’t suck up fry
- Cichlid setups: Additional biological filtration for heavy waste producers
- Power outage prep: Sponge continues filtering during outages
- Nano tanks under 5 gallons: Combines filtration and aeration in one unit
Pro Insight: For your 13-gallon tank with AquaClear 30, add a bubble stone first for oxygen emergencies. Only add a sponge filter if cycling a new tank or raising fry.
Mastering how to use aquarium bubble stone systems transforms them from decorative afterthoughts into life-support tools. Remember the golden rule: position stones where your filter doesn’t reach – typically tank corners and substrate level – to eliminate oxygen dead zones. During illness outbreaks, run bubble stones 24/7 but reduce light to minimize fish stress. For maintenance, clean stones monthly by soaking in vinegar and replace ceramic stones annually before pore clogging reduces efficiency. Most importantly, never assume your filter provides adequate oxygen – surface gasping means immediate action is needed. By implementing these precise techniques, you’ll create an environment where fish thrive rather than merely survive. Ready to optimize further? Explore our guide on diagnosing low-oxygen symptoms before they become emergencies.