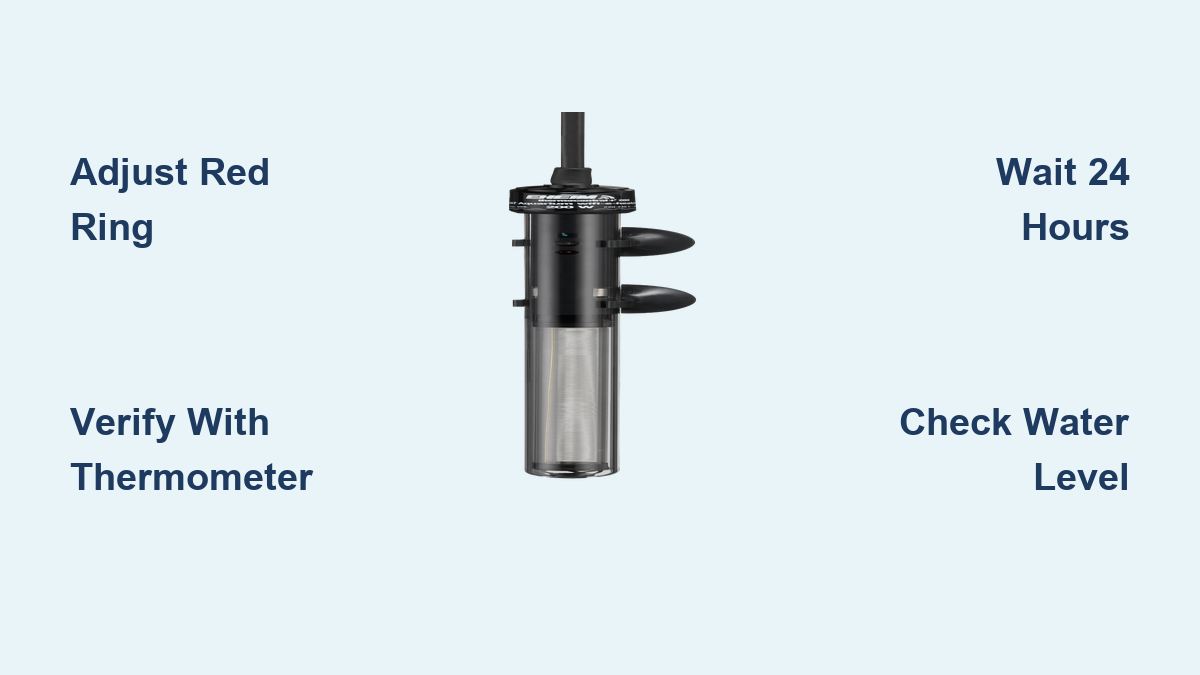
How to Adjust Eheim Aquarium Heater: Quick Guide
Your tropical fish are gasping at the surface. The thermometer reads 75°F, but your Eheim Jager heater display stubbornly shows 78°F. This 3-degree gap isn’t just inconvenient—it’s dangerous for sensitive species like discus or cardinal tetras. When your Eheim aquarium heater’s internal calibration drifts, even this reliable German-engineered device can’t maintain the stable environment your aquatic ecosystem demands. In this guide, you’ll learn exactly how to calibrate your Eheim Jager heater using its unique dual-ring system, transforming inaccurate readings into precise temperature control within 24 hours. No more guessing games with your fish’s survival.
Most aquarists never touch the red calibration ring, assuming the blue dial alone controls temperature. But here’s what Eheim technicians know: That inner red ring is your secret weapon against dangerous temperature swings. I’ve seen hobbyists replace perfectly functional heaters because they didn’t understand this single adjustment point. By the end of this guide, you’ll confidently fix discrepancies between your heater display and actual tank conditions—whether you’re setting up a new 20-gallon community tank or maintaining a delicate reef aquarium.
Identifying Your Eheim Heater’s Blue Dial vs Red Calibration Ring
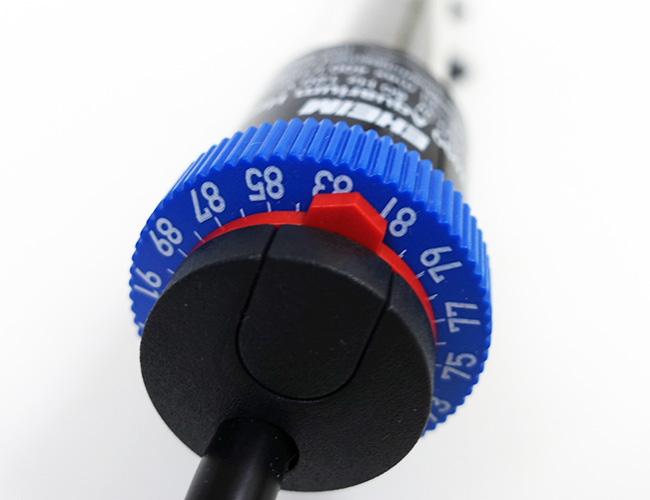
Before making adjustments, you must distinguish between the two critical components on your Jager heater head. The outer blue dial (labeled in both °C and °F) sets your target temperature. Rotate this ring to select 78°F for tropical tanks or 68°F for cold-water species. The fixed red arrow above this dial shows your current set point. Meanwhile, the inner red ring (marked in °C only) with its small red tab is the calibration mechanism—not the temperature control. Confusing these causes most user errors, leading to dangerously unstable tanks.
Why Misidentifying These Rings Causes Catastrophic Errors
When aquarists mistake the red ring for the temperature control, they inadvertently reset the heater’s internal calibration. Rotating the red ring while thinking it’s the set point creates a hidden offset—like setting your oven to 350°F but it actually runs at 325°F. Your fish experience this as sudden cold snaps or lethal overheating. The critical rule: Only touch the blue dial for daily temperature changes. Reserve the red ring exclusively for calibration against a trusted thermometer.
Mounting Your Eheim Jager Heater for Optimal Accuracy

Improper installation sabotages even perfect calibration. Eheim’s engineering requires specific positioning to prevent false readings. Mount your heater vertically or at ≤45° angle with the heating element pointing downward. Crucially, ensure the water level covers the entire heating tube and sits above the “min” fill line etched into the glass. If the heater touches tank walls, substrate, or decorations, it reads localized hot/cold spots instead of true water temperature.
Critical Submersion Safety Check
Never plug in your Eheim heater until fully submerged for 15+ minutes. The glass tube must acclimate to water temperature to avoid thermal shock cracks. I’ve seen hobbyists skip this step, causing instant heater failure when cold glass meets heating elements. After installation, wait 24 hours before calibration—this allows water circulation to eliminate micro-climates near the heater.
Decoding Eheim Heater Indicator Lights for Precision Tuning
Those tiny lights reveal your heater’s operational state. When the pilot light glows, the heater is actively warming water toward your set point. When the light turns off, it’s reached target temperature and entered standby mode. During calibration, watch this light cycle to pinpoint exact trigger points. If the light stays on constantly in a stable tank, your room temperature is below the heater’s capacity—or the calibration is severely off.
Finding the “Switch Point” for Accurate Calibration
Here’s a pro technique: With your independent thermometer in hand, slowly rotate the blue dial downward until the light turns off. Note this “off point” temperature. Then rotate upward until the light turns on again—this is your “on point.” The true calibration midpoint sits between these two values. For example, if it turns off at 77.5°F and on at 76.5°F, the actual set point is 77°F. This method beats guessing by 1-2°F.
Step-by-Step: Calibrating to Match Your Tank Thermometer
Calibration requires a high-quality external thermometer—your heater’s display is useless for this step. Alcohol or digital probe thermometers outperform cheap stick-on types. After 24 hours of stabilization at your initial setting (e.g., blue dial set to 78°F), compare readings. If your thermometer shows 75°F, here’s exactly how to fix it:
- Pull straight up on the small red tab atop the heater head (never twist it)
- Rotate the inner red ring until its arrow points to 75°F (the actual temperature)
- Press the tab down firmly to lock the new calibration
- Reset the blue dial to 78°F using the red arrow indicator
This process resets the heater’s internal thermostat to match reality. The blue dial now controls accurate temperature changes. Repeat after any major water change or if room temperatures shift seasonally.
Why Skipping the 24-Hour Stabilization Ruins Calibration
I’ve watched aquarists recalibrate hourly, worsening inaccuracies. Water mass requires time to equalize—surface readings differ from bottom temperatures initially. Eheim’s own testing shows tanks take 18-24 hours to achieve thermal homogeneity after adjustments. Rushing this step creates phantom discrepancies that make you over-adjust. Patience here prevents future headaches.
Fixing the 3°F Discrepancy That Harms Tropical Fish

That persistent 3-degree gap isn’t random—it’s your heater’s calibration drifting due to mineral buildup or age. When your thermometer reads 75°F but the blue dial shows 78°F, follow the red ring procedure above. For stubborn cases where calibration requires frequent adjustment, try the advanced method:
- Unplug and remove the heater (after 15-minute cool-down)
- Use a flathead screwdriver to gently pry off the top cap
- Locate the small white calibration wheel inside
- Rotate it clockwise (for higher actual temps) or counterclockwise (for lower)
- Reassemble and test with thermometer over 24 hours
Warning: Only attempt this if basic calibration fails. Over-rotation can damage the thermostat. If you’re uncomfortable, replace the unit—Eheim’s 2-year warranty covers manufacturing defects.
Troubleshooting Constant Cycling or No Heat
When your Eheim heater light flickers every 5 minutes or stays dark, diagnose systematically:
Heater Won’t Turn On? Check These First
- Power verification: Test the outlet with another device
- Water level check: Ensure coverage above the “min” line (dry-run protection triggers below this)
- Thermal fuse reset: Unplug for 10 minutes to reset overheat protection
- Glass integrity: Cracks near the base often cause silent failures
Heater Stays On Continuously?
This indicates either severe room temperature drop or calibration failure. First, verify with a second thermometer. If readings confirm cold water, your heater may be undersized for the tank volume. For calibration issues, redo the red ring adjustment—often the tab pops loose during maintenance.
Monthly Maintenance to Prevent Calibration Drift
Eheim recommends recalibrating every 6 months, but smart aquarists check monthly. During water changes:
- Unplug and remove the heater (after unplugging for 15+ minutes)
- Inspect for white mineral deposits on the glass tube
- Soak in 1:1 white vinegar/water solution for 10 minutes if scaling exists
- Rinse thoroughly before reinstalling
Critical: Never scrub the glass—abrasives create micro-scratches that accelerate future scaling. After reinstallation, wait 15 minutes submerged before plugging in. Document calibration adjustments in your tank log; sudden changes may indicate failing thermostats.
When to Replace vs. Recalibrate Your Eheim Heater
Know these failure signs:
– Calibration drift exceeding 4°F despite correct procedure
– Visible condensation inside the heater head (indicates seal failure)
– Glass tube discoloration (amber/brown stains mean overheating)
– Inconsistent cycling where light flickers erratically
Eheim Jager heaters typically last 3-5 years with proper care. If yours is older than 4 years and requires quarterly recalibration, replace it. Your fish’s health isn’t worth gambling on aging components.
Final Note: You now hold the exact calibration sequence Eheim technicians use—no more guessing why your angelfish hide near the heater. Remember this critical sequence: Stabilize 24 hours → Verify with external thermometer → Adjust red ring only → Reset blue dial. Perform this monthly maintenance ritual, and your Eheim aquarium heater will deliver German-engineered precision for years. Next, grab a high-precision thermometer (I recommend the ThermoPro TP03) to verify your calibration work—your tank’s stability depends on this unsung hero of aquarium equipment.