How Aquarium Chillers Work: Cooling Explained
Your prized coral polyps are receding. That vibrant mandarin fish you’ve nurtured for months suddenly seems lethargic. The culprit? Unseen temperature spikes from summer heat or powerful LED fixtures turning your carefully balanced reef ecosystem into a thermal time bomb. When ambient temperatures rise, standard aquarium heaters become useless guardians against overheating. This is where an aquarium chiller becomes your tank’s lifeline—but how does an aquarium chiller work to save your aquatic investment? Unlike makeshift ice packs or erratic fans, these precision machines deploy refrigeration science to maintain life-sustaining temperatures. In this guide, you’ll discover the exact mechanics that transform warm tank water into a consistently cool environment, why they’re non-negotiable for sensitive marine life, and how to avoid costly installation mistakes.
Why Aquarium Chillers Remove Heat Instead of Creating Cold
Understanding how an aquarium chiller works starts with a critical misconception: chillers don’t generate coldness. They’re sophisticated heat-removal systems that function like underwater air conditioners. When warm water from your tank flows through the chiller, it encounters refrigerant-filled coils chilled to temperatures below your desired setpoint. This temperature differential causes thermal energy to naturally migrate from the warmer water into the colder refrigerant—a physics principle called heat transfer. The chiller then expels this captured heat into your room air, returning cooled water to your ecosystem. Without this continuous heat-extraction process, summer heatwaves or high-output lighting would rapidly destabilize water chemistry, deplete oxygen, and trigger catastrophic die-offs in temperature-sensitive species like acropora corals or mandarin fish.
The Refrigeration Cycle: Inside Your Chiller’s Cooling Engine
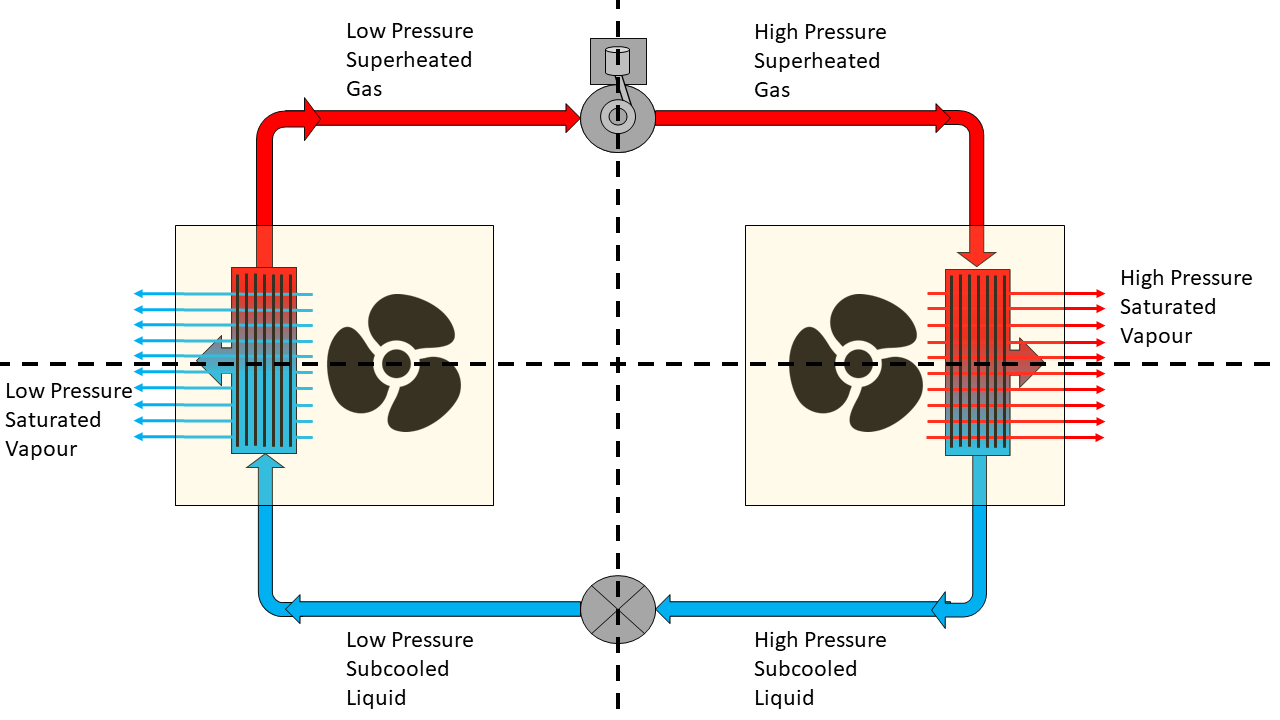
Every aquarium chiller operates on a closed-loop refrigeration cycle where a specialized fluid changes states to absorb and release heat. This isn’t magic—it’s precise thermodynamics engineered for aquatic stability.
How Evaporator Coils Suck Heat From Your Tank Water
Your aquarium’s warm water (typically 80-85°F) enters the chiller via external plumbing and flows over the evaporator coil—a maze of copper tubing containing liquid refrigerant under low pressure. Because this refrigerant boils at temperatures as low as -15°F, it instantly absorbs thermal energy from the passing water. As the water loses heat, the refrigerant evaporates into a gas while the cooled water (now 76-78°F) returns to your tank. Crucially, this heat exchange happens without direct contact between refrigerant and aquarium water—the copper barrier prevents contamination while maximizing thermal transfer. If you inspect your chiller during operation, you’ll notice condensation forming on the evaporator housing, a visible sign of this intense cooling process.
Compression: Where Heat Gets Supercharged for Expulsion
The now-gaseous refrigerant exits the evaporator and enters the compressor—the chiller’s powerhouse. Here, pistons or scroll mechanisms violently squeeze the gas, increasing its pressure 5-10x. This compression dramatically raises the gas temperature to 120-150°F, far hotter than your room air. Why deliberately make it hotter? Because heat only flows from warmer to cooler objects. By superheating the refrigerant, the chiller ensures it can efficiently dump captured tank heat into your ambient environment. You’ll hear the compressor engage as a distinct low hum; its cycling on/off (controlled by your thermostat) directly correlates to your tank’s temperature stability.
Expansion Valve: The Instant Cooling Trigger
After compression, the scalding refrigerant gas flows into the condenser coil where fans blast room air across its fins. This airflow strips heat from the refrigerant, causing it to condense back into a high-pressure liquid. But here’s the critical transition: this liquid then hits the thermostatic expansion valve (TXV). This precision component acts like a thermal gatekeeper, creating a sudden pressure drop that causes the refrigerant to explosively expand and cool—dropping to -15°F in milliseconds. This super-chilled liquid is now primed to re-enter the evaporator coil and restart the cycle, continuously siphoning heat from your aquarium 24/7. The TXV’s accuracy determines your temperature stability; cheaper units with fixed orifices often fluctuate ±2°F, while quality TXVs maintain ±0.5°F.
Essential Components You Must Integrate for Reliable Cooling
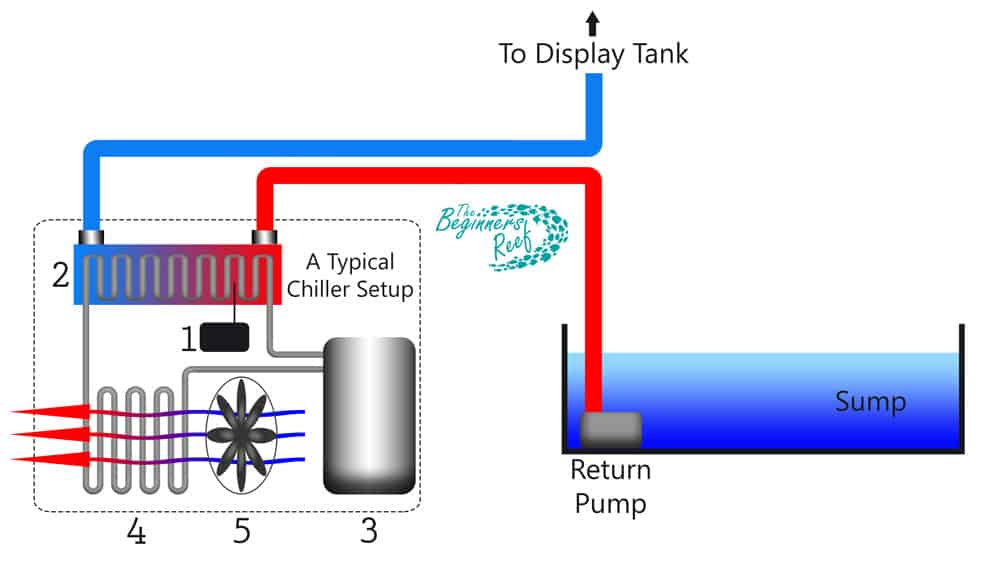
A chiller isn’t a standalone “plug-and-play” device—it’s the centerpiece of a precision cooling ecosystem requiring strategic integration.
The Chiller Unit: More Than Just a Box
Your chiller’s metal housing contains four non-negotiable components working in concert: the evaporator coil (where tank water cools), compressor (heat amplifier), condenser coil (heat radiator), and TXV (cooling catalyst). Modern units like the Nyos or Coralife models integrate digital controllers that monitor water temperature 10x per second, preventing short-cycling that destroys compressors. Crucially, the condenser fan must move 200+ CFM of air—any less, and heat backs up into the system. During operation, touch the condenser fins; they should feel hot (100-120°F), confirming active heat expulsion. If they’re merely warm, your unit is underperforming due to poor airflow or refrigerant issues.
Plumbing and Pump Requirements: The Flow Lifeline
Chillers rely entirely on external water movement—you absolutely need a dedicated pump or sump return line pushing water through the system. Most units require 2.7-5.3 GPM flow rates; too slow and water freezes inside the evaporator (shutting down the chiller via flow sensor), too fast and insufficient cooling occurs. For a 180-gallon reef tank, a Sicce 2.5 pump (500 GPH) works, but a 300-gallon system needs a Reeflo Bullet (1,000+ GPH). Always install a ball valve before the chiller inlet to fine-tune flow, and use 1/2″ ID tubing with double hose clamps at every connection point. Pro tip: Add a T-fitting with an in-line thermometer pre-chiller to monitor real-time temperature drop—your target is 2-4°F reduction per pass.
Thermostat Control: Your Precision Command Center
The thermostat is your chiller’s brain, but not all controllers are equal. Basic units like the Inkbird ITC-308 use simple on/off cycling that causes 1-2°F temperature swings. Advanced reef keepers use Neptune Systems Apex controllers that integrate with WiFi, allowing remote adjustments and logging. Set your target temperature 1-2°F below your critical threshold—e.g., if mandarins need ≤78°F, set the chiller to 76°F. This buffer prevents dangerous spikes during heatwaves. Always place the thermostat probe in high-flow areas like the sump outflow, never near heater outlets or light sources, to avoid false readings.
4 Critical Setup Mistakes That Destroy Chillers
Improper installation causes 80% of chiller failures. Avoid these traps that turn expensive equipment into paperweights.
Undersizing or Oversizing: The Capacity Kill Zone
A 1/10 HP chiller for a 100-gallon reef tank with 500W lighting will run nonstop yet fail to cool, burning out its compressor within months. Conversely, a 1/3 HP unit on that same tank will short-cycle—cooling too aggressively then shutting off, causing damaging temperature rollercoasters. Calculate your heat load: add all equipment wattage (lights + pumps + heaters), then multiply by 3.41 to get BTU/hr. For a 200-gallon tank with 800W total heat output: 800 × 3.41 = 2,728 BTU/hr. Add 30% buffer: 3,546 BTU/hr. Now choose a chiller rated for 3,600+ BTU/hr (like the JBJ Arctica 1/6 HP). Never size solely by tank volume—your Florida garage room adds 30% more heat load than an air-conditioned basement.
Suffocating Your Chiller: The Ventilation Death Trap
Placing your chiller inside a closed cabinet is the #1 cause of premature failure. Condenser coils need 12+ inches of clearance on all sides to exhaust 120°F+ air. One hobbyist’s $600 unit failed in 3 months because it sat under a stand with only 3″ rear clearance—the trapped heat triggered constant thermal shutdowns. Position units in open areas away from walls, and never stack equipment above them. In tight spaces, add 4″ exhaust fans venting hot air outside the room. During operation, measure ambient air 6″ from the condenser; if it exceeds 95°F, airflow is insufficient.
Ignoring Flow Rate: The Freeze or Fail Dilemma
Chillers have Goldilocks flow requirements—too slow risks evaporator coil freezing (tripping safety cutoffs), too fast yields minimal cooling. A JBJ Arctica 1/10 HP needs 150-300 GPH; at 100 GPH, ice forms inside within minutes. At 400 GPH, water cools only 1°F per pass. Install a flow meter ($15) on the outlet line and adjust inlet valves until flow hits the manufacturer’s sweet spot. If your chiller has a flow sensor light, it should glow steady green—not flickering or off.
Skipping Maintenance: The Silent Efficiency Killer
Dust-clogged condenser coils reduce cooling efficiency by 40% within 6 months. Pet hair is especially deadly, insulating fins like a thermal blanket. Monthly, vacuum coils with a soft brush attachment (never compressed air—it bends delicate fins). Every 3 months, flush the evaporator with a 50/50 vinegar-water solution for 30 minutes to dissolve mineral deposits. One reef keeper restored his struggling chiller’s performance by cleaning algae-clogged water filters—a 10-minute fix that saved a $500 replacement.
Why Chillers Beat DIY Cooling Methods for Reef Survival
Fans over tank surfaces seem cheap but fail when humidity exceeds 60%—common in marine rooms—because evaporative cooling stops working. They also cause dangerous salinity spikes as water evaporates. Frozen water bottles create lethal temperature swings (>5°F/hour) that shock corals. Air conditioners cool your entire house inefficiently at $0.30/kWh versus a chiller’s $0.15/kWh for targeted cooling. Crucially, only how an aquarium chiller works delivers the ±0.5°F stability that sensitive acropora and clams require. During a 2023 Texas heatwave, reef tanks with properly sized chillers maintained 77°F while ambient hit 105°F—units without chillers exceeded 88°F, triggering mass coral bleaching.
Final Note: An aquarium chiller isn’t a luxury—it’s life support for temperature-sensitive ecosystems. By understanding how an aquarium chiller works (heat extraction via refrigerant cycling), you transform it from a mysterious box into a precision tool. Prioritize correct sizing based on heat load, never compromise on ventilation, and maintain coils monthly. For reef tanks in warm climates, this knowledge isn’t just technical—it’s the difference between a thriving underwater garden and a tragic meltdown. When your acropora extends vibrant polyps at a rock-steady 76°F during summer’s peak, you’ll appreciate the engineering marvel silently preserving your aquatic world.