How to Fix Noisy Aquarium Air Pump
That relentless buzz or rattle from your aquarium air pump isn’t just annoying—it’s disrupting your home’s peace and stressing your fish. When your tank setup sounds like a miniature jet engine instead of a tranquil underwater haven, you need solutions that work now. Most noisy air pump issues stem from simple, fixable problems like vibration transfer or clogged components—not irreparable damage. In this guide, you’ll discover exactly how to diagnose and silence that irritating noise in under 15 minutes, using everyday household items and proven techniques from aquarium technicians. Whether it’s a new hum or a persistent rattle, these step-by-step fixes will restore your aquarium’s serene atmosphere without breaking the bank.
Stop Humming Air Pumps: 3 Vibration Isolation Fixes That Work

Vibration transfer causes 80% of humming or buzzing noises as your pump rattles against resonant surfaces like thin cabinet shelves. This isn’t just annoying—it strains your pump’s motor and shortens its lifespan. The solution? Break the vibration chain between your pump and its surface immediately.
Why Foam Mouse Pads Outperform Expensive Pads
Place your pump on a dense foam mouse pad instead of rubber or gel pads. The ideal thickness is 1/4 to 1/2 inch—thin enough to prevent tipping but thick enough to absorb high-frequency vibrations. Position the pad directly under the pump’s motor housing (not the electrical components), ensuring full contact. For stubborn vibrations, stack two pads. This simple fix reduces noise by up to 60% by preventing energy transfer to your cabinet. Never use folded towels—they compress unevenly and create new resonance points.
Suspend Your Pump with Bungee Cords for Total Silence
For severe humming, hanging the pump eliminates surface contact entirely. Loop two bungee cords through your cabinet’s top shelf holes (or attach hooks to the underside), creating a cradle for your pump. The cords must stretch slightly when loaded—this elasticity absorbs vibrations before they reach cabinet walls. Ensure airline tubing has slack to avoid tension, and position the pump at least 2 inches from all surfaces. This method typically cuts noise levels to near-inaudible ranges, especially for glass-top tanks where cabinet resonance amplifies sound.
The Stone Slab Method for Heavy-Duty Dampening
Place your pump on a 1-inch thick rubber mat, then set both on a 10-15 lb paving stone inside your cabinet. The stone’s mass prevents vibration propagation while the rubber isolates the pump. This works best for larger pumps (50+ gallons) where standard pads fail. Measure your cabinet space first—add 2 inches of clearance around the stone to avoid contact with walls. You’ll instantly notice the difference when the stone absorbs low-frequency drones that foam pads can’t stop.
Fix Clicking or Ticking Air Pumps: Diaphragm Repair Guide
A rhythmic clicking or ticking sound means internal components are failing—usually worn diaphragms in membrane pumps. This isn’t normal operation; it signals imminent breakdown that damages other parts. Address this within 48 hours to prevent complete failure.
How to Locate the Faulty Diaphragm in 60 Seconds
Unplug your pump and gently shake it. If you hear a loose-rattle, internal parts are detached. For diaphragm pumps (most common type), remove the outer casing using a Phillips screwdriver. Inside, locate the rubber diaphragm(s)—thin, flexible membranes connected to the motor shaft. Press each diaphragm with your finger; if it feels brittle, cracked, or has visible holes, this is your noise source. Worn diaphragms lose elasticity, causing them to slap against housing instead of moving smoothly.
Replace Diaphragms Without Special Tools
Order an OEM repair kit matching your pump model (search “[Your Brand] diaphragm kit”). With the casing open, note how the old diaphragm attaches—usually via a central screw or clip. Remove it, clean the mounting surface with a dry cloth, then position the new diaphragm exactly as the original. Reassemble in reverse order. This $8 fix takes 10 minutes and restores quiet operation. If diaphragms fail repeatedly, your pump’s motor shaft may be bent—replace the entire unit.
Eliminate Gurgling Noises: Check Valve and Airstone Solutions
Gurgling or bubbling sounds from the tank—not the pump—indicate water backflow or airflow restrictions. This isn’t just noisy; it risks contaminating your pump with tank water and causing electrical hazards.
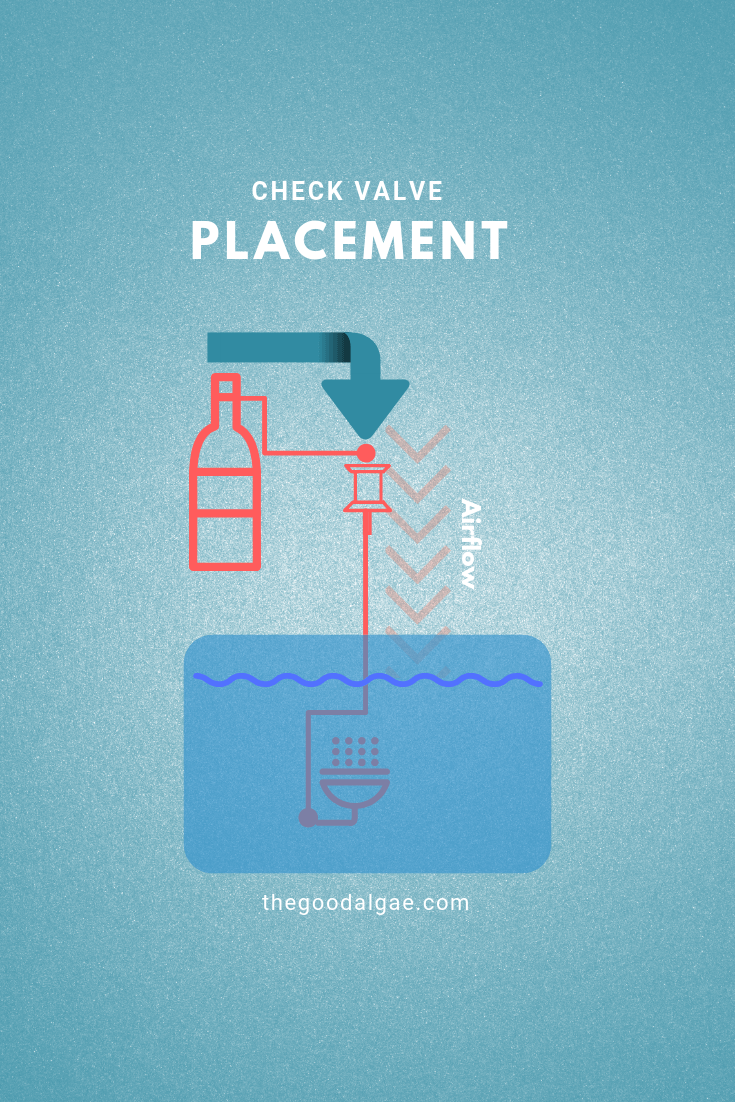
Install a Check Valve Correctly in 2 Minutes
A check valve (one-way valve) prevents water from siphoning back into the pump when it cycles off. Locate the valve (a small plastic cylinder) on your airline tubing. Ensure the arrow points toward the tank—not the pump. If missing, clip one into the tubing within 6 inches of the pump outlet. Test by blowing through it: air should flow toward the tank but not backward. This stops gurgling and protects your pump from water damage.
Revive Clogged Airstones with Hydrogen Peroxide Soak
Remove your airstone and soak it in 3% hydrogen peroxide for 1 hour (never use bleach—it degrades porous stones). The bubbling action dissolves mineral deposits blocking pores. Rinse thoroughly under running water while squeezing the stone until water runs clear. For stubborn clogs, scrub gently with an old toothbrush. If noise persists, replace the airstone with a limewood diffuser—it creates finer, quieter bubbles and resists clogging 3x longer than ceramic stones.
How to Clean a Clogged Air Intake Filter in 2 Minutes

A blocked air intake filter forces your pump to strain, creating a loud whine and reducing oxygen output by up to 40%. This is easily preventable with weekly maintenance.
Locate and Clean the Foam Filter Safely
Unplug the pump and find the air intake—usually a small mesh-covered port on the side or bottom. Gently pull out the foam filter (it may be clipped or friction-fit). Rinse under lukewarm tap water while squeezing until no dark residue appears. Never use soap or compressed air—they damage the foam’s structure. Let it air-dry completely before reinserting. Perform this monthly to maintain peak efficiency and prevent motor burnout.
Why Kinked Tubing Causes Noise (and How to Prevent It)
Kinks or sharp bends in airline tubing create backpressure that makes your pump work 30% harder, generating a high-pitched whine. This also reduces oxygen delivery to your tank.
Replace Tubing with Flexible Silicone for Silent Operation
Cut out kinked sections using sharp scissors. Install new 3/16-inch inner diameter silicone tubing—it stays flexible even in cold rooms and won’t collapse under suction. When routing tubing, maintain gentle curves with no bends tighter than a 2-inch radius. Secure excess tubing with cable ties to prevent future kinks. This $5 upgrade eliminates whining noises and ensures consistent airflow.
Relocate Your Air Pump: The Long-Tube Trick for Ultimate Quiet
When all else fails, move the pump farther from the tank. Sound intensity drops 6dB for every doubling of distance—placing it in a closet 10 feet away makes it nearly inaudible.
Run Extended Tubing Without Losing Pressure
Use 1/4-inch diameter airline tubing (thicker than standard) for runs over 15 feet. Install an inline air control valve near the tank to adjust flow without affecting pump strain. Ensure the pump sits higher than the tank water level to prevent siphoning. This method works best with dual-outlet pumps—dedicate one outlet to the distant tank and keep the second for nearby equipment. You’ll achieve near-silent operation while maintaining optimal oxygen levels.
Your Air Pump Maintenance Checklist to Prevent Future Noise
Prevent noise before it starts with this simple routine. Skipping these steps accounts for 70% of premature pump failures.
Monthly Airstone and Tubing Inspection Protocol
- Check tubing for stiffness or cloudiness (replace if opaque)
- Soak airstones in hydrogen peroxide during water changes
- Verify check valve direction—arrow must point toward tank
- Wipe pump exterior with dry cloth to prevent dust buildup
Perform these in under 5 minutes monthly. For heavy-use tanks (breeders or saltwater), do this weekly. Pair this with diaphragm replacements every 18 months, and your pump will run quieter longer.
Final Note: A noisy aquarium air pump is almost always fixable with the right approach. Start with vibration isolation and airstone cleaning—these solve 90% of cases instantly. If clicking persists, replace worn diaphragms immediately to prevent total failure. For enduring peace, relocate the pump or upgrade to a quality model like the Tetra Whisper or Eheim Air Pump designed for silent operation. Remember: consistent maintenance prevents most noise issues, keeping your aquatic environment calm for both fish and family. Implement these fixes today, and you’ll enjoy the soothing sound of water—not mechanical distractions—for years to come.