How to Clean Aquarium Air Pump: Easy Steps
Your aquarium’s air pump is the silent guardian of your underwater ecosystem—until it isn’t. When mineral deposits, algae, and bacterial slime infiltrate its delicate valves and diaphragms, airflow plummets, noise levels spike, and your fish start gasping at the surface. A neglected air pump can fail completely within weeks, suffocating fish and crashing your entire tank’s balance. Learning how to clean aquarium air pump components isn’t just maintenance—it’s emergency prevention. In this guide, you’ll master a step-by-step cleaning protocol that restores silent operation, extends pump lifespan by years, and ensures your aquatic life gets the oxygen it needs. Forget generic advice; we’re targeting every critical component from filters to air stones with precision techniques that work.
Most beginners make the fatal mistake of ignoring their air pump until bubbles stop flowing. But visible symptoms mean damage is already done. Proactive cleaning every 3 months prevents 90% of failures by removing calcium buildup that strangles airflow and corrodes internal parts. You’ll need just $5 worth of supplies—white vinegar, cotton swabs, and a soft brush—and 20 minutes of your time. By the end of this guide, you’ll diagnose clogs before they escalate, sanitize components without damaging seals, and implement a foolproof maintenance schedule. Let’s dive into the exact system professional aquarists use to keep pumps running like new.
Unplug and Prep Your Air Pump Safely
Never skip this critical safety step—electrocution risks are real when water meets electricity. First, unplug the pump from the wall outlet and disconnect all airline tubing from its output ports. Remove any attached check valves or air stones still submerged in the tank. Place the pump on a clean, dry towel away from water sources. Gather your toolkit: white vinegar (or 70% isopropyl alcohol), cotton swabs, soft-bristled toothbrush, lint-free cloth, small bowl, and compressed air can. Crucially, never submerge the pump motor housing or force open sealed units—water intrusion destroys internal electronics instantly. If your pump shows visible cracks or moisture inside, replace it immediately instead of cleaning.
What to Check Before Disassembly
Inspect the pump’s exterior for dust-packed vents or mineral crust around output ports. If the motor feels unusually hot during operation, severe internal buildup is likely. Note any airflow inconsistencies: weak bubbles suggest tubing clogs, while loud buzzing indicates diaphragm strain from restricted intake. These clues dictate which components need deepest cleaning.
Deep Clean the Air Intake Filter

A clogged foam filter forces your pump to overwork, generating excess heat that melts internal components. This is the #1 cause of premature failure.
Step-by-Step Filter Revival
- Locate and remove the filter: Typically a small gray foam disc near the motor housing’s base. Gently pry it out—never yank.
- Initial rinse: Hold under cool running water while squeezing gently. Never twist or wring—this shreds the foam’s pores.
- Vinegar soak for stubborn gunk: Submerge in 1:1 vinegar/water for 10 minutes. Agitate lightly to dissolve calcium deposits. Rinse until water runs clear.
- Dry thoroughly: Air-dry 24 hours or use a hairdryer on cool setting. Installing a damp filter breeds mold—wait until it’s bone-dry.
Replace filters annually or if torn. A clean filter should feel springy and smell neutral—not musty or sour.
Sanitize Airline Tubing Without Chemical Residues
Cloudy, slimy tubing isn’t just gross—it starves your tank of oxygen by blocking 70%+ of airflow. Vinegar’s acidity kills biofilm without toxic residues that harm fish.
Tubing Cleaning Protocol
- Quick flush: Run water through both ends until debris stops flowing.
- Deep clean: Fill tubing with 1:1 vinegar solution, seal ends with fingers, and shake for 30 seconds. Soak 15 minutes—never exceed 20 minutes as vinegar degrades silicone.
- Final rinse: Flush with running water for 2 full minutes while squeezing. Smell the tubing—any vinegar odor means rinse again. Hang vertically to dry completely before reattaching.
Pro Tip: Replace tubing every 6 months. Cracked or brittle tubes harbor bacteria even after cleaning.
Restore Check Valve Function in 3 Minutes
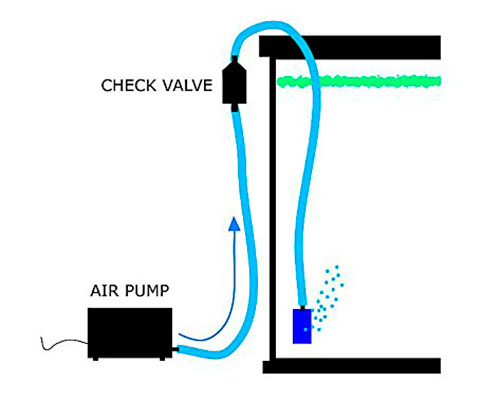
A sticky check valve allows tank water to back-siphon into your pump during power outages—flooding and destroying the motor.
Critical Valve Maintenance
- Test valve direction: Blow through it. Air should flow only toward the tank (arrow direction).
- Soak in vinegar: Submerge 20 minutes to dissolve mineral buildup on the rubber flap.
- Rinse and test: Shake out water, then verify one-way airflow before reinstalling. Never force misaligned valves—they’ll leak.
If the flap doesn’t seal tightly after cleaning, replace the valve. A $2 part saves a $50 pump.
Unclog Air Stones for Maximum Oxygenation
Clogged air stones reduce bubble output by 80%, suffocating beneficial bacteria. Hydrogen peroxide works better than vinegar here—it penetrates porous stone without residue.
Stone Revival Process
- Hydrogen peroxide soak: Submerge in 3% H₂O₂ for 30 minutes. Never use vinegar—it gets trapped in pores, leaching into your tank.
- Gentle scrub: Use a soft brush on the surface only. Avoid poking holes deeper.
- Boil for emergency revival: 5 minutes in water kills stubborn algae but shortens stone life. Replace if crumbling.
Expert Note: Air stones last 6-12 months. If bubbles remain weak after cleaning, replace it—mineral deposits are permanent.
Clean Pump Exterior Without Risking Damage
Dust-clogged vents cause overheating, the silent killer of air pumps. But one wrong move can ruin everything.
Safe Exterior Cleaning
- Cooling vents: Blast with compressed air from 6 inches away. Hold the can upright to avoid propellant residue.
- Plastic housing: Wipe with vinegar-dampened cloth. Never spray liquid directly—mist could seep into vents.
- Critical warning: Do not open the sealed motor housing. Most pumps are non-serviceable internally. Attempting disassembly voids warranties and risks electric shock.
Wipe vents weekly during water changes—this prevents 60% of heat-related failures.
Reassemble and Diagnose Post-Cleaning Issues
Rushing reassembly causes leaks or reversed valves. Follow this sequence:
Precision Reassembly Checklist
- Install the dry air filter first—damp filters attract dust.
- Reconnect tubing to pump outputs, ensuring no kinks.
- Attach the check valve with the arrow pointing toward the tank.
- Plug in the pump while holding it above tank water level—prevents back-siphoning during startup.
Listen for these critical sounds:
– Hissing: Loose tubing connection—tighten by hand.
– Loud buzzing: Clogged air stone or bent diaphragm—re-clean components.
– No bubbles: Check valve installed backward—flip it immediately.
If issues persist, unplug and retrace each step—90% of problems stem from assembly errors.
Monthly Maintenance Schedule That Prevents Disasters
Prevention beats emergency repairs every time. Implement this tiered routine:
- Weekly: Wipe exterior with dry cloth; inspect tubing for kinks.
- Monthly: Rinse air filter under tap water (no vinegar soak needed).
- Quarterly: Full clean of all components as detailed above.
Never skip these:
– Place the pump above your tank’s water line to prevent siphoning.
– Always use a check valve—even if your pump has built-in anti-siphon.
– Store spare filters and tubing in your aquarium kit.
When bubbles slow or noise increases, clean immediately—don’t wait for total failure. A well-maintained air pump runs silently for 3-5 years, versus 12-18 months for neglected units. Your fish won’t thank you, but they’ll thrive in the stable, oxygen-rich environment you’ve secured. Start your cleaning session today—your tank’s lifeline depends on it.