How Long Does a 10lb CO2 Tank Last in Aquariums
You’ve set up your thriving planted tank with lush carpeting and vibrant stem plants, only to wonder when that 10lb CO2 tank will run dry. This common frustration hits every aquascaper relying on pressurized CO2 systems—especially when you’re mid-trim and notice bubbles slowing to a trickle. The truth? Your 10lb CO2 tank could last anywhere from six months to over 18 months, but pinning down an exact timeline requires understanding your unique setup’s demands. Unlike a fixed fuel gauge, CO2 consumption depends entirely on how you balance injection rates against your tank’s biological needs. This guide cuts through the guesswork to show you exactly what controls your tank’s lifespan and how to maximize every ounce of gas.
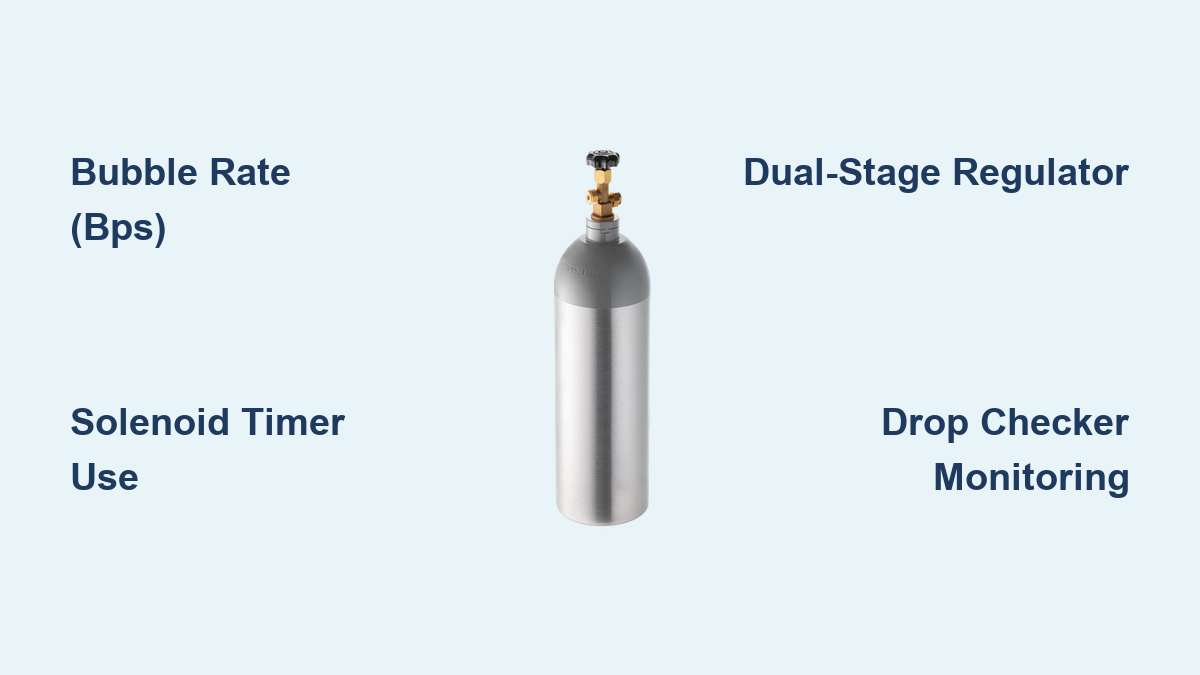
Most beginners assume tank size alone determines longevity, but a 10lb cylinder in a densely planted 75-gallon high-tech tank depletes twice as fast as in a low-tech 20-gallon. The critical factor isn’t gallons of water—it’s your bubble rate (BPS) and system efficiency. When you grasp how bubble size, regulator quality, and lighting schedules interact, you’ll stop playing CO2 roulette and start predicting refill dates with confidence. Let’s dive into the real-world variables that dictate whether your tank lasts six months or stretches beyond a year.
Bubble Rate: Why Your BPS Setting Controls Tank Longevity
Your bubble counter isn’t just a visual aid—it’s the primary throttle for CO2 consumption. Every additional bubble per second (BPS) directly accelerates tank depletion, but the relationship isn’t linear. Running at 2 BPS drains gas twice as fast as 1 BPS, while 3 BPS triples the consumption rate. This exponential drain explains why high-demand tanks exhaust cylinders rapidly, while nano setups sip gas slowly. The key is finding your tank’s minimum effective rate rather than chasing maximum bubble counts.
How Bubble Size Changes Your Consumption Math
“1 BPS” means radically different things across systems because bubble volume varies wildly. A ceramic diffuser might produce 10% larger bubbles than an inline reactor at the same needle valve setting, delivering more CO2 per bubble. This is why comparing your BPS to forum posts is useless—your “1 BPS” could inject 30% more gas than another hobbyist’s. Always treat BPS as a relative benchmark only for your specific setup. When adjusting rates, note the exact needle valve position and bubble size for consistent reference.
Why You Can’t Ignore Regulator Flow Stability
Inconsistent pressure from low-quality regulators creates deceptive bubble patterns. Single-stage regulators often show fluctuating BPS as tank pressure drops, causing sudden CO2 spikes that waste gas and endanger fish. Invest in a dual-stage regulator with a precision needle valve—it maintains stable flow until the tank is nearly empty, preventing erratic consumption. Test yours by monitoring bubbles over 30 minutes; if counts vary by more than 10%, upgrade before relying on BPS calculations.
Aquarium Size and Plant Density: The Hidden Demand Factors
Tank volume alone doesn’t dictate CO2 needs—it’s the combination of water capacity and photosynthetic demand. A heavily planted 55-gallon with T5 lighting consumes CO2 3-4× faster than a sparsely planted 75-gallon with low-light species. The real drain comes from plant mass and light intensity working together to accelerate photosynthesis.
Matching Injection to Tank Volume Without Waste
Start with baseline rates: Nano tanks (5-20 gallons) typically need 0.5-1 BPS, while 50+ gallon high-tech setups require 1.5-3 BPS. But never set-and-forget—adjust based on plant response. If stem plants show new growth within days but no “pearling” (oxygen bubbles on leaves), increase BPS by 0.2 increments. Conversely, if you see algae blooms, reduce rate immediately. Your target is the lowest BPS that sustains visible plant health—not maximum possible injection.
High-Light Tanks: When CO2 Demand Skyrockets
Tanks with >3W/gallon lighting and CO2-hungry plants like HC Cuba or Glossostigma can deplete a 10lb tank in 4-6 months. These setups often need 2.5+ BPS to maintain 25-30ppm dissolved CO2. If you run such a system, budget for two annual refills and always keep a backup cylinder. For extended tank life, consider supplementing with liquid carbon in low-light periods to reduce pressurized CO2 usage by 20-30%.
Preventing End of Tank Dump: Avoiding a Lethal CO2 Surge
End of Tank Dump (EOTD) isn’t just inconvenient—it’s a silent killer that can wipe out your entire tank overnight. As pressure drops below 200 PSI in single-stage regulators, the mechanism fails catastrophically, flooding your aquarium with pure CO2. This causes pH to crash below 6.0 within hours, suffocating fish through CO2 poisoning. Dual-stage regulators prevent 95% of EOTD incidents, but vigilance remains critical.
Dual-Stage Regulators as Your Essential Safety Net
Never operate without this upgrade. Dual-stage regulators maintain consistent output pressure until the tank is nearly empty, eliminating dangerous pressure surges. When shopping, verify it has two pressure gauges (high-pressure tank gauge and low-pressure output gauge). The high-pressure gauge should hold steady at 800-1000 PSI for 90% of the tank’s life—any significant drop indicates imminent depletion. This simple feature transforms CO2 from a risk into a reliable tool.
Recognizing Early Warning Signs of Depletion
Monitor your high-pressure gauge weekly. A full 10lb tank reads 800-1000 PSI; when it drops to 600 PSI, schedule a refill within 2-3 weeks. Never wait for zero PSI—that’s when EOTD risk peaks. Also watch for:
– Reduced bubble consistency (gaps between bubbles)
– Diminished plant pearling despite stable BPS
– Rising pH in drop checker (shifting from green to blue)
Why You Must Use a Solenoid Timer with Your 10lb CO2 Tank

Running CO2 24/7 wastes 50% of your gas while stressing fish. Plants only absorb CO2 during photosynthesis—turning it off at night prevents dangerous buildup and extends tank life significantly. A solenoid valve connected to a timer is non-negotiable for responsible CO2 management.
Programming Your Timer for Maximum Efficiency
Set the solenoid to activate 90 minutes before lights-on and deactivate 60 minutes before lights-off. This creates optimal CO2 saturation at dawn (when plants start photosynthesizing) and prevents residual gas buildup at night. For example:
– Lights on at 8:00 AM → CO2 on at 6:30 AM
– Lights off at 10:00 PM → CO2 off at 9:00 PM
This schedule alone can extend a 10lb tank’s life by 3-4 months compared to continuous injection. Use a digital timer with battery backup to avoid schedule failures during power outages.
Avoiding Common Timer Mistakes That Waste Gas
Never sync CO2 with lights turning on/off simultaneously—plants need time to saturate. Also, don’t assume “off” means zero leakage; test by closing the tank valve while the solenoid is off. If bubbles continue, you have a faulty solenoid wasting gas 12 hours daily. Replace leaky solenoids immediately—they’re cheaper than premature refills.
Real-World Lifespan: What to Expect from a 10lb Tank
Forget theoretical calculations—actual user experiences reveal the true range. Hobbyists with 30-40 gallon moderate-tech tanks (2 BPS, 8-hour injection) consistently report 8-12 month lifespans. Nano tank owners (0.5 BPS, 6-hour injection) often stretch tanks to 14-18 months. But high-demand setups like 75-gallon Dutch aquascapes (3+ BPS) may exhaust tanks in 5-7 months.
Interpreting Anecdotal Reports Without Misleading Yourself
One user documented a 10lb tank lasting 22 months in a 20-gallon low-tech tank with minimal injection. Another drained the same size tank in 4 months running dual 120-gallon planted tanks. These extremes prove two truths: Your specific BPS matters more than tank size, and solenoid usage is the great equalizer. Track your own consumption for 30 days—multiply daily BPS by 86,400 seconds—to establish a personalized depletion timeline.
When to Suspect Hidden Gas Leaks
If your tank depletes faster than expected despite stable BPS, check for leaks immediately. Apply soapy water to all connections—bubbles indicate leaks wasting gas. Common culprits include:
– Loose regulator-tank valve connections
– Cracked bubble counter tubing
– Degraded O-rings in needle valves
Fixing minor leaks can add 2-3 months to tank life. Perform this check monthly during routine maintenance.
Drop Checker vs. pH/KH: Pinpointing the Perfect CO2 Level
Relying solely on BPS is like driving blindfolded—you need real-time feedback on dissolved CO2. A $10 drop checker provides instant visual monitoring, while pH/KH testing offers precise ppm calculations. Both prevent dangerous over/under-injection that shortens tank life.
Interpreting Color Cues for Safe CO2 Levels
Fill your drop checker with 4dKH reference solution and place it near filter outflow. Colors indicate:
– Blue: <15 ppm CO2 (too low—increase BPS)
– Green: 20-30 ppm (ideal range)
– Yellow: >30 ppm (danger zone—shut off CO2)
Check it 2 hours after CO2 activation for accurate readings. If consistently blue, you’re wasting potential growth; if yellow, you’re risking fish safety and accelerating tank depletion. Adjust BPS in 0.1 increments until you hit stable green.
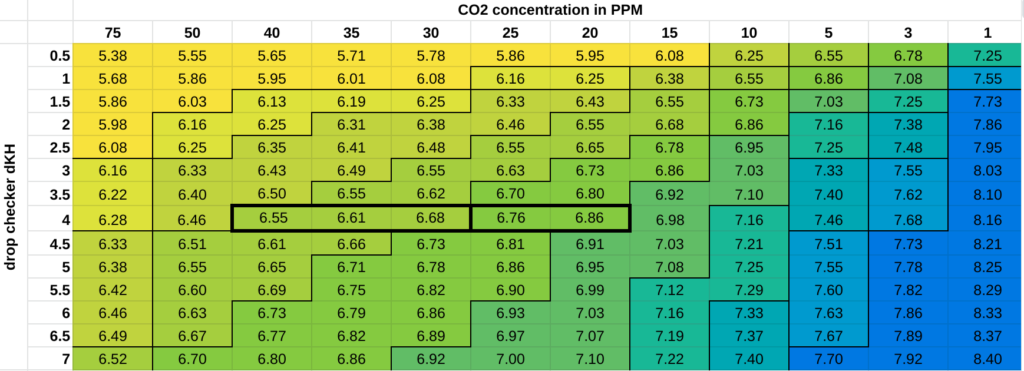
The pH/KH Method for Precision Targeting
For scientific accuracy, measure your tank’s pH without CO2 (after 24h aeration), then with CO2 running. The difference reveals ppm:
– 1.0 pH drop = ~20 ppm CO2
– 1.5 pH drop = ~30 ppm CO2
Aim for 1.0-1.5 point drop—this sweet spot maximizes plant growth without endangering livestock. This method prevents the “BPS trap” where you inject excess gas trying to hit arbitrary bubble counts.
Maximizing Tank Life: 3 Actionable Strategies for Efficiency
Extend your 10lb CO2 tank’s lifespan by 25% with these proven tactics. These aren’t theoretical tweaks—they’re field-tested methods that convert gas waste into months of extra runtime.
Optimize Diffuser Placement for Maximum Dissolution
Position your diffuser opposite the filter outflow to create turbulent water movement. This ensures CO2 mists disperse evenly rather than rising to the surface. For canister filters, place the diffuser near the intake tube to pull mist through the entire water column. Proper placement boosts dissolution efficiency by 15-20%, meaning less gas needed for the same ppm.
Seal Critical Connection Points Before They Leak
Tighten all fittings weekly using two wrenches (one to hold the regulator, one for the nut). Focus on:
– Tank valve to regulator connection
– Solenoid inlet/outlet ports
– Bubble counter tubing ends
Apply PTFE tape to threaded connections annually. A single pinhole leak can drain 1lb of CO2 weekly—enough to shorten tank life by 45+ days.
Calibrate BPS to Plant Response, Not Forum Advice
Your ideal rate is where plants show active growth without stress signs. For most tanks, this is 0.8-1.2 BPS per 20 gallons with 8-hour injection. But watch for:
– ✅ Good sign: New leaves on stem plants within 7 days
– ⚠️ Reduce BPS: Fish gasping at surface or rapid gill movement
– ✅ Perfect: Consistent pearling during peak light hours
Adjust only when plants show clear response—never based on arbitrary schedules. This precision prevents 30% over-injection common in new setups.
Final Note: A 10lb CO2 tank typically lasts 6-18 months depending on your bubble rate, tank demands, and system efficiency—but you control the outcome. By using a dual-stage regulator with solenoid timer, monitoring with a drop checker, and adjusting BPS to plant response, you’ll maximize every ounce of gas while keeping livestock safe. Track your personal consumption rate for 30 days to predict refill dates accurately, and always replace tanks at 600 PSI to avoid End of Tank Dump risks. For next steps, calculate your tank’s specific depletion rate using the BPS tracking method in this guide, and bookmark a local refill station before your next cylinder runs low.