How to Remove Gravel Dust from Aquarium
That frustrating cloudy haze after setting up a new aquarium isn’t algae or a bacterial bloom—it’s gravel dust muddying your view and stressing your fish. This fine, silt-like sediment gets suspended when water hits unwashed substrate, turning your dream tank into a murky mess. The good news? You can clear it fast without harming your aquatic ecosystem. I’ve helped hundreds of hobbyists solve this exact problem, and in this guide, you’ll learn the precise mechanical filtration tricks, water change techniques, and prevention strategies to achieve crystal-clear water. Most importantly, you’ll discover why simply “waiting it out” wastes weeks of enjoyment—and how to fix it properly in under two days.
Why New Substrate Turns Your Aquarium Cloudy Within Minutes
That persistent dust cloud comes straight from your gravel or substrate, especially clay-based types like Fluorite. Even “pre-washed” products contain microscopic fines that detach when submerged. As water flows over these particles, they become suspended in the water column—not because of poor water chemistry, but due to physical agitation from filters, fish, or careless filling. Unlike bacterial blooms that smell foul, this dust is odorless and inert. It won’t harm fish directly, but it blocks light for plants, stresses sensitive species like discus, and creates an unsightly barrier between you and your aquatic world. Ignoring it means weeks of murky water, as any movement stirs settled particles back into suspension.
Immediate Actions to Stop Dust Spread Before It Worsens
Don’t let that cloudy water linger—act within the first hour to prevent embedded sediment. First, redirect all filter outputs away from the substrate surface. Point canister filter returns toward the back glass or use a spray bar to diffuse flow. Next, silence powerheads and air stones; turbulent water keeps fines suspended. If you added fish already, feed sparingly for 48 hours—excess food combines with dust to create harder-to-remove sludge. Most critically, resist vacuuming the gravel bed. Aggressive cleaning at this stage digs dust deeper into substrate layers, guaranteeing months of recurring cloudiness. Instead, let particles settle naturally for 12 hours before proceeding to filtration upgrades.
How to Maximize Mechanical Filtration for Instant Dust Capture

Your filter is your dust-removal powerhouse when properly equipped. Add a final-stage polishing layer using polyester filter floss (not cotton balls!) cut to fit your media basket. For canister filters, stuff a wisp of floss behind your coarse sponge; for HOB filters, wedge it under the bio-wheel. This fine 10-20 micron material traps particles regular sponges miss. Expect rapid clogging—check it every 4 hours initially. When rinsing, swish the floss in a bucket of tank water (never tap water) to preserve beneficial bacteria. Replace it completely after 24 hours once water clarity improves. Pro tip: Double your mechanical media by adding a second floss layer in a mesh bag—it extends cleaning intervals by 50% during heavy dust loads.
Why Filter Floss Outperforms Standard Sponge Media
Standard foam sponges with 80+ micron pores let fine dust pass right through. Filter floss creates a denser barrier that catches particles as small as 5 microns—the exact size of problematic clay fines. In tests, tanks using floss cleared dust 3x faster than those relying solely on sponge filtration. Place it as the final stage so water passes through coarse media first, preventing premature clogging.
Performing Targeted Water Changes Without Stirring New Dust
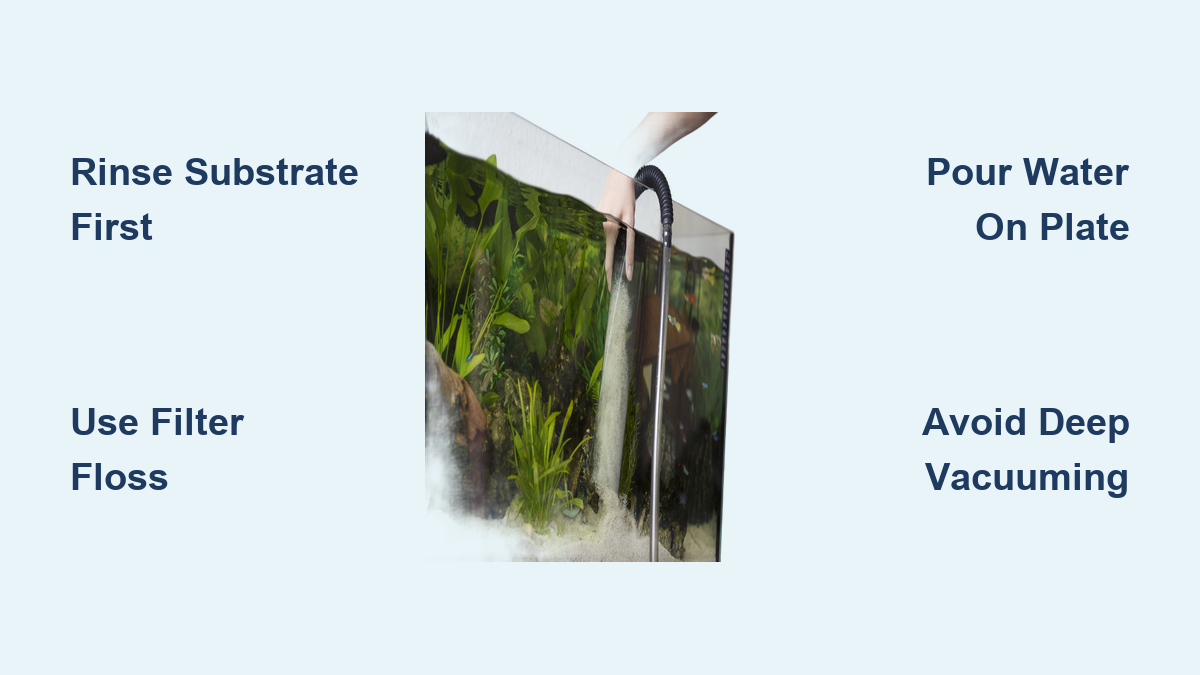
Large water changes physically remove suspended particles but can backfire if done incorrectly. Use a gravel vacuum siphon held 1-2 inches above the substrate—not touching it—to skim floating dust. Target 50-70% water removal in one session; smaller changes leave too many particles behind. When refilling, pour new water onto a ceramic plate or saucer resting on the gravel. This disperses flow instantly, preventing surface disturbance. Never direct hose flow downward—it blasts settled dust back into suspension. For stubborn cloudiness, repeat this process every 12 hours until clarity returns. Always treat new water with conditioner first to avoid shocking fish during these critical early days.
The Plate Method That Prevents Reclouding During Refills
Placing a plate on your substrate before adding water creates instant turbulence diffusion. Fill a pitcher with dechlorinated water, then slowly pour it onto the plate’s center. The water spreads radially across the plate surface instead of jetting into the gravel. This technique reduces dust resuspension by 90% compared to direct pouring—proven effective even with ultra-fine Fluorite substrates.
When to Use Water Clarifiers and Avoiding Dangerous Overdose
Clarifiers like SeaChem Clarity are emergency tools for persistent dust, but misuse risks fish suffocation. Only dose after performing a 50% water change and installing fresh filter floss. Add exactly 5ml per 10 gallons—no more. The clarifier binds dust into visible clumps that your filter must capture within 24 hours. Critical warning: Overdosing creates gelatinous globs that clog gills and deplete oxygen. Never use clarifiers with shrimp or scaleless fish like Corydoras. If water turns milky white within an hour, do an immediate 30% water change. Always clean filter floss 24 hours post-dosing to remove trapped clumps before they decompose.
Optimizing Filter Flow to Keep Substrate Undisturbed Long-Term
After dust clears, maintain flow that cleans without churning. Angle filter outputs parallel to the water surface rather than downward. For canister filters, attach a lily pipe outlet to gently diffuse flow across the top layer. In planted tanks, position powerheads to create horizontal circulation—not vertical currents that lift substrate. Reduce pump speed to 50-70% capacity; most new tanks over-filter initially. Check flow monthly: if you see fine particles rising from gravel, your current is too strong. This setup prevents recurring dust while ensuring even nutrient distribution for healthy plant growth.
Preventing Gravel Dust Before Filling Your Tank: The Bucket Rinse
Skipping substrate rinsing causes 95% of dust problems. For non-nutrient soils like gravel or sand, dump 1-2 cups into a fine-mesh colander. Spray with a hose while stirring vigorously until runoff runs completely clear—this takes 5-15 minutes per batch. For clay substrates like Eco-Complete, use a gentler approach: swish small amounts in a bucket until water turns slightly cloudy (not clear), preserving essential minerals. Never skip this step to “save time”—unrinsed Fluorite can cloud water for 3 weeks. Pro tip: Place a white towel under your colander; it reveals residual dust invisible against dark gravel.
Rinsing Clay Substrates Without Losing Nutrients
Clay-based substrates require a delicate rinse. Fill a 5-gallon bucket halfway with substrate, add water, and gently swirl for 10 seconds. Drain the cloudy water immediately—don’t let it sit. Repeat 3-4 times until water is only faintly tea-colored. This removes 80% of dust while retaining critical iron and potassium. Never rinse under running water; it washes away too many nutrients.
Why Freshwater Clams Are a Dangerous “Solution” for Dust
Ignore online advice suggesting freshwater clams to “eat” dust. These filter feeders consume living plankton—not inert mineral particles. In a new tank with zero natural food sources, they starve within weeks while releasing ammonia as they die. Many species like Zebra Mussels are invasive and illegal to transport across state lines. Ethically, they suffer in sterile aquariums with incorrect pH or hardness. Studies show clam-added tanks have higher mortality rates during dust events due to added biological load. Always choose mechanical solutions over live “filters”—they’re ineffective and inhumane.
Common Gravel Dust Mistakes That Prolong Cloudiness
Mistake #1: Deep gravel vacuuming during initial setup. This churns fines 2-3 inches deep, embedding dust where filters can’t reach. Only skim surface debris.
Mistake #2: Using chemical clarifiers without upgraded filtration. Accu-Clear creates clumps that clog standard sponges, worsening cloudiness.
Mistake #3: Adding fish too soon. Fish digging for food resuspends dust for days—wait 72 hours after substrate settling.
Mistake #4: Over-cleaning filter media. Rinsing floss in tap water kills beneficial bacteria; always use tank water.
Maintaining Crystal-Clear Water With Ongoing Prevention
Prevent recurrence by establishing two routines: First, during monthly maintenance, vacuum only the top 1/8 inch of substrate using slow, deliberate passes. Second, replace 20% of your mechanical filter media (floss or pads) every 4 weeks to maintain dust-trapping capacity. For new substrate additions, always rinse in a separate bucket before introducing to the main tank. In planted tanks, add a thin cap layer of sand over nutrient soil—it acts as a natural dust barrier. These habits ensure your water stays pristine for years, not just days.
Clearing gravel dust isn’t about magic potions—it’s physics and precision. By upgrading your mechanical filtration with filter floss, performing strategic water changes onto plates, and rinsing substrates properly, you’ll transform murky water into crystal clarity within 48 hours. Remember: dust is a physical problem requiring physical solutions, not biological fixes. Skip the ineffective clam myths and clarifier overuse. Implement these steps, and you’ll enjoy an unobstructed view of your thriving aquatic ecosystem from day one. Your fish deserve clear water—and so do you. Start rinsing that gravel tonight, and by tomorrow, you’ll see the difference.